1. 块级作用域 ES6之前没有块级作用域,ES5的var没有块级作用域的概念,只有function有作用域的概念,ES6的let、const引入了块级作用域。
ES5之前if和for都没有作用域,所以很多时候需要使用function的作用域,比如闭包。
1.1. 什么是变量作用域 变量在什么范围内可用,类似Java的全局变量和局部变量的概念,全局变量,全局都可用,局部变量只在范围内可用。ES5之前的var是没有块级作用域的概念,使用var声明的变量就是全局的。
1
2
3
4
5
{ var name = 'zzz' ; console .log (name); } console .log (name);
上述代码中{}外的console.log(name)可以获取到name值并打印出来,用var声明赋值的变量是全局变量,没有块级作用域。
1.2. 没有块级作用域造成的问题 if块级 1 2 3 4 5 6 7 8 9 10 11 12 var func ( if (true ){ var name = 'zzz' ; func = function ( console .log (name); } func (); } } name = 'ttt' ; func ();console .log (name);
代码输出结果为'zzz','ttt','ttt',第一次调用func(),此时name=‘zzz’,在if块外将name置成‘ttt’,此时生效了,if没有块级作用域。
for块级 定义五个按钮,增加事件,点击哪个按钮打印“第哪个按钮被点击了”。
1 2 3 4 5 6 7 8 9 10 11 12 13 14 15 16 17 18 19 20 21 22 23 24 25 26 <!DOCTYPE html > <html lang ="en" > <head > <meta charset ="UTF-8" > <meta name ="viewport" content ="width=device-width, initial-scale=1.0" > <meta http-equiv ="X-UA-Compatible" content ="ie=edge" > <title > 块级作用域</title > </head > <body > <button > 按钮1</button > <button > 按钮2</button > <button > 按钮3</button > <button > 按钮4</button > <button > 按钮5</button > <script src ="https://cdn.jsdelivr.net/npm/[email protected] /dist/vue.js" > </script > <script > var btns = document .getElementsByTagName ("button" ); for (var i = 0 ; i < btns.length ; i++) { btns[i].addEventListener ('click' ,function (param ) { console .log ("第" +i+"个按钮被点击了" ); }); } </script > </body > </html >
for块级中使用var声明变量i时,是全局变量,点击任意按钮结果都是“第五个按钮被点击了”。说明在执行btns[i].addEventListener('click',function())时,for块级循环已经走完,此时i=5,所有添加的事件的i都是5。
改造上述代码,将for循环改造,由于函数有作用域,使用闭包能解决上述问题。
1 2 3 4 5 6 7 8 for (var i = 0 ; i < btns.length ; i++) { (function (i ) { btns[i].addEventListener ('click' ,function (param ) { console .log ("第" +i+"个按钮被点击了" ); }) })(i); }
结果如图所示,借用函数的作用域解决块级作用域的问题,因为有块级作用域,每次添加的i都是当前i。
在ES6中使用let/const解决块级作用域问题,let和const有块级作用域,const定义常量,在for块级中使用let解决块级作用域问题。
1 2 3 4 5 6 7 const btns = document .getElementsByTagName ("button" );for (let i = 0 ; i < btns.length ; i++) { btns[i].addEventListener ('click' ,function (param ) { console .log ("第" +i+"个按钮被点击了" ); }) }
结果和使用闭包解决一致。
2. const的使用 1.const用来定义常量,赋值之后不能再赋值,再次赋值会报错。
1 2 3 4 5 <script> const count = 1 </script>
2.const不能只声明不赋值,会报错。
3.const常量含义是你不能改变其指向的对象,例如user,都是你可以改变user属性。
1 2 3 4 5 6 7 8 9 10 11 12 13 <script> const user = { name :"zzz" , age :24 , height :175 } console .log (user) user.name = "ttt" user.age = 22 user.height = 188 console .log (user) </script>
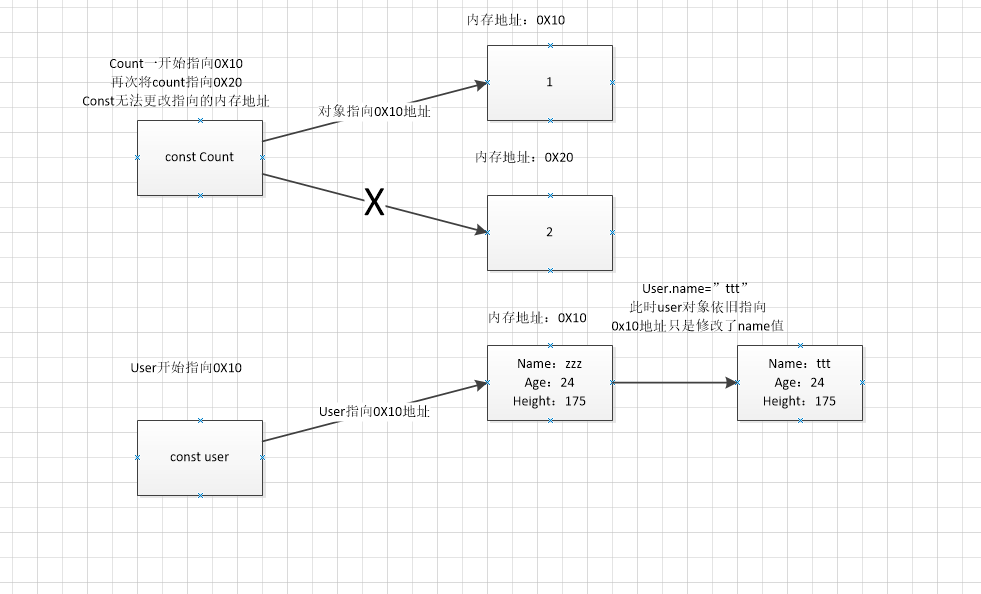
const内存地址详解
对象count一开始只是0x10的地址,直接将count(给count重新赋值,指向一个新的对象)指向地址改为0x20会报错,const是常量,无法更改对象地址。
对象user一开始指向0x10地址,user有Name、Age、Height三个属性,此时修改属性Name='ttt',user对象的地址未改变,不会报错。
3. ES6的增强写法 3.1. ES6的对象属性增强型写法 ES6以前定义一个对象
1 2 3 4 5 6 7 const name = "zzz" ;const age = 18 ;const user = { name :name, age :age } console .log (user);
ES6写法
1 2 3 4 5 6 const name = "zzz" ;const age = 18 ;const user = { name,age } console .log (user);
3.2 ES6对象的函数增强型写法 ES6之前对象内定义函数
1 2 3 4 5 const obj = { run :function ( console .log ("奔跑" ); } }
ES6写法
1 2 3 4 5 const obj = { run ( console .log ("奔跑" ); } }
4. 箭头函数
传统定义函数的方式
1 2 3 const aaa = function (param ) { }
对象字面量中定义函数
1 2 3 const obj = { bbb (param) { }, }
ES6中的箭头函数
4.1 箭头函数的参数和返回值 4.1.1 参数问题
1.放入两个参数
1 2 3 const sum = (num1,num2 ) => { return num1 + num2 }
2.放入一个参数,()可以省略
1 2 3 const power = num => { return num * num }
4.1.2 函数内部
1.函数中代码块中有多行代码
1 2 3 4 const test = ( console .log ("hello zzz" ) console .log ("hello vue" ) }
2.函数代码块中只有一行代码,可以省略return
1 2 3 4 5 6 7 8 const mul = (num1,num2 ) => num1* num2const log = (console .log ("log" )
4.3 箭头函数的this使用
什么时候使用箭头函数
1 2 3 4 5 6 setTimeout (function ( console .log (this ) } , 1000 ); setTimeout (() => { console .log (this ) }, 1000 );
结论:箭头函数没有this,这里this引用的是最近作用域(aaa函数里的this)的this。
1 2 3 4 5 6 7 8 9 10 11 const obj = { aaa ( setTimeout (function ( console .log (this ) }); setTimeout (() => { console .log (this ) }); } } obj.aaa ()
上述中第一个是window对象的this,第二个箭头函数的this是obj的。
1 2 3 4 5 6 7 8 9 10 11 12 13 14 15 16 17 18 19 20 21 const obj = { aaa ( setTimeout (function ( setTimeout (function ( console .log (this ) }) setTimeout (() => { console .log (this ) }) }) setTimeout (() => { setTimeout (function ( console .log (this ) }) setTimeout (() => { console .log (this ) }) }) } } obj.aaa ()
5. 高阶函数 5.1 filter过滤函数 1 2 3 4 5 6 7 8 9 10 11 const nums = [2 ,3 ,5 ,1 ,77 ,55 ,100 ,200 ]let newNums = nums.filter (function (num ) { if (num > 50 ){ return true ; } return false ; })
5.2 map高阶函数 1 2 3 4 5 6 7 8 let newNums2 = newNums.map (function (num ) { return num * 2 }) console .log (newNums2);
5.3 reduce高阶函数 1 2 3 4 5 6 7 8 9 10 let newNum = newNums2.reduce (function (preValue,currentValue ) { return preValue + currentValue },0 ) console .log (newNum);
5.4综合使用 1 2 3 let n = nums.filter (num =>50 ).map (num =>2 ).reduce ((preValue,currentValue ) => preValue + currentValue)console .log (n);
1. HelloVuejs 如何开始学习Vue,当然是写一个最简单的demo,直接上代码。此处通过cdn<script src="https://cdn.jsdelivr.net/npm/[email protected] /dist/vue.js"></script>获取vuejs。
vue是声明式编程,区别于jquery的命令式编程。
1.1. 命令式编程 原生js做法(命令式编程)
创建div元素,设置id属性
定义一个变量叫message
将message变量放在div元素中显示
修改message数据
将修改的元素替换到div
1.2 . 声明式编程 vue写法(声明式)
创建一个div元素,设置id属性
定义一个vue对象,将div挂载在vue对象上
在vue对象内定义变量message,并绑定数据
将message变量放在div元素上显示
修改vue对象中的变量message,div元素数据自动改变
1 2 3 4 5 6 7 8 9 10 11 12 13 14 15 16 17 18 19 20 21 22 23 24 25 26 27 <!DOCTYPE html > <html lang ="en" > <head > <meta charset ="UTF-8" > <meta name ="viewport" content ="width=device-width, initial-scale=1.0" > <meta http-equiv ="X-UA-Compatible" content ="ie=edge" > <script src ="https://cdn.jsdelivr.net/npm/[email protected] /dist/vue.js" > </script > <title > HelloVuejs</title > </head > <body > <div id ="app" > <h2 > {{message}}</h2 > <p > {{name}}</p > </div > <script > const app = new Vue ({ el :"#app" , data :{ message :"HelloVuejs" , name :"zzz" } }) </script > </body > </html >
在谷歌浏览器中按F12,在开发者模式中console控制台,改变vue对象的message值,页面显示也随之改变。
{{message}}表示将变量message输出到标签h2中,所有的vue语法都必须在vue对象挂载的div元素中,如果在div元素外使用是不生效的。el:"#app"表示将id为app的div挂载在vue对象上,data表示变量对象。
2. vue列表的展示(v-for) 开发中常用的数组有许多数据,需要全部展示或者部分展示,在原生JS中需要使用for循环遍历依次替换div元素,在vue中,使用v-for可以简单遍历生成元素节点。
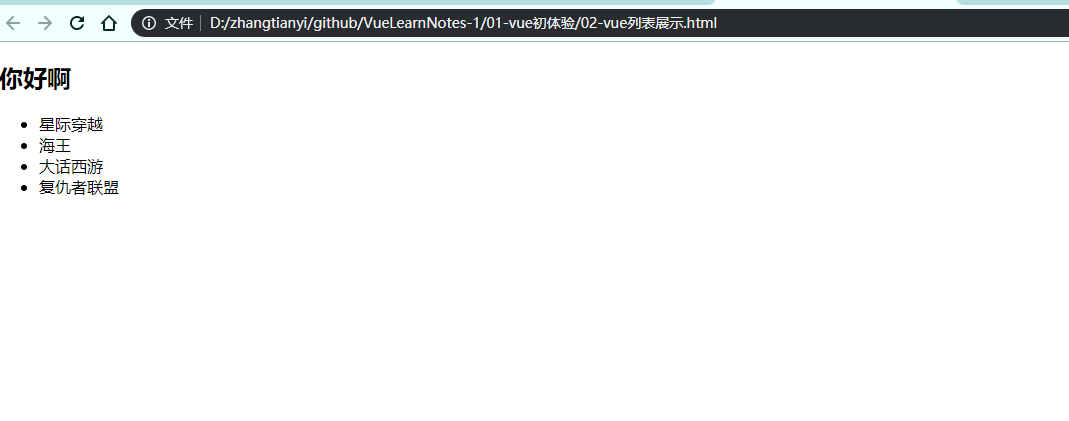
1 2 3 4 5 6 7 8 9 10 11 12 13 14 15 16 17 18 19 20 21 22 23 24 25 26 27 <!DOCTYPE html > <html lang ="en" > <head > <meta charset ="UTF-8" > <meta name ="viewport" content ="width=device-width, initial-scale=1.0" > <meta http-equiv ="X-UA-Compatible" content ="ie=edge" > <script src ="https://cdn.jsdelivr.net/npm/[email protected] /dist/vue.js" > </script > <title > vue列表展示</title > </head > <body > <div id ="app" > <h2 > {{message}}</h2 > <ul > <li v-for ="(item, index) in movies" :key ="index" > {{item}}</li > </ul > </div > <script > const app = new Vue ({ el :"#app" , data :{ message :"你好啊" , movies :["星际穿越" ,"海王" ,"大话西游" ,"复仇者联盟" ] } }) </script > </body > </html >
显示结果如图所示:
<li v-for="(item, index) in movies" :key="index">{{item}}</li>item表示当前遍历的元素,index表示元素索引, 为了给 Vue 一个提示,以便它能跟踪每个节点的身份,从而重用和重新排序现有元素,你需要为每项提供一个唯一 key 属性。建议尽可能在使用 v-for 时提供 key attribute,除非遍历输出的 DOM 内容非常简单,或者是刻意依赖默认行为以获取性能上的提升。
因为它是 Vue 识别节点的一个通用机制,key 并不仅与 v-for 特别关联。
不要使用对象或数组之类的非基本类型值作为 v-for 的 key。请用字符串或数值类型的值。
3. vue案例-计数器 使用vue实现一个小计数器,点击+按钮,计数器+1,使用-按钮计数器-1。
1 2 3 4 5 6 7 8 9 10 11 12 13 14 15 16 17 18 19 20 21 22 23 24 25 26 27 28 29 30 31 32 33 34 35 36 37 <!DOCTYPE html > <html lang ="en" > <head > <meta charset ="UTF-8" > <meta name ="viewport" content ="width=device-width, initial-scale=1.0" > <meta http-equiv ="X-UA-Compatible" content ="ie=edge" > <script src ="https://cdn.jsdelivr.net/npm/[email protected] /dist/vue.js" > </script > <title > vue计数器</title > </head > <body > <div id ="app" > <h2 > 当前计数:{{count}}</h2 > <button v-on:click ="sub()" > -</button > <button @click ="add()" > +</button > </div > <script > const app = new Vue ({ el :"#app" , data :{ count :0 }, methods : { add :function ( console .log ("add" ) this .count ++ }, sub :function ( console .log ("sub" ) this .count -- } }, }) </script > </body > </html >
定义vue对象并初始化一个变量count=0
定义两个方法add和sub,用于对count++或者count–
定义两个button对象,给button添加上点击事件
在vue对象中使用methods表示方法集合,使用v-on:click的关键字给元素绑定监听点击事件,给按钮分别绑定上点击事件,并绑定触发事件后回调函数add和sub。也可以在回调方法中直接使用表达式。例如:count++和count--。
1. Mustache语法 mustache是胡须的意思,因为{{}}像胡须,又叫大括号语法。
在vue对象挂载的dom元素中,{{}}不仅可以直接写变量,还可以写简单表达式。
1 2 3 4 5 6 7 8 9 10 11 12 13 14 15 16 17 18 19 20 21 22 23 24 25 26 27 28 29 30 31 32 33 34 <!DOCTYPE html > <html lang ="en" > <head > <meta charset ="UTF-8" > <meta name ="viewport" content ="width=device-width, initial-scale=1.0" > <meta http-equiv ="X-UA-Compatible" content ="ie=edge" > <title > Mustache的语法</title > </head > <body > <div id ="app" > <h2 > {{message}}</h2 > <h2 > {{message}},啧啧啧</h2 > <h2 > {{firstName + lastName}}</h2 > <h2 > {{firstName + " " + lastName}}</h2 > <h2 > {{firstName}}{{lastName}}</h2 > <h2 > {{count * 2}}</h2 > </div > <script src ="https://cdn.jsdelivr.net/npm/[email protected] /dist/vue.js" > </script > <script > const app = new Vue ({ el :"#app" , data :{ message :"你好啊" , firstName :"skt t1" , lastName :"faker" , count :100 } }) </script > </body > </html >
2. v-once v-once表示该dom元素只渲染一次,之后数据改变,不会再次渲染。
1 2 3 4 5 6 <div id ="app" > <h2 > {{message}}</h2 > <h2 v-once > {{message}}</h2 > </div >
上述{{message}}的message修改后,第一个h2标签数据会自动改变,第二个h2不会。
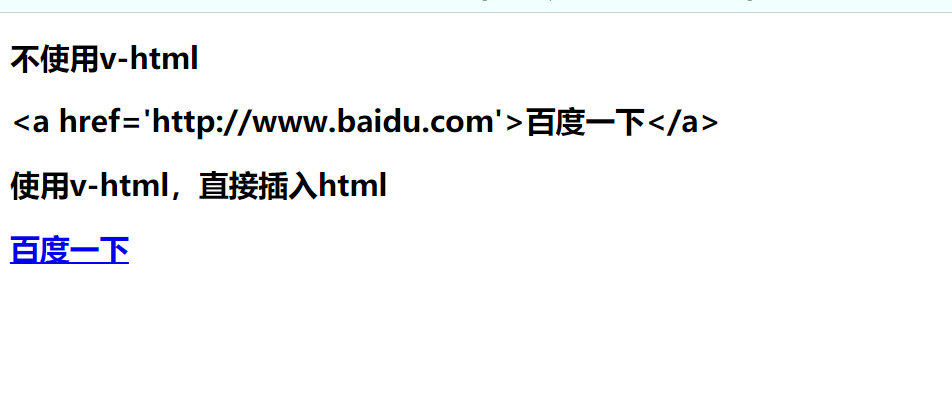
3. v-html 在某些时候我们不希望直接输出<a href='http://www.baidu.com'>百度一下</a>这样的字符串,而输出被html自己转化的超链接。此时可以使用v-html。
1 2 3 4 5 6 7 8 9 10 11 12 13 14 15 16 17 18 19 20 21 22 23 24 25 26 27 28 <!DOCTYPE html > <html lang ="en" > <head > <meta charset ="UTF-8" > <meta name ="viewport" content ="width=device-width, initial-scale=1.0" > <meta http-equiv ="X-UA-Compatible" content ="ie=edge" > <title > v-html指令的使用</title > </head > <body > <div id ="app" > <h2 > 不使用v-html</h2 > <h2 > {{url}}</h2 > <h2 > 使用v-html,直接插入html</h2 > <h2 v-html ="url" > </h2 > </div > <script src ="https://cdn.jsdelivr.net/npm/[email protected] /dist/vue.js" > </script > <script > const app = new Vue ({ el :"#app" , data :{ message :"你好啊" , url :"<a href='http://www.baidu.com'>百度一下</a>" } }) </script > </body > </html >
输出结果如下:
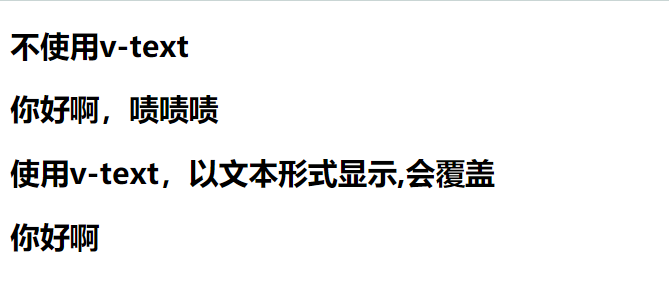
4. v-text v-text会覆盖dom元素中的数据,相当于js的innerHTML方法。
1 2 3 4 5 6 7 8 9 10 11 12 13 14 15 16 17 18 19 20 21 22 23 24 25 26 27 <!DOCTYPE html > <html lang ="en" > <head > <meta charset ="UTF-8" > <meta name ="viewport" content ="width=device-width, initial-scale=1.0" > <meta http-equiv ="X-UA-Compatible" content ="ie=edge" > <title > v-text指令的使用</title > </head > <body > <div id ="app" > <h2 > 不使用v-text</h2 > <h2 > {{message}},啧啧啧</h2 > <h2 > 使用v-text,以文本形式显示,会覆盖</h2 > <h2 v-text ="message" > ,啧啧啧</h2 > </div > <script src ="https://cdn.jsdelivr.net/npm/[email protected] /dist/vue.js" > </script > <script > const app = new Vue ({ el :"#app" , data :{ message :"你好啊" } }) </script > </body > </html >
如图所示,使用{{message}}是拼接变量和字符串,而是用v-text是直接覆盖字符串内容。
5. v-pre 有时候我们期望直接输出{{message}}这样的字符串,而不是被{{}}语法转化的message的变量值,此时我们可以使用v-pre标签。
1 2 3 4 5 6 7 8 9 10 11 12 13 14 15 16 17 18 19 20 21 22 23 24 25 26 27 <!DOCTYPE html > <html lang ="en" > <head > <meta charset ="UTF-8" > <meta name ="viewport" content ="width=device-width, initial-scale=1.0" > <meta http-equiv ="X-UA-Compatible" content ="ie=edge" > <title > v-pre指令的使用</title > </head > <body > <div id ="app" > <h2 > 不使用v-pre</h2 > <h2 > {{message}}</h2 > <h2 > 使用v-pre,不会解析</h2 > <h2 v-pre > {{message}}</h2 > </div > <script src ="https://cdn.jsdelivr.net/npm/[email protected] /dist/vue.js" > </script > <script > const app = new Vue ({ el :"#app" , data :{ message :"你好啊" } }) </script > </body > </html >
结果如图,使用v-pre修饰的dom会直接输出字符串。
6. v-cloak 有时候因为加载延时问题,例如卡掉了,数据没有及时刷新,就造成了页面显示从{{message}}到message变量“你好啊”的变化,这样闪动的变化,会造成用户体验不好。此时需要使用到v-cloak的这个标签。在vue解析之前,div属性中有v-cloak这个标签,在vue解析完成之后,v-cloak标签被移除。简单,类似div开始有一个css属性display:none;,加载完成之后,css属性变成display:block,元素显示出来。
1 2 3 4 5 6 7 8 9 10 11 12 13 14 15 16 17 18 19 20 21 22 23 24 25 26 27 28 29 30 31 32 33 34 35 <!DOCTYPE html > <html lang ="en" > <head > <meta charset ="UTF-8" > <meta name ="viewport" content ="width=device-width, initial-scale=1.0" > <meta http-equiv ="X-UA-Compatible" content ="ie=edge" > <title > v-cloak指令的使用</title > <style > [v-cloak] { display : none; } </style > </head > <body > <div id ="app" v-cloak > <h2 > {{message}}</h2 > </div > <script src ="https://cdn.jsdelivr.net/npm/[email protected] /dist/vue.js" > </script > <script > setTimeout (() => { const app = new Vue ({ el : "#app" , data : { message : "你好啊" } }) }, 1000 ); </script > </body > </html >
这里通过延时1秒模拟加载卡住的状态,结果一开始不显示message的值,div元素中有v-cloak的属性,1秒后显示message变量的值,div中的v-cloak元素被移除。
1. v-bind的基本使用 某些时候我们并不想将变量放在标签内容中,像这样<h2>{{message}}</h2>是将变量h2标签括起来,类似js的innerHTML。但是我们期望将变量imgURL写在如下位置,想这样<img src="imgURL" alt="">导入图片是希望动态获取图片的链接,此时的imgURL并非变量而是字符串imgURL,如果要将其生效为变量,需要使用到一个标签v-bind:,像这样<img v-bind:src="imgURL" alt="">,而且这里也不能使用Mustache语法,类似<img v-bind:src="{{imgURL}}" alt="">,这也是错误的。
1 2 3 4 5 6 7 8 9 10 11 12 13 14 15 16 17 18 19 20 21 22 23 24 25 26 27 28 29 30 31 32 33 <!DOCTYPE html > <html lang ="en" > <head > <meta charset ="UTF-8" > <meta name ="viewport" content ="width=device-width, initial-scale=1.0" > <meta http-equiv ="X-UA-Compatible" content ="ie=edge" > <title > v-bind的基本使用</title > </head > <body > <div id ="app" > <img v-bind:src ="imgURL" alt ="" > <a v-bind:href ="aHerf" > </a > <img :src ="imgURL" alt ="" > <a :href ="aHerf" > </a > </div > <script src ="https://cdn.jsdelivr.net/npm/[email protected] /dist/vue.js" > </script > <script > const app = new Vue ({ el :"#app" , data :{ message :"你好啊" , imgURL :"https://cn.bing.com/th?id=OIP.NaSKiHPRcquisK2EehUI3gHaE8&pid=Api&rs=1" , aHerf :"http://www.baidu.com" } }) </script > </body > </html >
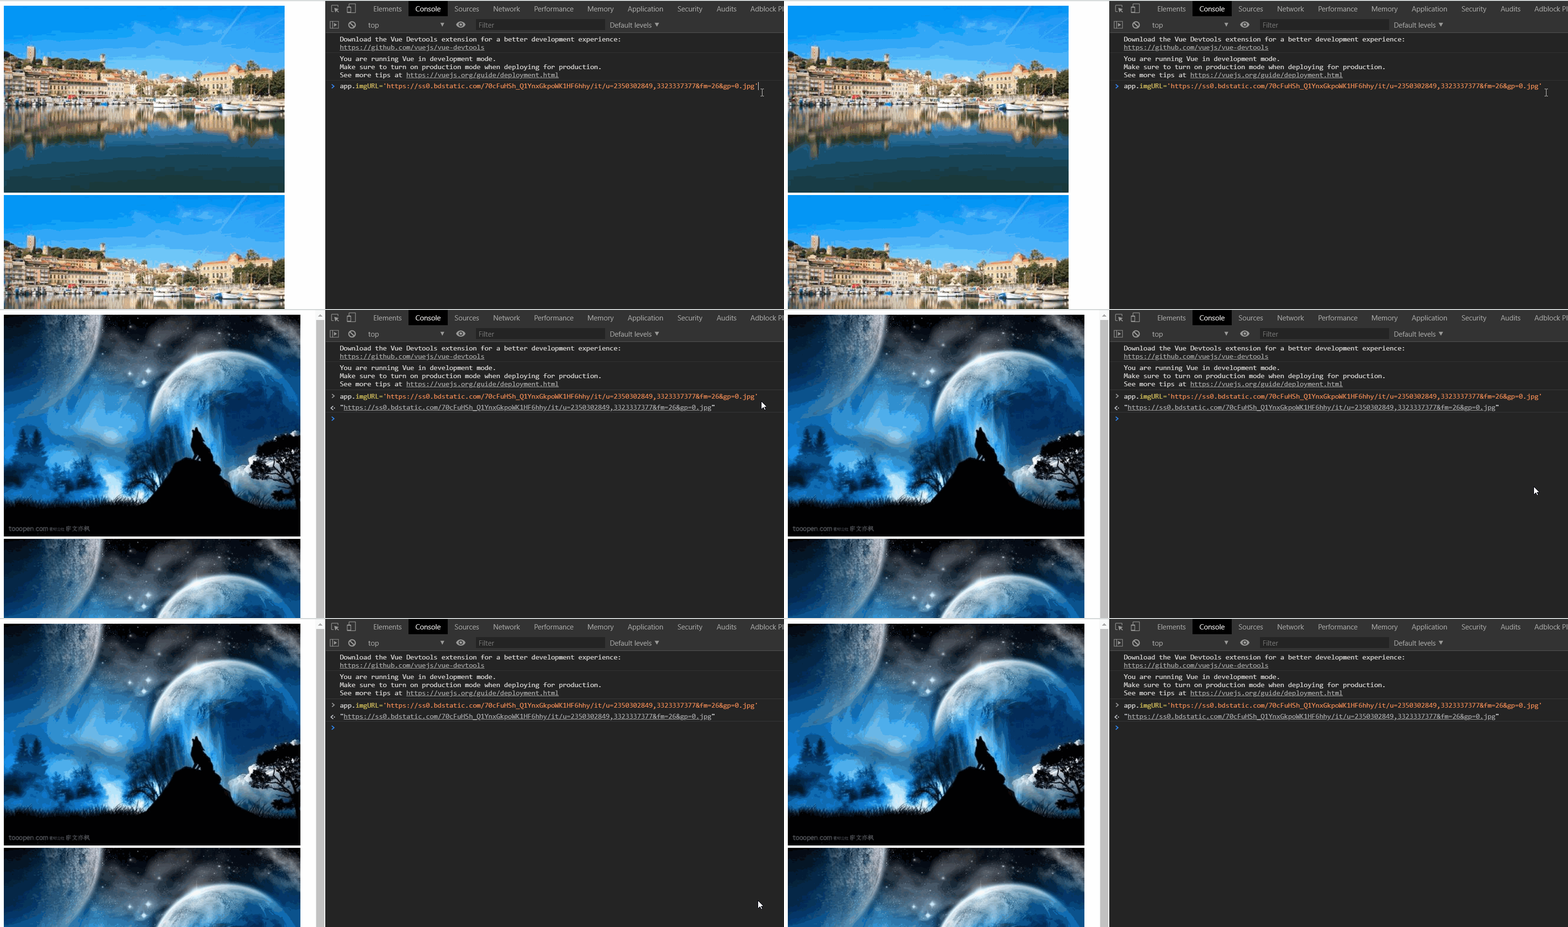
此时vue对象中定义的imgURL变量和aHerf变量可以动态的绑定到img标签的src属性和a标签的href属性。v-bind:由于用的很多,vue对他有一个语法糖的优化写法也就是:,此时修改imgURL变量图片会重新加载。
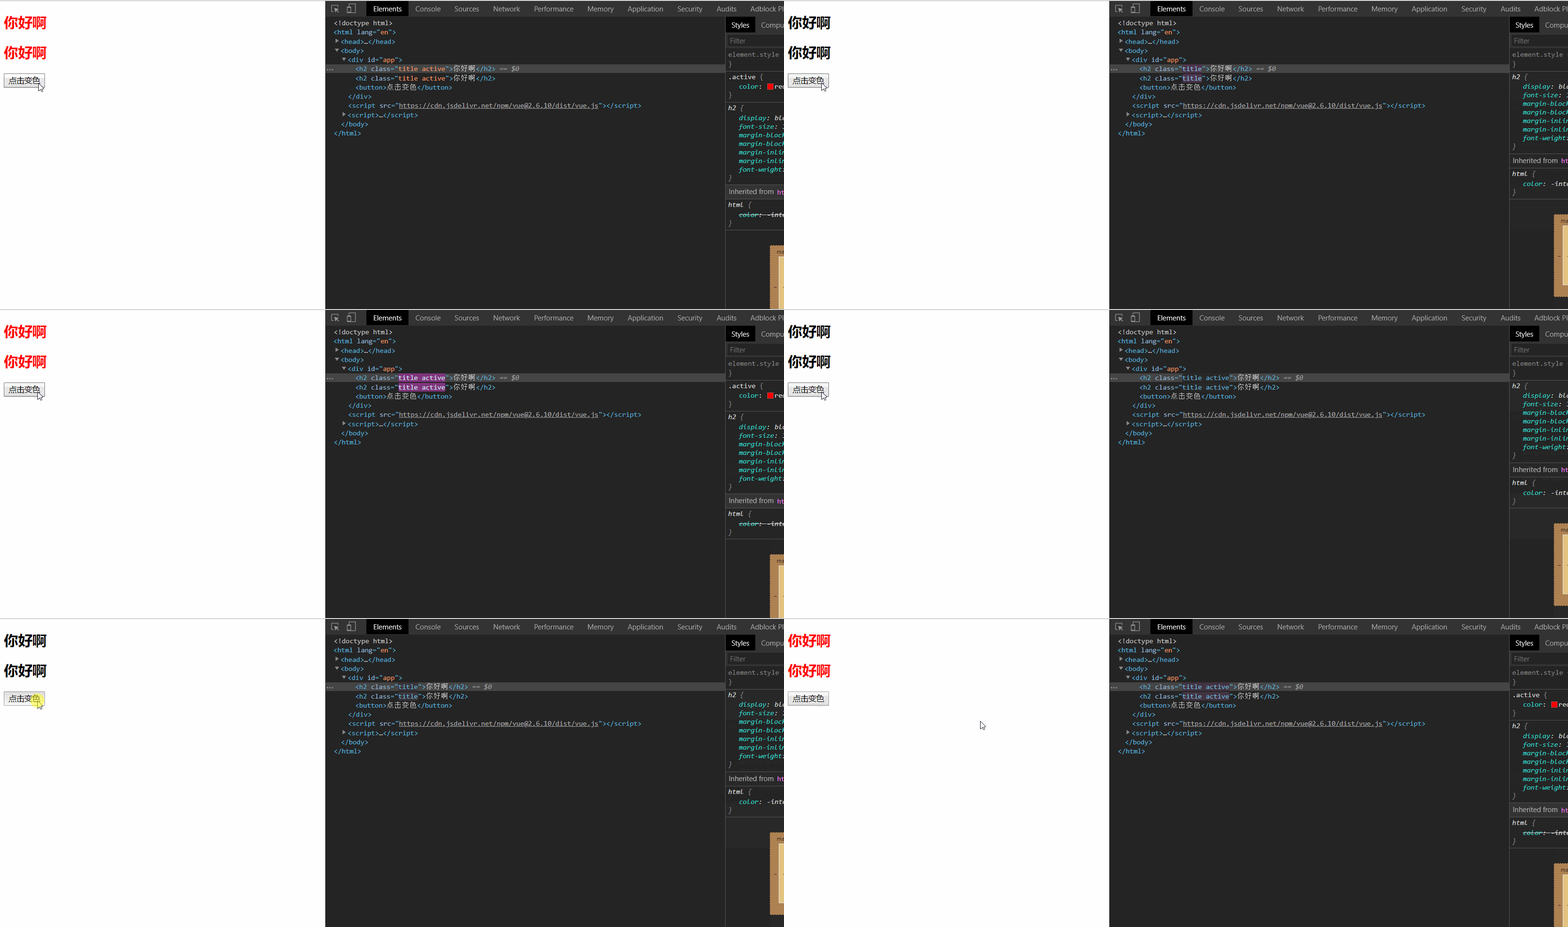
2. v-bind动态绑定class 2.1. v-bind动态绑定class(对象语法) 有时候我们期望对Dom元素的节点的class进行动态绑定,选择此Dom是否有指定class属性。例如,给h2标签加上class="active",当Dom元素有此class时候,变红<style>.active{color:red;}</style>,在写一个按钮绑定事件,点击变黑色,再次点击变红色。
1 2 3 4 5 6 7 8 9 10 11 12 13 14 15 16 17 18 19 20 21 22 23 24 25 26 27 28 29 30 31 32 33 34 35 36 37 38 39 40 41 42 43 44 45 46 47 <!DOCTYPE html > <html lang ="en" > <head > <meta charset ="UTF-8" > <meta name ="viewport" content ="width=device-width, initial-scale=1.0" > <meta http-equiv ="X-UA-Compatible" content ="ie=edge" > <title > v-bind动态绑定class(对象语法)</title > <style > .active { color :red; } </style > </head > <body > <div id ="app" > <h2 class ="title" :class ="{active:isActive}" > {{message}}</h2 > <h2 class ="title" :class ="getClasses()" > {{message}}</h2 > <button @click ="change" > 点击变色</button > </div > <script src ="https://cdn.jsdelivr.net/npm/[email protected] /dist/vue.js" > </script > <script > const app = new Vue ({ el :"#app" , data :{ message :"你好啊" , active :"active" , isActive :true }, methods : { change ( this .isActive = !this .isActive }, getClasses ( return {active :this .isActive } } }, }) </script > </body > </html >
定义两个变量active和isActive,在Dom元素中使用:class={active:isActive},此时绑定的class='active',isActive为true,active显示,定义方法change()绑定在按钮上,点击按钮this.isActive = !this.isActive,控制Dom元素是否有class='active'的属性。
2.2. v-bind动态绑定class(数组用法) class属性中可以放数组,会依次解析成对应的class。
1 2 3 4 5 6 7 8 9 10 11 12 13 14 15 16 17 18 19 20 21 22 23 24 25 26 27 28 29 30 31 32 33 34 35 36 37 38 <!DOCTYPE html > <html lang ="en" > <head > <meta charset ="UTF-8" > <meta name ="viewport" content ="width=device-width, initial-scale=1.0" > <meta http-equiv ="X-UA-Compatible" content ="ie=edge" > <title > v-bind动态绑定class(数组用法)</title > <style > </style > </head > <body > <div id ="app" > <h2 class ="title" :class ="['active','line']" > {{message}}</h2 > <h2 class ="title" :class ="[active,line]" > {{message}}</h2 > <h2 class ="title" :class ="getClasses()" > {{message}}</h2 > </div > <script src ="https://cdn.jsdelivr.net/npm/[email protected] /dist/vue.js" > </script > <script > const app = new Vue ({ el :"#app" , data :{ message :"你好啊" , active :"aaaa" , line :'bbbb' }, methods : { getClasses ( return [this .active ,this .line ] } }, }) </script > </body > </html >
加上单引号的表示字符串
不加的会当成变量
可以直接使用方法返回数组对象
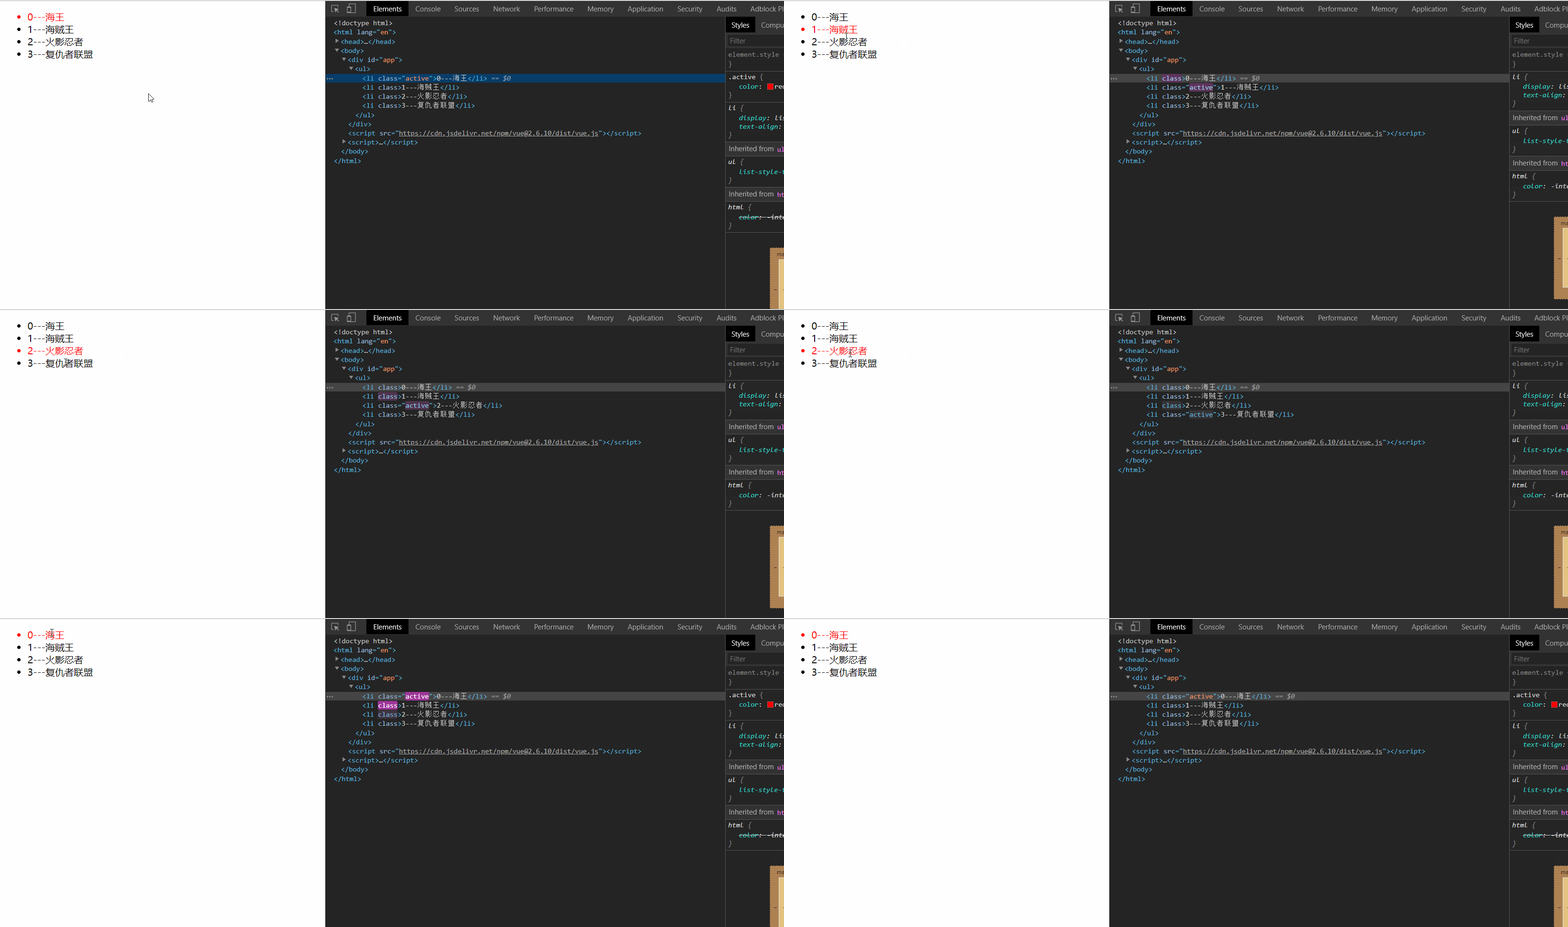
3. v-for和v-bind结合 使用v-for和v-bind实现一个小demo,将电影列表展示,并点击某一个电影列表时候,将此电影列表变成红色。
1 2 3 4 5 6 7 8 9 10 11 12 13 14 15 16 17 18 19 20 21 22 23 24 25 26 27 28 29 30 31 32 33 34 35 36 37 38 <!DOCTYPE html > <html lang ="en" > <head > <meta charset ="UTF-8" > <meta name ="viewport" content ="width=device-width, initial-scale=1.0" > <meta http-equiv ="X-UA-Compatible" content ="ie=edge" > <title > 作业(v-for和v-bind的结合)</title > <style > .active { color :red; } </style > </head > <body > <div id ="app" > <ul > <li v-for ="(item, index) in movies" :key ="index" :class ="{active:index===currentIndex}" @click ="changeColor(index)" > {{index+"---"+item}}</li > </ul > </div > <script src ="https://cdn.jsdelivr.net/npm/[email protected] /dist/vue.js" > </script > <script > const app = new Vue ({ el :"#app" , data :{ currentIndex :0 , movies :["海王" ,"海贼王" ,"火影忍者" ,"复仇者联盟" ] }, methods : { changeColor (index ){ this .currentIndex = index } }, }) </script > </body > </html >
v-for时候的index索引,给每行绑定事件点击事件,点击当行是获取此行索引index并赋值给currentIndex,使用v-bind:绑定class,当index===currentIndexDom元素有active的class,颜色变红。
4. v-bind动态绑定style 4.1 v-bind动态绑定style(对象语法) 1 2 3 4 5 6 <h2 :style ="{fontSize:'50px'}" > {{message}}</h2 > <h2 :style ="{fontSize:fontSize}" > {{message}}</h2 > <h2 :style ="getStyle()" > {{message}}</h2 >
4.2 v-bind动态绑定style(数组语法) 1 2 3 4 5 6 7 8 9 10 11 12 13 14 15 16 17 18 19 <div id ="app" > <h2 :style ="[baseStyle]" > {{message}}</h2 > <h2 :style ="getStyle()" > {{message}}</h2 > </div > <script src ="https://cdn.jsdelivr.net/npm/[email protected] /dist/vue.js" > </script > <script > const app = new Vue ({ el :"#app" , data :{ message :"你好啊" , baseStyle :{backgroundColor :'red' } }, methods : { getStyle ( return [this .baseStyle ] } }, }) </script >
类似绑定class,绑定style也是一样的。
1. 计算属性的基本使用 现在有变量姓氏和名字,要得到完整的名字。
1 2 3 4 5 6 7 8 9 10 11 12 13 14 15 16 17 18 19 20 21 22 23 24 25 26 27 28 29 30 31 32 33 34 35 36 37 38 39 <!DOCTYPE html > <html lang ="en" > <head > <meta charset ="UTF-8" > <meta name ="viewport" content ="width=device-width, initial-scale=1.0" > <meta http-equiv ="X-UA-Compatible" content ="ie=edge" > <title > 计算属性的基本使用</title > </head > <body > <div id ="app" > <h2 > {{firstName+ " " + lastName}}</h2 > <h2 > {{getFullName()}}</h2 > <h2 > {{fullName}}</h2 > </div > <script src ="https://cdn.jsdelivr.net/npm/[email protected] /dist/vue.js" > </script > <script > const app = new Vue ({ el :"#app" , data :{ firstName :"skt t1" , lastName :"faker" }, computed : { fullName :function ( return this .firstName + " " + this .lastName } }, methods : { getFullName ( return this .firstName + " " + this .lastName } }, }) </script > </body > </html >
使用Mastache语法拼接<h2>{{firstName+ " " + lastName}}</h2>
使用方法methods<h2>{{getFullName()}}</h2>
使用计算属性computed<h2>{{fullName}}</h2>
例子中计算属性computed看起来和方法似乎一样,只是方法调用需要使用(),而计算属性不用,方法取名字一般是动词见名知义,而计算属性是属性是名词,但这只是基本使用。
2. 计算属性的复杂使用 现在有一个数组数据books,里面包含许多book对象,数据结构如下:
1 2 3 4 5 6 books :[ {id :110 ,name :"JavaScript从入门到入土" ,price :119 }, {id :111 ,name :"Java从入门到放弃" ,price :80 }, {id :112 ,name :"编码艺术" ,price :99 }, {id :113 ,name :"代码大全" ,price :150 }, ]
要求计算出所有book的总价格totalPrice。
1 2 3 4 5 6 7 8 9 10 11 12 13 14 15 16 17 18 19 20 21 22 23 24 25 26 27 28 29 30 31 32 33 34 35 36 37 38 39 40 <!DOCTYPE html > <html lang ="en" > <head > <meta charset ="UTF-8" > <meta name ="viewport" content ="width=device-width, initial-scale=1.0" > <meta http-equiv ="X-UA-Compatible" content ="ie=edge" > <title > 计算属性的复杂使用</title > </head > <body > <div id ="app" > <h2 > 总价格:{{totalPrice}}</h2 > </div > <script src ="https://cdn.jsdelivr.net/npm/[email protected] /dist/vue.js" > </script > <script > const app = new Vue ({ el :"#app" , data :{ books :[ {id :110 ,name :"JavaScript从入门到入土" ,price :119 }, {id :111 ,name :"Java从入门到放弃" ,price :80 }, {id :112 ,name :"编码艺术" ,price :99 }, {id :113 ,name :"代码大全" ,price :150 }, ] }, computed : { totalPrice ( let result= 0 ; for (let i = 0 ; i < this .books .length ; i++) { result += this .books [i].price ; } return result } } }) </script > </body > </html >
获取每一个book对象的price累加,当其中一个book的价格发生改变时候,总价会随之变化。
3. 计算属性的setter和getter 在计算属性中其实是由这样两个方法setter和getter。
1 2 3 4 5 6 7 8 9 10 11 12 13 14 computed : { fullName :{ set :function (newValue ){ console .log ("-----" ) const names = newValue.split (" " ) this .firstName = names[0 ] this .lastName = names[1 ] }, get :function ( return this .firstName + " " + this .lastName } } }
但是计算属性一般没有set方法,只读属性,只有get方法,但是上述中newValue就是新的值,也可以使用set方法设置值,但是一般不用。
computed的getter/setter
请看如下代码:
1 2 3 4 5 6 7 8 9 10 11 12 13 14 15 16 17 18 19 20 21 22 23 24 25 26 27 28 29 30 31 32 33 34 35 36 37 38 39 40 41 42 <!DOCTYPE html > <html lang ="en" > <head > <meta charset ="UTF-8" > <meta name ="viewport" content ="width=device-width, initial-scale=1.0" > <meta http-equiv ="X-UA-Compatible" content ="ie=edge" > <title > Vue计算属性的getter和setter</title > <script src ="https://cdn.jsdelivr.net/npm/[email protected] /dist/vue.js" > </script > </head > <body > <div id ="app" > <h1 > 计算属性:computed的getter/setter</h1 > <h2 > fullName</h2 > {{fullName}} <h2 > firstName</h2 > {{firstName}} <h2 > lastName</h2 > {{lastName}} </div > <script > var app = new Vue ({ el :"#app" , data :{ firstName :"zhang" , lastName :"san" , }, computed : { fullName :{ get :function ( return this .firstName +" " +this .lastName }, set :function (value ){ var list = value.split (' ' ); this .firstName =list[0 ] this .lastName =list[1 ] } } }, }); </script > </body > </html >
初始化
修改fullName
结论
- 通过这种方式,我们可以在改变计算属性值的同时也改变和计算属性相关联的属性值。
4. 计算属性和methods的对比 直接看代码,分别使用计算属性和方法获得fullName的值。
1 2 3 4 5 6 7 8 9 10 11 12 13 14 15 16 17 18 19 20 21 22 23 24 25 26 27 28 29 30 31 32 33 34 35 36 37 38 39 40 41 42 43 44 45 46 47 48 49 <!DOCTYPE html > <html lang ="en" > <head > <meta charset ="UTF-8" > <meta name ="viewport" content ="width=device-width, initial-scale=1.0" > <meta http-equiv ="X-UA-Compatible" content ="ie=edge" > <title > 计算属性和methods的对比</title > </head > <body > <div id ="app" > <h2 > {{getFullName}}</h2 > <h2 > {{getFullName}}</h2 > <h2 > {{getFullName}}</h2 > <h2 > {{getFullName}}</h2 > <h2 > {{fullName}}</h2 > <h2 > {{fullName}}</h2 > <h2 > {{fullName}}</h2 > <h2 > {{fullName}}</h2 > </div > <script src ="https://cdn.jsdelivr.net/npm/[email protected] /dist/vue.js" > </script > <script > const app = new Vue ({ el :"#app" , data :{ firstName :"skt t1" , lastName :"faker" }, computed : { fullName ( console .log ("调用了计算属性fullName" ); return this .firstName + " " + this .lastName } }, methods : { getFullName ( console .log ("调用了getFullName" ); return this .firstName + " " + this .lastName } }, }) </script > </body > </html >
分别使用方法和计算属性获取四次fullName,结果如图。
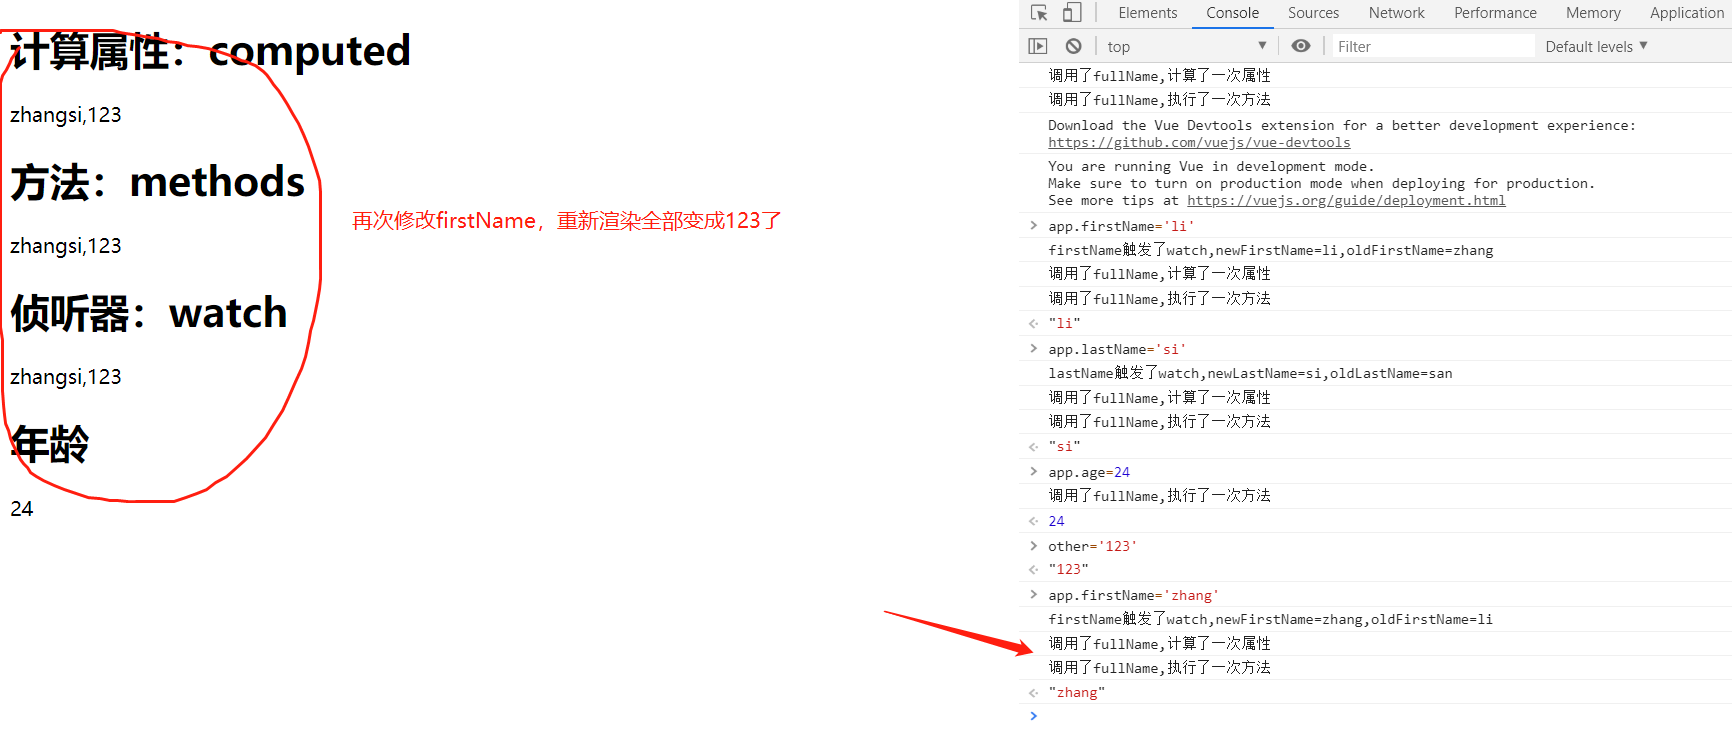
由此可见计算属性有缓存,在this.firstName + " " + this.lastName的属性不变的情况下,methods调用了四次,而计算属性才调用了一次,性能上计算属性明显比methods好。而且在改动firstName的情况下,计算属性只调用一次,methods依然要调用4次。
5. Vue计算属性与侦听器总结
照例看一段代码:
1 2 3 4 5 6 7 8 9 10 11 12 13 14 15 16 17 18 19 20 21 22 23 24 25 26 27 28 29 30 31 32 33 34 35 36 37 38 39 40 41 42 43 44 45 46 47 48 49 50 51 52 53 54 55 56 57 <!DOCTYPE html > <html lang ="en" > <head > <meta charset ="UTF-8" > <meta name ="viewport" content ="width=device-width, initial-scale=1.0" > <meta http-equiv ="X-UA-Compatible" content ="ie=edge" > <title > Vue计算属性/侦听器/方法比较</title > <script src ="https://cdn.jsdelivr.net/npm/[email protected] /dist/vue.js" > </script > </head > <body > <div id ="app" > <h1 > 计算属性:computed</h1 > {{fullName}} <h1 > 方法:methods</h1 > {{fullName2()}} <h1 > 侦听器:watch</h1 > {{watchFullName}} <h1 > 年龄</h1 > {{age}} </div > <script > var other = 'This is other' ; var app = new Vue ({ el :"#app" , data :{ firstName :"zhang" , lastName :"san" , watchFullName :"zhangsan" , age :18 , }, watch : { firstName :function (newFirstName, oldFirstName ){ console .log ("firstName触发了watch,newFirstName=" +newFirstName+",oldFirstName=" +oldFirstName) this .watchFullName = this .firstName +this .lastName +"," +other }, lastName :function (newLastName, oldLastName ){ console .log ("lastName触发了watch,newLastName=" +newLastName+",oldLastName=" +oldLastName) this .watchFullName = this .firstName +this .lastName +"," +other } }, computed : { fullName :function ( console .log ("调用了fullName,计算了一次属性" ) return this .firstName +this .lastName +"," +other; } }, methods : { fullName2 :function ( console .log ("调用了fullName,执行了一次方法" ) fullName2 = this .firstName +this .lastName +"," +other; return fullName2; } } }); </script > </body > </html >
初始化:
修改firstName/lastName/两者都修改
修改computed中没计算的age
修改Vue实例外的对象
修改Vue实例外对象后在修改Vue实例内的对象
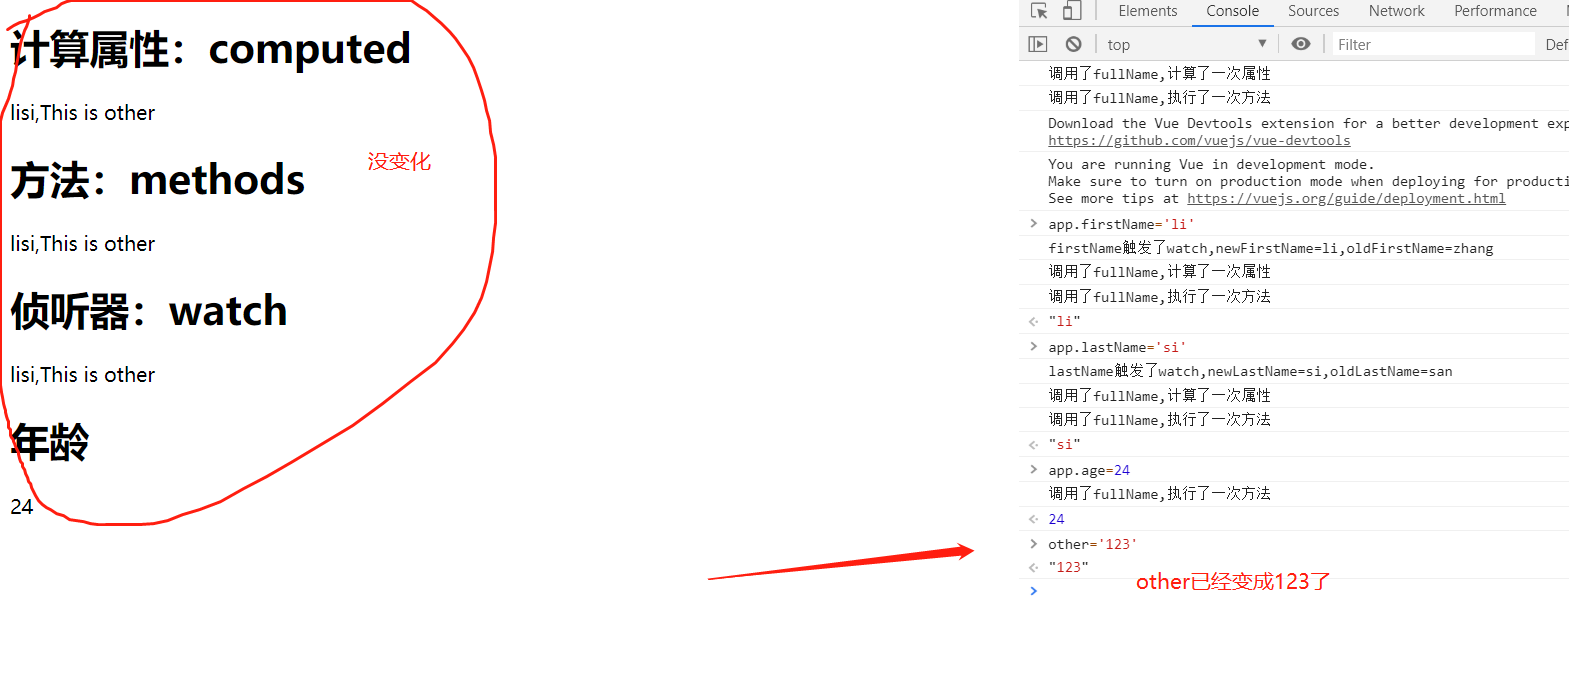
测试结论:
使用computed计算了fullName属性,值为firstName+lastName。计算属性具有缓存功能,当firstName和lastName都不改变的时候,fullName不会重新计算,比如我们改变age的值,fullName的值是不需要重新计算的。
methods并没有缓存特性,比如我们改变age的值,fullName2()方法会被执行一遍。
当一个功能可以用上面三个方法来实现的时候,明显使用computed更合适,代码简单也有缓存特性。
计算属性范围在vue实例内,修改vue实例外部对象,不会重新计算渲染,但是如果先修改了vue实例外对象,在修改vue计算属性的对象,那么外部对象的值也会重新渲染。
计算属性:computed
计算属性范围在Vue实例的fullName内所管理的firstName和lastName,通常监听多个变量
侦听器:watch
监听数据变化,一般只监听一个变量或数组
使用场景
watch(异步场景),computed(数据联动)
1. v-on的基本使用 在前面的计数器案例中使用了v-on:click监听单击事件。这里在回顾一下:
1 2 3 4 5 6 7 8 9 10 11 12 13 14 15 16 17 18 19 20 21 22 23 24 25 26 27 28 29 30 31 32 33 34 35 36 <!DOCTYPE html> <html lang="en"> <head> <meta charset="UTF-8"> <meta name="viewport" content="width=device-width, initial-scale=1.0"> <meta http-equiv="X-UA-Compatible" content="ie=edge"> <script src="https://cdn.jsdelivr.net/npm/[email protected] /dist/vue.js"></script> <title>Document</title> </head> <body> <div id="app"> <h2>{{count}}</h2> <!-- <button v-on:click="count++">加</button> <button v-on:click="count--">减</button> --> <button @click="increment">加</button> <button @click="decrement()">减</button> </div> <script> const app = new Vue({ el:"#app", data:{ count:0 }, methods: { increment(){ this.count++ }, decrement(){ this.count-- } } }) </script> </body> </html>
使用v-on:click给button绑定监听事件以及回调函数,@是v-on:的语法糖,也就是简写也可以使用@click。方法一般是需要写方法名加上(),在@click中可以省掉,如上述的<button @click="increment">加</button>。
2. v-on的参数传递 了解了v-on的基本使用,现在需要了解参数传递。
1 2 3 4 5 6 7 8 9 10 11 12 13 14 15 16 17 18 19 20 21 22 23 24 25 26 27 28 29 30 31 32 33 34 35 36 37 38 39 <!DOCTYPE html > <html lang ="en" > <head > <meta charset ="UTF-8" > <meta name ="viewport" content ="width=device-width, initial-scale=1.0" > <meta http-equiv ="X-UA-Compatible" content ="ie=edge" > <title > Document</title > </head > <body > <div id ="app" > <button @click ="btnClick" > 按钮1</button > <button @click ="btnClick()" > 按钮2</button > <button @click ="btnClick2(123)" > 按钮3</button > <button @click ="btnClick2()" > 按钮4</button > <button @click ="btnClick2" > 按钮5</button > <button @click ="btnClick3($event,123)" > 按钮6</button > </div > <script src ="https://cdn.jsdelivr.net/npm/[email protected] /dist/vue.js" > </script > <script > const app = new Vue ({ el :"#app" , methods :{ btnClick ( console .log ("点击XXX" ); }, btnClick2 (value ){ console .log (value+"----------" ); }, btnClick3 (event,value ){ console .log (event+"----------" +value); } } }) </script > </body > </html >
事件没传参,可以省略()
事件调用方法传参了,写函数时候省略了小括号,但是函数本身是需要传递一个参数的,这个参数就是原生事件event参数传递进去
如果同时需要传入某个参数,同时需要event是,可以通过$event传入事件。
按钮4调用btnClick2(value){},此时undefined。按钮5调用时省略了(),会自动传入原生event事件,如果我们需要event对象还需要传入其他参数,可以使用$event对象。
3. v-on的修饰词 1 2 3 4 5 6 7 8 9 10 11 12 13 14 15 16 17 18 19 20 21 22 23 24 25 26 27 28 29 30 31 32 33 34 35 36 37 38 39 40 41 42 43 44 <!DOCTYPE html > <html lang ="en" > <head > <meta charset ="UTF-8" > <meta name ="viewport" content ="width=device-width, initial-scale=1.0" > <meta http-equiv ="X-UA-Compatible" content ="ie=edge" > <title > v-on的修饰符</title > </head > <body > <div id ="app" > <div @click ="divClick" > <button @click.stop ="btnClick" > 按钮1</button > </div > <form action ="www.baidu.com" > <button type ="submit" @click.prevent ="submitClick" > 提交</button > </form > <input type ="text" @click.enter ="keyup" > </div > <script src ="https://cdn.jsdelivr.net/npm/[email protected] /dist/vue.js" > </script > <script > const app = new Vue ({ el :"#app" , methods :{ btnClick ( console .log ("点击button" ); }, divClick ( console .log ("点击div" ); }, submitClcik ( console .log ("提交被阻止了" ) }, keyup ( console .log ("keyup点击" ) } } }) </script > </body > </html >
.stop的使用,btn的click事件不会传播,不会冒泡到上层,调用event.stopPropagation()。.prevent 调用event.preeventDefault阻止默认行为。.enter监听键盘事件
1. v-if、v-else、v-elseif v-if用于条件判断,判断Dom元素是否显示。
1 2 3 4 5 6 7 8 9 10 11 12 13 14 15 16 17 18 19 20 21 22 23 24 25 26 27 28 29 <!DOCTYPE html > <html lang ="en" > <head > <meta charset ="UTF-8" > <meta name ="viewport" content ="width=device-width, initial-scale=1.0" > <meta http-equiv ="X-UA-Compatible" content ="ie=edge" > <title > Document</title > </head > <body > <div id ="app" > <h2 v-if ="isFlag" > isFlag为true显示这个</h2 > <h2 v-show ="isShow" > isShow为true是显示这个</h2 > <div v-if ="age<18" > 小于18岁未成年</div > <div v-else-if ="age<60" > 大于18岁小于60岁正值壮年</div > <div v-else ="" > 大于60岁,暮年</div > </div > <script src ="https://cdn.jsdelivr.net/npm/[email protected] /dist/vue.js" > </script > <script > const app = new Vue ({ el :"#app" , data :{ isFlag :true , isShow :false , age :66 } }) </script > </body > </html >
单独使用v-if,变量为布尔值,为true才渲染Dom
v-show的变量也是布尔值,为true才显示内容,类似css的display
v-if、v-else、v-else-if联合使用相当于if、elseif、else,但是在条件比较多的时候建议使用计算属性。
2. v-if的demo 在登录网站是经常可以选择使用账户名或者邮箱登录的切换按钮。要求点击按钮切换登录方式。
1 2 3 4 5 6 7 8 9 10 11 12 13 14 15 16 17 18 19 20 21 22 23 24 25 26 27 28 29 30 31 <!DOCTYPE html > <html lang ="en" > <head > <meta charset ="UTF-8" > <meta name ="viewport" content ="width=device-width, initial-scale=1.0" > <meta http-equiv ="X-UA-Compatible" content ="ie=edge" > <title > Document</title > </head > <body > <div id ="app" > <span v-if ="isUser" > <label for ="username" > 用户账号</label > <input type ="text" id ="username" placeholder ="请输入用户名" > </span > <span v-else ="isUser" > <label for ="email" > 用户邮箱</label > <input type ="text" id ="email" placeholder ="请输入用户邮箱" > </span > <button @click ="isUser=!isUser" > 切换类型</button > </div > <script src ="https://cdn.jsdelivr.net/npm/[email protected] /dist/vue.js" > </script > <script > const app = new Vue ({ el :"#app" , data :{ isUser :true } }) </script > </body > </html >
使用v-if和v-else选择渲染指定的Dom,点击按钮对isUser变量取反。
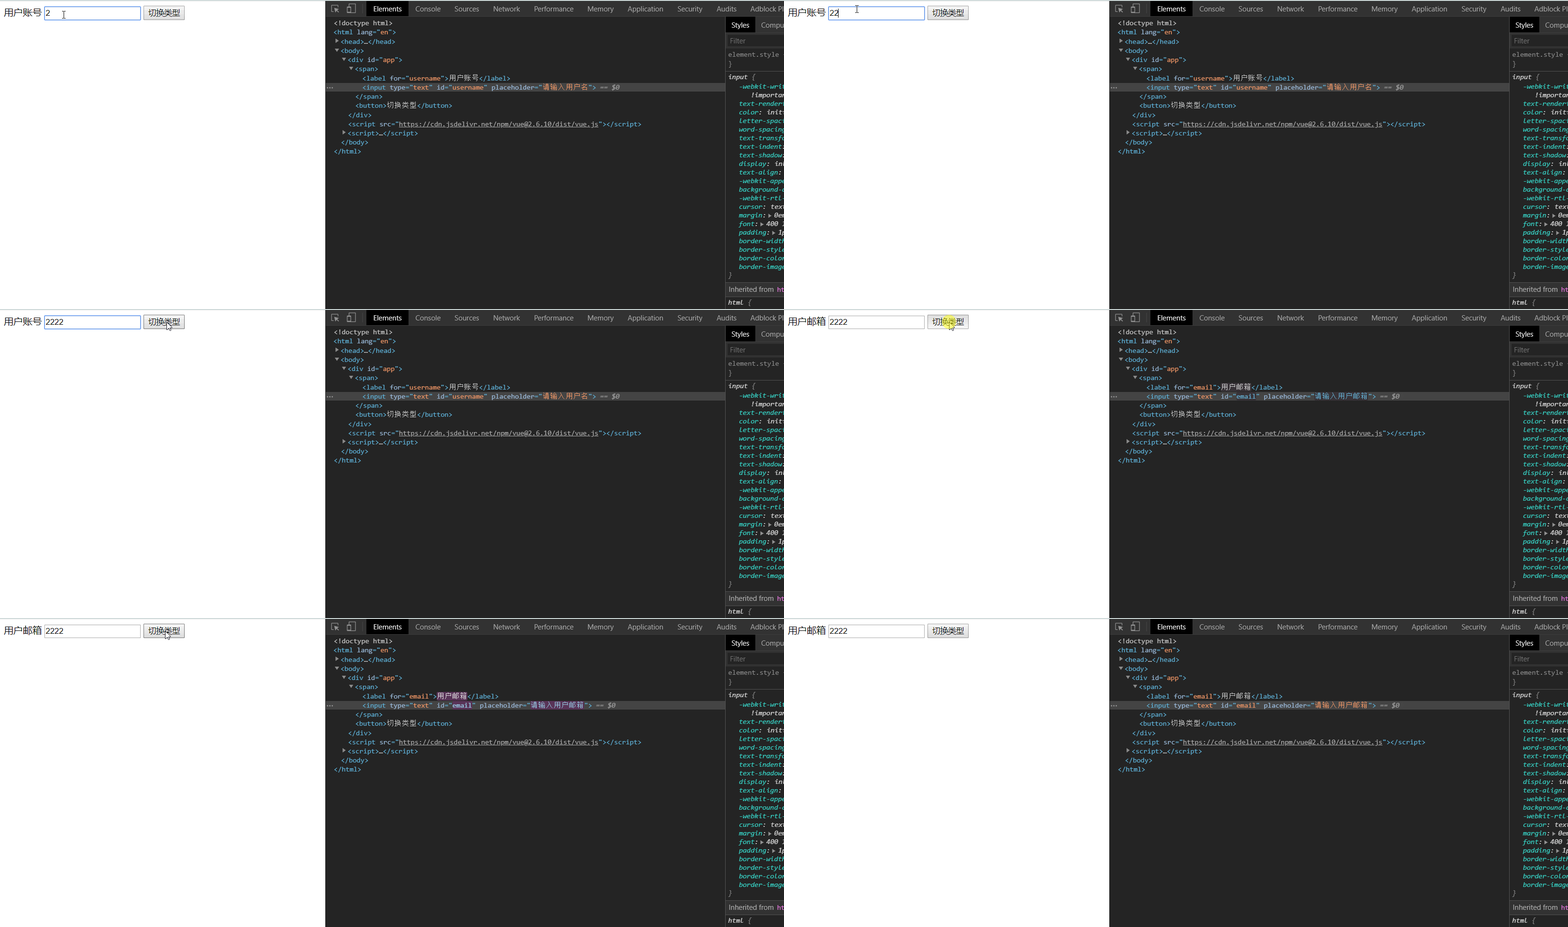
这里有个小问题,如果已经输入了账号了,此时想切换到邮箱输入,输入框未自己清空。
这里需要了解一下vue底层操作,此时input输入框值被复用了。
vue在进行DOM渲染是,处于性能考虑,会复用已经存在的元素,而不是每次都创建新的DOM元素。
在上面demo中,Vue内部发现原来的input元素不再使用,所以直接将其映射对应虚拟DOM,用来复用。
如果不希望出现类似复用问题,可以给对应的dom元素加上key值,并保证key不同。
1 2 <input type ="text" id ="username" placeholder ="请输入用户名" key ="username" > <input type ="text" id ="email" placeholder ="请输入用户邮箱" key ="email" >
3. v-show v-if 在首次渲染的时候,如果条件为假,什么也不操作,页面当作没有这些元素。当条件为真的时候,开始局部编译,动态的向DOM元素里面添加元素。当条件从真变为假的时候,开始局部编译,卸载这些元素,也就是删除。
v-show 不管条件是真还是假,第一次渲染的时候都会编译出来,也就是标签都会添加到DOM中。之后切换的时候,通过display: none;样式来显示隐藏元素。可以说只是改变css的样式,几乎不会影响什么性能。
1 2 3 4 5 6 7 8 9 10 11 12 13 14 15 16 17 18 19 20 21 22 23 24 <!DOCTYPE html > <html lang ="en" > <head > <meta charset ="UTF-8" > <meta name ="viewport" content ="width=device-width, initial-scale=1.0" > <meta http-equiv ="X-UA-Compatible" content ="ie=edge" > <title > Document</title > </head > <body > <div id ="app" > <h2 v-show ="isFlag" > v-show只是操作元素的style属性display</h2 > <h2 v-if ="isFlag" > v-if是新增和删除dom元素</h2 > </div > <script src ="https://cdn.jsdelivr.net/npm/[email protected] /dist/vue.js" > </script > <script > const app = new Vue ({ el :"#app" , data :{ isFlag :true } }) </script > </body > </html >
1. v-for遍历数组 1 2 3 4 5 6 7 8 9 10 11 12 13 14 15 16 17 18 19 20 21 22 23 24 25 26 27 28 29 30 <!DOCTYPE html > <html lang ="en" > <head > <meta charset ="UTF-8" > <meta name ="viewport" content ="width=device-width, initial-scale=1.0" > <meta http-equiv ="X-UA-Compatible" content ="ie=edge" > <title > Document</title > </head > <body > <div id ="app" > <ul > <li v-for ="item in names" > {{item}}</li > </ul > <ul > <li v-for ="(item,index) in names" > {{index+":"+item}}</li > </ul > </div > <script src ="https://cdn.jsdelivr.net/npm/[email protected] /dist/vue.js" > </script > <script > const app = new Vue ({ el :"#app" , data :{ names :["zzz" ,"ttt" ,"yyy" ] } }) </script > </body > </html >
一般需要使用索引值。<li v-for="(item,index) in names" >{{index+":"+item}}</li>index表示索引,item表示当前遍历的元素。
2. v-for遍历对象 1 2 3 4 5 6 7 8 9 10 11 12 13 14 15 16 17 18 19 20 21 22 23 24 25 26 27 28 29 30 31 32 33 34 35 36 <!DOCTYPE html > <html lang ="en" > <head > <meta charset ="UTF-8" > <meta name ="viewport" content ="width=device-width, initial-scale=1.0" > <meta http-equiv ="X-UA-Compatible" content ="ie=edge" > <title > Document</title > </head > <body > <div id ="app" > <ul > <li v-for ="(item,key) in user" > {{key+"-"+item}}</li > </ul > <ul > <li v-for ="(item,key,index) in user" > {{key+"-"+item+"-"+index}}</li > </ul > </div > <script src ="https://cdn.jsdelivr.net/npm/[email protected] /dist/vue.js" > </script > <script > const app = new Vue ({ el :"#app" , data :{ user :{ name :"zzz" , height :188 , age :24 } } }) </script > </body > </html >
遍历过程没有使用index索引,<li v-for="(item,key) in user" >{{key+"-"+item}}</li>,item表示当前元素是属性值,key表示user对象属性名。
遍历过程使用index索引,index表示索引从0开始。
3. v-for使用key 1 2 3 4 5 6 7 8 9 10 11 12 13 14 15 16 17 18 19 20 21 22 23 24 25 26 27 28 29 30 31 32 33 34 35 36 37 38 39 40 <!DOCTYPE html > <html lang ="en" > <head > <meta charset ="UTF-8" > <meta name ="viewport" content ="width=device-width, initial-scale=1.0" > <meta http-equiv ="X-UA-Compatible" content ="ie=edge" > <title > v-for使用key</title > </head > <body > <div id ="app" > <ul > <li v-for ="item in letters" > {{item}}</li > </ul > <button @click ="add1" > 没有key</button > <ul > <li v-for ="item in letters" :key ="item" > {{item}}</li > </ul > <button @click ="add2" > 有key</button > </div > <script src ="https://cdn.jsdelivr.net/npm/[email protected] /dist/vue.js" > </script > <script > const app = new Vue ({ el :"#app" , data :{ letters :['a' ,'b' ,'c' ,'d' ,'e' ] }, methods : { add1 ( this .letters .splice (2 ,0 ,'f' ) }, add2 ( this .letters .splice (2 ,0 ,'f' ) } } }) </script > </body > </html >
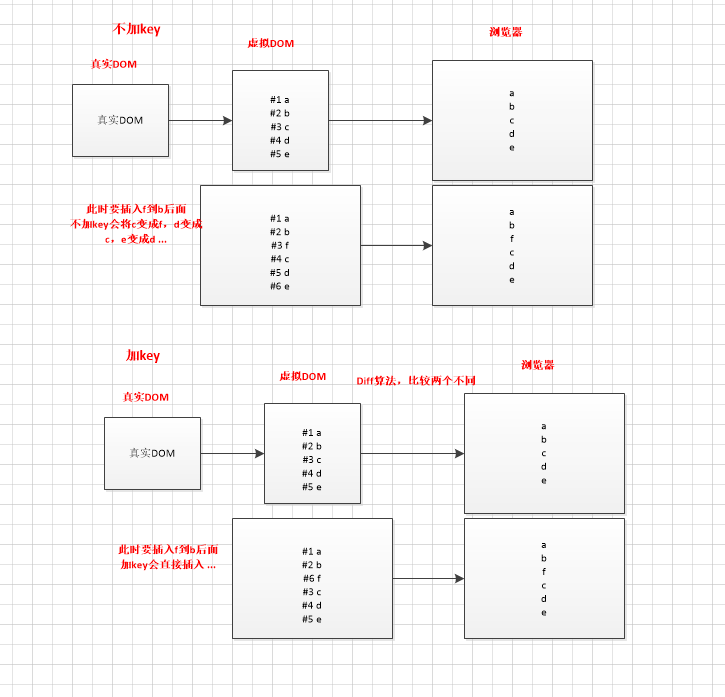
使用key可以提高效率,加key如果要插入f使用diff算法高效,如果使用index做key一直变,所以item如果唯一可以使用item。
不加key如果要插入f依次替换。
v-for加key与不加
不加key渲染时候会依次替换渲染,加了key会直接将其放在指定位置,加key提升效率。
4. 数组的响应方式 我们改变DOM绑定的数据时,DOM会动态的改变值。数组也是一样的。但是对于动态变化数据,有要求,不是任何情况改变数据都会变化。
1 2 3 4 5 6 7 8 9 10 11 12 13 14 15 16 17 18 19 20 21 22 23 24 25 26 27 28 29 30 31 32 33 34 35 36 37 38 39 40 41 42 43 44 45 46 47 48 49 50 51 52 53 <!DOCTYPE html > <html lang ="en" > <head > <meta charset ="UTF-8" > <meta name ="viewport" content ="width=device-width, initial-scale=1.0" > <meta http-equiv ="X-UA-Compatible" content ="ie=edge" > <title > 数组的响应式方法 </title > </head > <body > <div id ="app" > <ul > <li v-for ="item in letters" > {{item}}</li > </ul > <button @click ="btn1" > push</button > <br > <button @click ="btn2" > 通过索引值修改数组</button > </div > <script src ="https://cdn.jsdelivr.net/npm/[email protected] /dist/vue.js" > </script > <script > const app = new Vue ({ el :"#app" , data :{ letters :['a' ,'b' ,'c' ,'d' ,'e' ] }, methods : { btn1 ( this .letters .push ('f' ) }, btn2 ( this .letters [0 ]='f' } } }) </script > </body > </html >
btn2按钮是通过索引值修改数组的值,这种情况,数组letters变化,DOM不会变化。
而数组的方法,例如push()、pop()、shift()、unshift()、splice()、sort()、reverse()等方法修改数组的数据,DOM元素会随之修改。
push():在最后添加元素
pop():删除最后一个元素
shift():删除第一个元素
unshift():添加在最前面,可以添加多个
splic():删除元素、插入元素、替换元素
splice(1,1)再索引为1的地方删除一个元素,第二个元素不传,直接删除后面所有元素
splice(index,0,’aaa’)再索引index后面删除0个元素,加上’aaa’
splice(1,1,’aaa’)替换索引为1的后一个元素为’aaa’
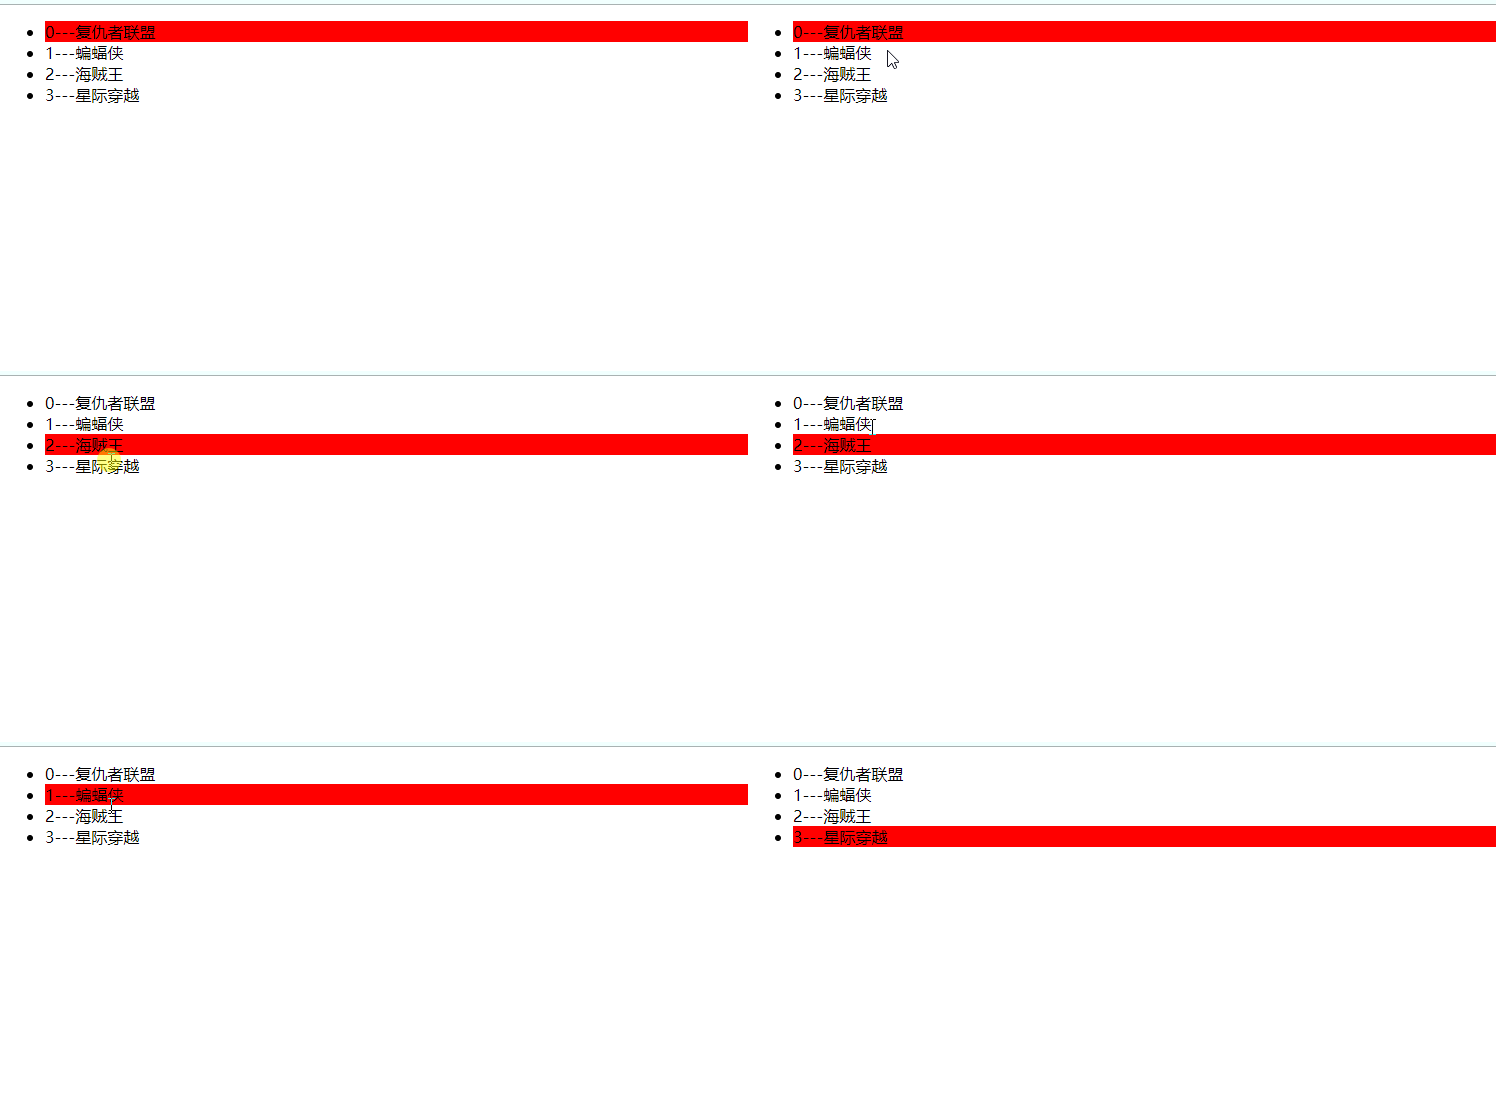
5. 综合练习 现在要求将数组内的电影展示到页面上,并选中某个电影,电影背景变红,为选中状态。
1 2 3 4 5 6 7 8 9 10 11 12 13 14 15 16 17 18 19 20 21 22 23 24 25 26 27 28 29 30 31 32 33 34 35 36 37 38 39 40 <!DOCTYPE html > <html lang ="en" > <head > <meta charset ="UTF-8" > <meta name ="viewport" content ="width=device-width, initial-scale=1.0" > <meta http-equiv ="X-UA-Compatible" content ="ie=edge" > <title > 综合练习</title > <style > .active { background-color : red; } </style > </head > <body > <div id ="app" > <ul > <li v-for ="(item,index) in movies" @click ="liClick(index)" :class ="{active:index===curIndex}" > {{index+"---"+item}}</li > </ul > </div > <script src ="https://cdn.jsdelivr.net/npm/[email protected] /dist/vue.js" > </script > <script > const app = new Vue ({ el : "#app" , data : { movies : ['复仇者联盟' , '蝙蝠侠' , '海贼王' , '星际穿越' ], curIndex :0 }, methods : { liClick (index ){ this .curIndex = index } } }) </script > </body > </html >
先使用v-for将电影列表展示到页面上,并获取index索引定位当前的<li>标签。
给每个<li>标签加上,单击事件,并将index传入单击事件的回调函数methods的liClick()。
定义一个变量curIndex表示当前索引,初始值为0,用于表示选中状态的电影列。
定义个class样式active,在active为激活状态是, background-color: red;为红色。使用表达式index=curIndex判断当前选中状态的列。
综合前面的知识,需要通过一个小demo来串联起知识。
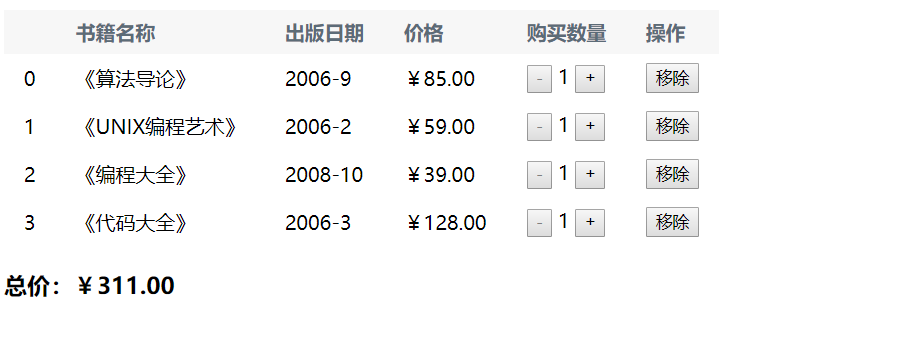
如图所示:
点击“+”按钮,总价增加,点击“-”按钮总价减少,点击移除,移除当列。
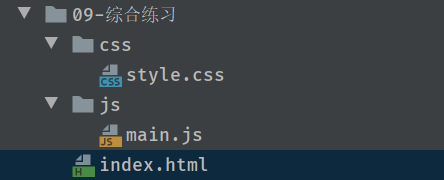
1. 目录结构
2. index.html 1 2 3 4 5 6 7 8 9 10 11 12 13 14 15 16 17 18 19 20 21 22 23 24 25 26 27 28 29 30 31 32 33 34 35 36 37 38 39 40 41 <!DOCTYPE html > <html lang ="en" > <head > <meta charset ="UTF-8" > <title > 综合练习</title > <link rel ="stylesheet" href ="./css/style.css" > </head > <body > <div id ="app" > <table > <thead > <th > </th > <th > 书籍名称</th > <th > 出版日期</th > <th > 价格</th > <th > 购买数量</th > <th > 操作</th > </thead > <tbody > <tr v-for ="(book,index) in books" > <td > {{index}}</td > <td > {{book.name}}</td > <td > {{book.beginDate}}</td > <td > {{book.price | showPrice}}</td > <td > <button @click ="decrement(index)" :disabled ="book.count<=1" > -</button > {{book.count}} <button @click ="increment(index)" > +</button > </td > <td > <button @click ="remove(index)" > 移除</button > </td > </tr > </tbody > </table > <h3 > 总价:{{totalPrice | showPrice}}</h3 > </div > <script src ="../js/vue.js" > </script > <script src ="./js/main.js" > </script > </body > </html >
3.main.js 1 2 3 4 5 6 7 8 9 10 11 12 13 14 15 16 17 18 19 20 21 22 23 24 25 26 27 28 29 30 31 32 33 34 35 36 37 38 39 40 41 42 43 44 45 46 47 48 49 50 51 52 53 54 55 56 const app = new Vue ({ el : '#app' , data : { books : [ { name : "《算法导论》" , beginDate : "2006-9" , price : 85.00 , count : 1 }, { name : "《UNIX编程艺术》" , beginDate : "2006-2" , price : 59.00 , count : 1 }, { name : "《编程大全》" , beginDate : "2008-10" , price : 39.00 , count : 1 }, { name : "《代码大全》" , beginDate : "2006-3" , price : 128.00 , count : 1 }, ] }, methods : { increment (index ){ this .books [index].count ++ }, decrement (index ){ this .books [index].count -- }, remove (index ){ this .books .splice (index,1 ) } }, computed : { totalPrice ( return this .books .map (book =>price *book.count ) .reduce ((preValue,currentValue ) => preValue+currentValue) } }, filters : { showPrice : function (price ){ console .log (typeof price); let priceStr = price.toFixed (2 ) console .log (priceStr); return "¥" + priceStr } } })
4. style.css 1 2 3 4 5 6 7 8 9 10 11 12 13 14 15 table { border : 1px ; border-collapse : collapse; border-spacing : 0 ; } th ,td { padding : 8px 16px ; border : ipx solid #e9e9e9 ; text-align : left; } th { background-color : #f7f7f7 ; color : #5c6b77 ; font-weight : 600 ; }
filter、map、reduce 1 2 3 4 5 6 7 8 9 10 11 12 13 14 15 16 17 18 19 20 21 22 23 24 25 26 27 28 29 30 31 32 33 34 35 36 const nums = [2 ,3 ,5 ,1 ,77 ,55 ,100 ,200 ]let newNums = nums.filter (function (num ) { if (num > 50 ){ return true ; } return false ; }) console .log (newNums); let newNums2 = newNums.map (function (num ) { return num * 2 }) console .log (newNums2);let newNum = newNums2.reduce (function (preValue,currentValue ) { return preValue + currentValue },0 ) console .log (newNum);let n = nums.filter (num =>50 ).map (num =>2 ).reduce ((preValue,currentValue ) => preValue + currentValue)console .log (n);
1. v-model的基本使用 1 2 3 4 5 6 7 8 9 10 11 12 13 14 15 16 17 18 19 20 21 <!DOCTYPE html > <html lang ="en" > <head > <meta charset ="UTF-8" > <title > Title</title > </head > <body > <div id ="app" > <input type ="text" v-model ="message" > {{message}} </div > <script src ="../js/vue.js" > </script > <script > const app = new Vue ({ el : '#app' , data : { message : "hello" } }) </script > </body > </html >
v-model双向绑定,既输入框的value改变,对应的message对象值也会改变,修改message的值,input的value也会随之改变。无论改变那个值,另外一个值都会变化。
2. v-model的原理 先来一个demo实现不使用v-model实现双向绑定。
1 2 3 4 5 6 7 8 9 10 11 12 13 14 15 16 17 18 19 20 21 22 23 24 25 26 27 28 29 30 <!DOCTYPE html > <html lang ="en" > <head > <meta charset ="UTF-8" > <title > Title</title > </head > <body > <div id ="app" > <input type ="text" :value ="message" @input ="changeValue" > {{message}} </div > <script src ="../js/vue.js" > </script > <script > const app = new Vue ({ el : '#app' , data : { message : "hello world" }, methods : { changeValue (event ){ console .log ("值改变了" ); this .message = event.target .value } } }) </script > </body > </html >
v-model = v-bind + v-on,实现双向绑定需要是用v-bind和v-on,使用v-bind给input的value绑定message对象,此时message对象改变,input的值也会改变。但是改变input的value并不会改变message的值,此时需要一个v-on绑定一个方法,监听事件,当input的值改变的时候,将最新的值赋值给message对象。$event获取事件对象,target获取监听的对象dom,value获取最新的值。
3. v-model结合radio类型使用 radio单选框的name属性是互斥的,如果使用v-model,可以不使用name就可以互斥。
1 2 3 4 5 6 7 8 9 10 11 12 13 14 15 16 17 18 19 20 21 22 <div id ="app" > <label for ="male" > <input type ="radio" id ="male" name ="sex" value ="男" v-model ="sex" > 男 </label > <label for ="female" > <input type ="radio" id ="female" name ="sex" value ="女" v-model ="sex" > 女 </label > <div > 你选择的性别是:{{sex}}</div > </div > <script src ="../js/vue.js" > </script > <script > const app = new Vue ({ el :"#app" , data :{ message :"zzz" , sex :"男" }, }) </script >
v-model绑定`sex`属性,初始值为“男”,选择女后`sex`属性变成“女”,因为此时是双向绑定。
4. v-model结合checkbox类型使用 checkbox可以结合v-model做单选框,也可以多选框。
1 2 3 4 5 6 7 8 9 10 11 12 13 14 15 16 17 18 19 20 21 22 23 24 25 26 27 28 29 30 31 32 <!DOCTYPE html > <html lang ="en" > <head > <meta charset ="UTF-8" > <title > Title</title > </head > <body > <div id ="app" > <h2 > 单选框</h2 > <label for ="agree" > <input type ="checkbox" id ="agree" v-model ="isAgree" > 同意协议 </label > <h2 > 多选框</h2 > <label :for ="item" v-for ="(item,index) in hobbies" :key ="index" > <input type ="checkbox" name ="hobby" :value ="item" :id ="item" v-model ="hobbies" > {{item}} </label > <h2 > 你的爱好是:{{hobbies}}</h2 > </div > <script src ="../js/vue.js" > </script > <script > const app = new Vue ({ el : '#app' , data : { isAgree : false , hobbies : ["篮球" ,"足球" ,"乒乓球" ,"羽毛球" ] } }) </script > </body > </html >
checkbox结合v-model实现单选框,定义变量isAgree初始化为false,点击checkbox的值为true,isAgree也是true。
checkbox结合v-model实现多选框,定义数组对象hobbies,用于存放爱好,将hobbies与checkbox对象双向绑定,此时选中,一个多选框,就多一个true,hobbies就添加一个对象。
5. v-model结合select 1 2 3 4 5 6 7 8 9 10 11 12 13 14 15 16 17 18 19 20 21 22 23 24 25 26 27 28 29 30 31 32 33 34 35 36 37 38 <!DOCTYPE html > <html lang ="en" > <head > <meta charset ="UTF-8" > <meta name ="viewport" content ="width=device-width, initial-scale=1.0" > <meta http-equiv ="X-UA-Compatible" content ="ie=edge" > <title > v-model结合select类型</title > </head > <body > <div id ="app" > <select name ="fruit" v-model ="fruit" > <option value ="苹果" > 苹果</option > <option value ="香蕉" > 香蕉</option > <option value ="西瓜" > 西瓜</option > </select > <h2 > 你选择的水果是:{{fruit}}</h2 > <select name ="fruits" v-model ="fruits" multiple > <option value ="苹果" > 苹果</option > <option value ="香蕉" > 香蕉</option > <option value ="西瓜" > 西瓜</option > </select > <h2 > 你选择的水果是:{{fruits}}</h2 > </div > <script src ="../js/vue.js" > </script > <script > const app = new Vue ({ el :"#app" , data :{ fruit :"苹果" , fruits :[] }, }) </script > </body >
v-model结合select可以单选也可以多选。
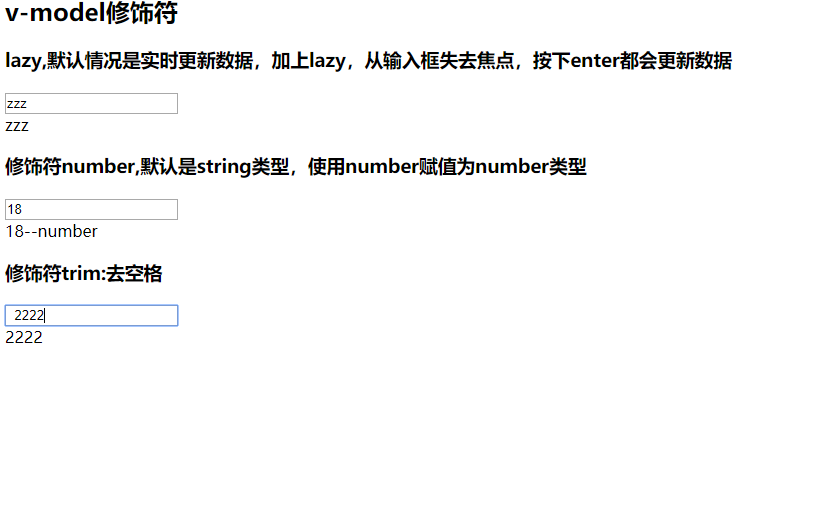
6. v-model的修饰符的使用 1 2 3 4 5 6 7 8 9 10 11 12 13 14 15 16 17 18 19 20 21 22 23 24 25 26 27 28 29 30 31 32 33 34 35 <!DOCTYPE html > <html lang ="en" > <head > <meta charset ="UTF-8" > <meta name ="viewport" content ="width=device-width, initial-scale=1.0" > <meta http-equiv ="X-UA-Compatible" content ="ie=edge" > <title > v-model修饰符</title > </head > <body > <div id ="app" > <h2 > v-model修饰符</h2 > <h3 > lazy,默认情况是实时更新数据,加上lazy,从输入框失去焦点,按下enter都会更新数据</h3 > <input type ="text" v-model.lazy ="message" > <div > {{message}}</div > <h3 > 修饰符number,默认是string类型,使用number赋值为number类型</h3 > <input type ="number" v-model.number ="age" > <div > {{age}}--{{typeof age}}</div > <h3 > 修饰符trim:去空格</h3 > <input type ="text" v-model.trim ="name" > </div > <script src ="../js/vue.js" > </script > <script > const app = new Vue ({ el :"#app" , data :{ message :"zzz" , age :18 , name :"ttt" }, }) </script > </body > </html >
lazy:默认情况下是实时更新数据,加上lazy,从输入框失去焦点,按下enter都会更新数据。number:默认是string类型,使用number复制为number类型。trim:用于自动过滤用户输入的首尾空白字符
1. 组件的基本使用 简单的组件示例
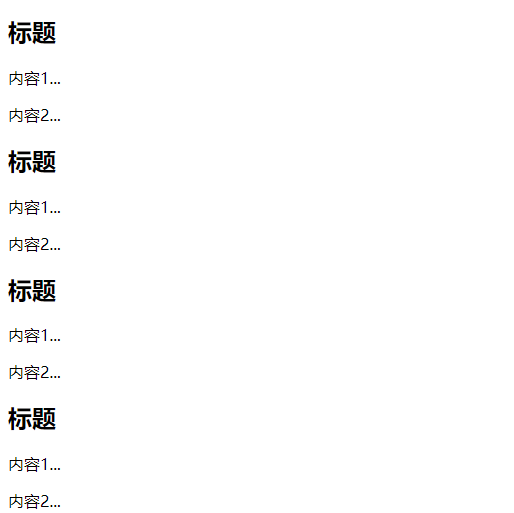
1 2 3 4 5 6 7 8 9 10 11 12 13 14 15 16 17 18 19 20 21 22 23 24 25 26 27 28 29 30 31 32 33 34 35 36 37 38 39 <!DOCTYPE html > <html lang ="en" > <head > <meta charset ="UTF-8" > <title > Title</title > </head > <body > <div id ="app" > <my-cpn > </my-cpn > <my-cpn > </my-cpn > <my-cpn > </my-cpn > <cpnc > </cpnc > </div > <script src ="../js/vue.js" > </script > <script > const cpnc = Vue .extend ({ template :` <div> <h2>标题</h2> <p>内容1...<p> <p>内容2...<p> </div>` }) Vue .component ('my-cpn' , cpnc) const app = new Vue ({ el :"#app" , data :{ }, components :{ cpnc :cpnc } }) </script > </body > </html >
组件是可复用的 Vue 实例,且带有一个名字:在这个例子中是 my-cpn。我们可以在一个通过 new Vue 创建的 Vue 根实例中,把这个组件作为自定义元素来使用: <my-cpn></my-cpn>。
1.1 创建组件构造器对象 template中是组件的DOM元素内容。
1.2 注册组件
全局注册,通过 Vue.component 。
局部注册,通过 components:{cpnc:cpnc}。
1.3 使用组件 像使用html标签一样使用。
1 2 3 4 5 6 7 <div id ="app" > <my-cpn > </my-cpn > <my-cpn > </my-cpn > <my-cpn > </my-cpn > <cpnc > </cpnc > </div >
2. 全局组件和局部组件 组件的注册方式有两种,一种是全局组件一种是局部组件。
1 2 3 4 5 6 7 8 9 10 11 12 13 14 15 16 17 18 19 20 21 22 23 24 25 26 27 <div id ="app" > <h2 > 全局组件</h2 > <my-cpn > </my-cpn > <h2 > 局部组件</h2 > <cpnc > </cpnc > </div > <script src ="../js/vue.js" > </script > <script > const cpnc = Vue .extend ({ template :` <div> <h2>标题</h2> <p>内容1</p> <p>内容2</p> </div>` }) Vue .component ('my-cpn' , cpnc) const app = new Vue ({ el :"#app" , components :{ cpnc :cpnc } }) </script >
2.1 全局组件 全局组件,可以在多个vue实例中使用,类似于全局变量。
使用Vue.component('my-cpn', cpnc)方式注册,直接使用<my-cpn></my-cpn>调用。my-cpn是全局组件的名字,cpnc是定义的组件对象。
2.2 局部组件 局部组件,只能在当前vue实例挂载的对象中使用,类似于局部变量,有块级作用域。
注册方式
1 2 3 4 5 6 const app = new Vue ({ el :"#app" , components :{ cpnc :cpnc } })
使用方式与全局变量一样,直接使用<cpnc></cpnc>调用。cpnc:cpnc第一个cpnc是给组件命名的名字,第二个是定义的组件对象。如果俩个同名也可以直接使用es6语法:
3. 父组件和子组件的区别 1 2 3 4 5 6 7 8 9 10 11 12 13 14 15 16 17 18 19 20 21 22 23 24 25 26 27 28 29 30 31 32 33 <div id ="app" > <cpn2 > </cpn2 > </div > <script src ="../js/vue.js" > </script > <script > // 1.创建组件构造器对象 const cpn1 = Vue.extend({ template:` <div > <h2 > 标题1</h2 > <p > 组件1</p > </div > ` }) // 组件2中使用组件1 const cpn2 = Vue.extend({ template:` <div > <h2 > 标题2</h2 > <p > 组件2</p > <cpn1 > </cpn1 > </div > `, components:{ cpn1:cpn1 } }) const app = new Vue({ el:"#app", components:{//局部组件创建 cpn2:cpn2 } }) </script >
上述代码中定义了两个组件对象cpn1和cpn2,在组件cpn2中使用局部组件注册了cpn1,并在template中使用了注册的cpn1,然后在vue实例中使用注册了局部组件cpn2,在vue实例挂载的div中调用了cpn2,cpn2与cpn1形成父子组件关系。
注意:组件就是一个vue实例,vue实例的属性,组件也可以有,例如data、methods、computed等。
4. 注册组件的语法糖 1 2 3 4 5 6 7 8 9 10 11 12 13 14 15 16 17 18 19 20 21 22 23 24 25 26 27 28 <div id ="app" > <cpn1 > </cpn1 > <cpn2 > </cpn2 > </div > <script src ="../js/vue.js" > </script > <script > // 1.注册全局组件语法糖 Vue.component('cpn1', { template:` <div > <h2 > 全局组件语法糖</h2 > <p > 全局组件语法糖</p > </div > ` }) const app = new Vue({ el:"#app", components:{//局部组件创建 cpn2:{ template:` <div > <h2 > 局部组件语法糖</h2 > <p > 局部组件语法糖</p > </div > ` } } }) </script >
注册组件时候可以不实例化组件对象,直接在注册的时候实例化。{}就是一个组件对象。
5. 组件模板的分离写法 5.1 script标签 使用script标签定义组件的模板,script标签注意类型是text/x-template。
1 2 3 4 5 6 7 <script type ="text/x-template" id ="cpn1" > <div > <h2 > 组件模板的分离写法</h2 > <p > script标签注意类型是text/x-template</p > </div > </script >
5.2 template标签 使用template标签,将内容写在标签内。
1 2 3 4 5 6 7 <template id ="cpn2" > <div > <h2 > 组件模板的分离写法</h2 > <p > template标签</p > </div > </template >
调用分离的模板,使用template:'#cpn1'
1 2 3 4 5 6 7 8 9 10 11 12 13 14 15 <script src ="../js/vue.js" > </script > <script > const app = new Vue ({ el : "#app" , components : { cpn1 :{ template :'#cpn1' }, cpn2 : { template : '#cpn2' } } }) </script >
6. 组件的数据 6.1 存放问题 前面说过vue组件就是一个vue实例,相应的vue组件也有data属性来存放数据。
1 2 3 4 5 6 7 8 9 10 11 12 13 14 15 16 17 18 19 20 21 <div id ="app" > <cpn1 > </cpn1 > </div > <script src ="../js/vue.js" > </script > <script > const app = new Vue ({ el : "#app" , components : { cpn1 :{ template :'<div>{{msg}}</div>' , data ( return { msg :"组件的数据存放必须要是一个函数" } } } } }) </script >
在template中使用组件内部的数据msg。
6.2 组件的data为什么必须要是函数 组件的思想是复用,定义组件当然是把通用的公共的东西抽出来复用。
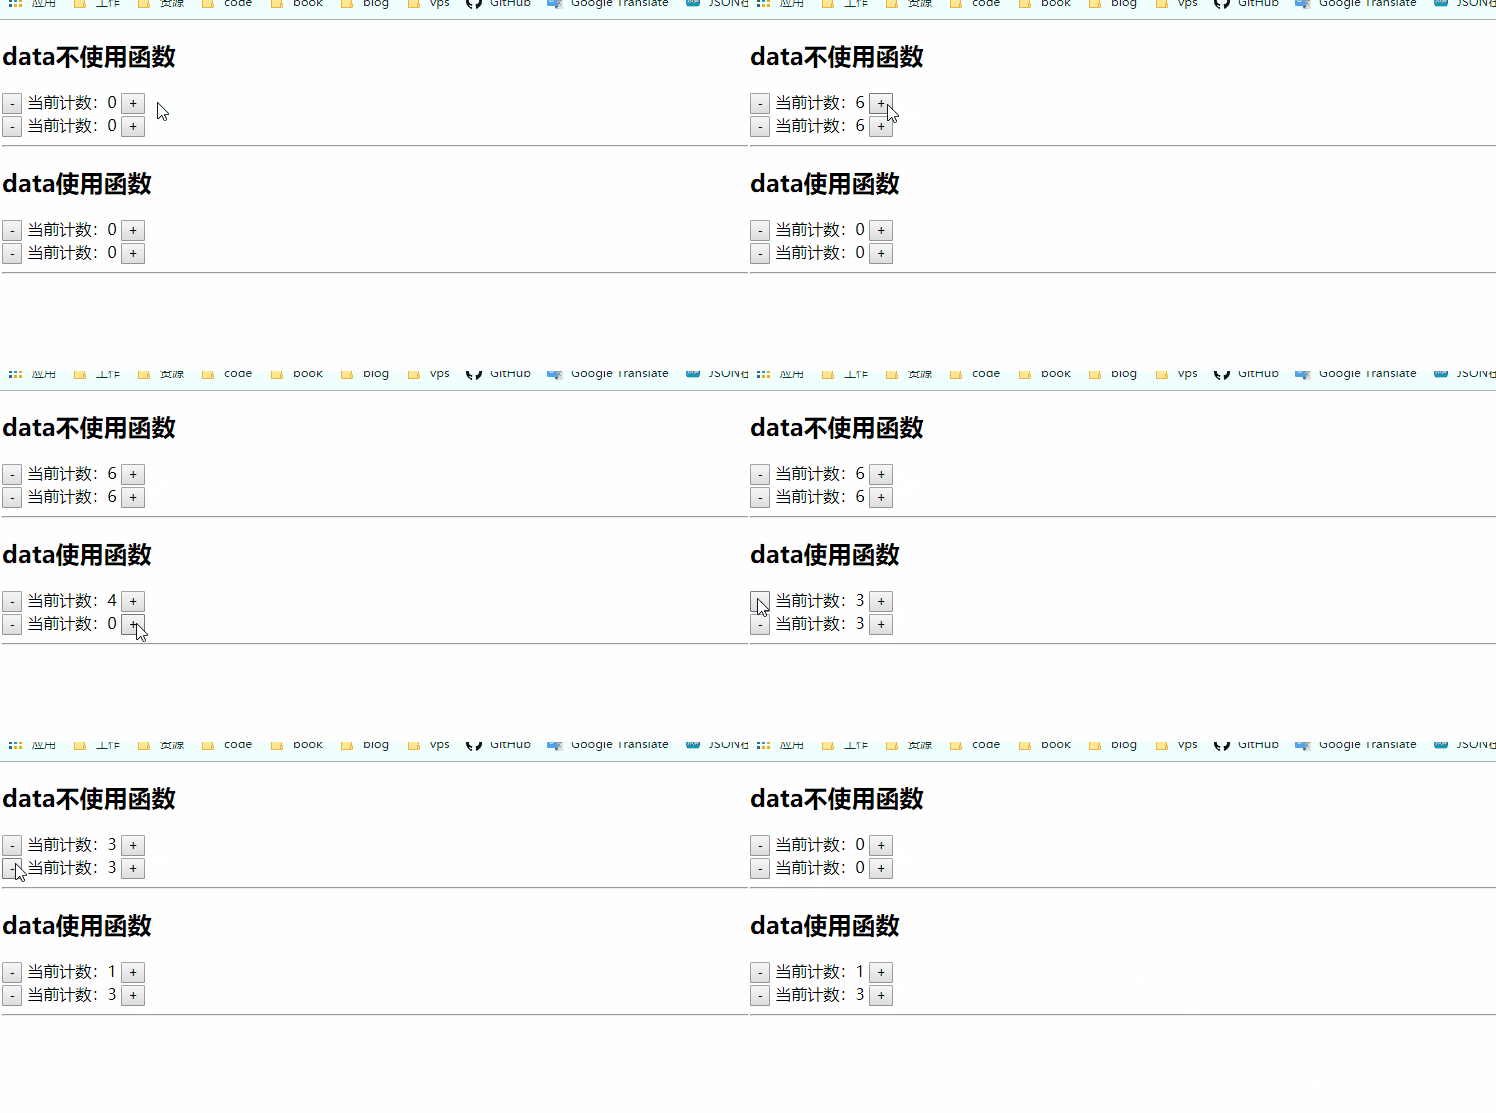
1 2 3 4 5 6 7 8 9 10 11 12 13 14 15 16 17 18 19 20 21 22 23 24 25 26 27 28 29 30 31 32 33 34 35 36 37 38 39 40 41 42 43 44 45 46 47 48 49 <div id ="app" > <h2 > data不使用函数</h2 > <cpn1 > </cpn1 > <cpn1 > </cpn1 > <hr > <h2 > data使用函数</h2 > <cpn2 > </cpn2 > <cpn2 > </cpn2 > <hr > </div > <script src ="../js/vue.js" > </script > <template id ="cpn1" > <div > <button @click ="count--" > -</button > 当前计数:{{count}} <button @click ="count++" > +</button > </div > </template > <template id ="cpn2" > <div > <button @click ="count--" > -</button > 当前计数:{{count}} <button @click ="count++" > +</button > </div > </template > <script > const obj = { count :0 }; const app = new Vue ({ el : "#app" , components : { cpn1 : { template : '#cpn1' , data ( return obj; } }, cpn2 : { template : '#cpn2' , data ( return { count : 0 } } } } }) </script >
上述代码中定义了两个组件cpn1和cpn2,都是定义了两个计数器,con1的data虽然使用了函数,但是为了模拟data:{count:0},使用了常量obj来返回count。
图中可以看到,不使用函数data的好像共用一个count属性,而使用函数的data的count是各自用各自的,像局部变量一样有块级作用域,这个块级就是vue组件的作用域。
我们在复用组件的时候肯定希望,各自组件用各自的变量,如果确实需要都用一样的,可以全局组件注册,也可以是用vuex来进行状态管理。
7. 父组件给子组件传递数据 7.1 使用props属性,父组件向子组件传递数据
使用组件的props属性
1 2 3 4 5 6 7 8 9 10 const cpn = { template : "#cpn" , props : { cmessage : { type : String , default : 'zzzzz' , required : true } } }
向cmessage对象传值
1 2 3 4 5 6 7 8 9 10 11 12 13 14 15 <div id ="app" > <cpn :cMessage ="message" > </cpn > </div > <script > const app = new Vue ({ el : "#app" , data : { message : "你好" , movies : ["复仇者联盟" , "钢铁侠" , "星际穿越" , "哪吒传奇" ] }, components : { cpn } }) </script >
7.2 props属性使用
数组写法
1 props : ['cmovies' , 'cmessage' ]
对象写法
1 2 3 4 5 6 7 props : { cmessage : { type : String , default : 'zzzzz' , required : true } }
props属性的类型限制
1 2 3 4 cmovies :Array ,cmessage :String ,cmessage :['String' ,'Number' ]
props属性的默认值
1 2 3 4 5 cmessage : { type : String , default : 'zzzzz' , }
props属性的必传值
1 2 3 4 5 cmessage : { type : String , default : 'zzzzz' , required : true }
类型是Object/Array,默认值必须是一个函数
1 2 3 4 5 6 7 cmovies : { type : Array , default () { return [1 , 2 , 3 , 4 ] } },
自定义验证函数
1 2 3 4 vaildator : function (value ) { return ['zzzzz' , 'ttttt' , 'yyy' ].indexOf (value) !== -1 }
自定义类型
1 2 3 4 5 function Person (firstName,lastName ) { this .firstName = firstName this .lastName = lastName } cmessage :Person
综合使用
1 2 3 4 5 6 7 8 9 10 11 12 13 14 15 16 17 18 19 20 21 22 23 24 25 26 27 28 29 30 31 32 33 34 35 36 37 38 39 40 41 42 43 44 45 46 47 48 49 50 51 52 53 54 55 56 57 58 59 60 61 62 63 64 65 66 67 <div id ="app" > <cpn :cMovies ="movies" :cMessage ="message" > </cpn > </div > <template id ="cpn" > <div > <ul > <li v-for ="(item, index) in cmovies" :key ="index" > {{item}}</li > </ul > <h2 > {{cmessage}}</h2 > </div > </template > <script src ="../js/vue.js" > </script > <script > function Person (firstName,lastName ) { this .firstName = firstName this .lastName = lastName } const cpn = { template : "#cpn" , props : { cmessage : { type : String , default : 'zzzzz' , required : true }, cmovies : { type : Array , default () { return [1 , 2 , 3 , 4 ] } }, }, data ( return { } }, methods : { }, }; const app = new Vue ({ el : "#app" , data : { message : "你好" , movies : ["复仇者联盟" , "钢铁侠" , "星际穿越" , "哪吒传奇" ] }, components : { cpn } }) </script >
8. 组件通信 8.1 父传子(props的驼峰标识) v-bind是 不支持使用驼峰标识的,例如cUser要改成c-User。
1 2 3 4 5 6 7 8 9 10 11 12 13 14 15 16 17 18 19 20 21 22 23 24 25 26 27 28 29 30 31 32 33 34 35 36 37 38 39 40 41 42 <div id ="app" > <cpn :c-User ="user" > </cpn > <cpn :cuser ="user" > </cpn > </div > <template id ="cpn" > <div > <h2 > {{cUser}}</h2 > <h2 > {{cuser}}</h2 > </div > </template > <script src ="../js/vue.js" > </script > <script > const cpn = { template : "#cpn" , props : { cUser :Object , cuser :Object }, data (return {}}, methods : {}, }; const app = new Vue ({ el : "#app" , data : { user :{ name :'zzz' , age :18 , height :175 } }, components : { cpn } }) </script >
8.2 子传父$emit 子组件向父组件传值,使用自定义事件$emit。
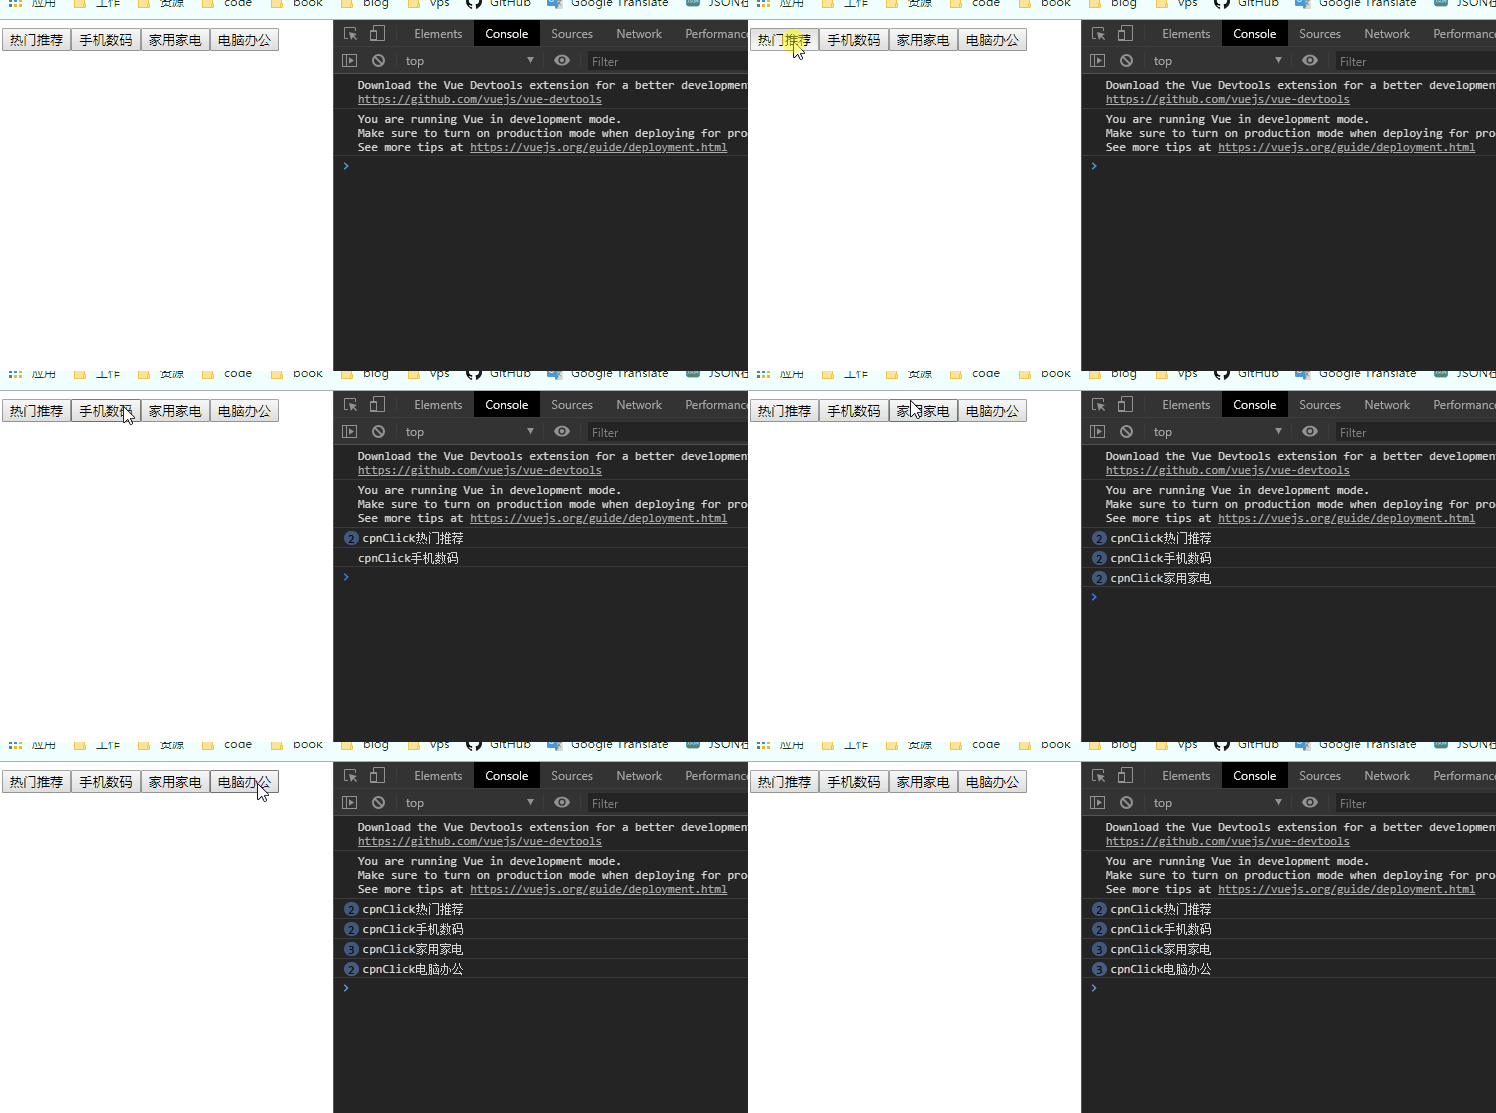
1 2 3 4 5 6 7 8 9 10 11 12 13 14 15 16 17 18 19 20 21 22 23 24 25 26 27 28 29 30 31 32 33 34 35 36 37 38 39 40 41 42 43 44 45 46 47 48 49 50 51 52 53 54 55 56 57 58 59 60 61 62 63 64 <div id ="app" > <cpn @itemclick ="cpnClcik" > </cpn > </div > <template id ="cpn" > <div > <button v-for ="(item, index) in categoties" :key ="index" @click ="btnClick(item)" > {{item.name}}</button > </div > </template > <script src ="../js/vue.js" > </script > <script > const cpn = { template : "#cpn" , data ( return { categoties : [{ id : 'aaa' , name : '热门推荐' }, { id : 'bbb' , name : '手机数码' }, { id : 'ccc' , name : '家用家电' }, { id : 'ddd' , name : '电脑办公' }, ] } }, methods : { btnClick (item ) { this .$emit('itemclick' , item) } }, }; const app = new Vue ({ el : "#app" , data ( return { } }, methods : { cpnClcik (item ) { console .log ('cpnClick' +item.name ); } }, components : { cpn }, }) </script >
1.在子组件中定义一个方法btnClick(item),使用$emit,’itemclick’是事件名,item是传过去的值。
1 2 3 4 5 methods : { btnClick (item ) { this .$emit('itemclick' , item) } },
2.在子组件中监听点击事件并回调此方法
1 2 3 <div > <button v-for ="(item, index) in categoties" :key ="index" @click ="btnClick(item)" > {{item.name}}</button > </div >
3.在父组件中定义一个方法cpnClcik(item)
1 2 3 4 5 methods : { cpnClcik (item ) { console .log ('cpnClick' +item.name ); } },
4.并在父组件(vue实例)中调用<cpn @itemclick="cpnClcik"></cpn>(不写参数默认传递btnClick的item ),父组件监听事件名为itemclick的子组件传过来的事件。
1 <cpn @itemclick ="cpnClcik" > </cpn >
8.3 父子组件通信案例 实现父子组件的值双向绑定。
1 2 3 4 5 6 7 8 9 10 11 12 13 14 15 16 17 18 19 20 21 22 23 24 25 26 27 28 29 30 31 32 33 34 35 36 37 38 39 40 41 42 43 44 45 46 47 48 49 50 51 52 53 54 55 56 57 58 59 60 61 62 63 64 65 66 67 68 69 70 71 72 73 74 75 76 77 78 79 80 81 82 83 84 85 86 87 88 89 <!DOCTYPE html > <html lang ="en" > <head > <meta charset ="UTF-8" > <meta name ="viewport" content ="width=device-width, initial-scale=1.0" > <meta http-equiv ="X-UA-Compatible" content ="ie=edge" > <title > 组件通信-父子通信案例</title > </head > <body > <div id ="app" > <h2 > 子组件</h2 > <cpn :number1 ='num1' :number2 ='num2' @num1change ="num1Change" @num2change ="num2Change" > </cpn > <h2 > --------------</h2 > <h2 > 父组件{{num1}}</h2 > <input type ="text" v-model ="num1" > <h2 > 父组件{{num2}}</h2 > <input type ="text" v-model ="num2" > </div > <template id ="cpn" > <div > <h2 > number1:{{number1}}</h2 > <h2 > dnumber1:{{dnumber1}}</h2 > <input type ="text" :value ="dnumber1" @input ="num1input" > <h2 > number2:{{number2}}</h2 > <h2 > dnumber2:{{dnumber2}}</h2 > <input type ="text" :value ="dnumber2" @input ="num2input" > </div > </template > <script src ="../js/vue.js" > </script > <script > const cpn = { template : "#cpn" , data ( return { dnumber1 :this .number1 , dnumber2 :this .number2 } }, props :{ number1 :[Number ,String ], number2 :[Number ,String ], }, methods : { num1input (event ){ this .dnumber1 = event.target .value this .$emit('num1change' ,this .dnumber1 ) }, num2input (event ){ this .dnumber2 = event.target .value this .$emit('num2change' ,this .dnumber2 ) } }, }; const app = new Vue ({ el : "#app" , data : { num1 :1 , num2 :2 }, methods : { num1Change (value ){ this .num1 =value }, num2Change (value ){ this .num1 =value } }, components : { cpn }, }) </script > </body > </html >
使用watch实现。
1 2 3 4 5 6 7 8 9 10 11 12 13 14 15 16 17 18 19 20 21 22 23 24 25 26 27 28 29 30 31 32 33 34 35 36 37 38 39 40 41 42 43 44 45 46 47 48 49 50 51 52 53 54 55 56 57 58 59 60 61 62 63 64 65 66 67 68 69 70 71 72 73 74 75 76 77 78 79 80 81 82 83 84 85 <!DOCTYPE html > <html lang ="en" > <head > <meta charset ="UTF-8" > <meta name ="viewport" content ="width=device-width, initial-scale=1.0" > <meta http-equiv ="X-UA-Compatible" content ="ie=edge" > <title > 组件通信-父子通信案例(watch实现)</title > </head > <body > <div id ="app" > <cpn :number1 ='num1' :number2 ='num2' @num1change ="num1Change" @num2change ="num2Change" > </cpn > <h2 > 父组件{{num1}}</h2 > <input type ="text" v-model ="num1" > <h2 > 父组件{{num2}}</h2 > <input type ="text" v-model ="num2" > </div > <template id ="cpn" > <div > <h2 > {{number1}}</h2 > <input type ="text" v-model ="dnumber1" > <h2 > {{number2}}</h2 > <input type ="text" v-model ="dnumber2" > </div > </template > <script src ="../js/vue.js" > </script > <script > const cpn = { template : "#cpn" , data ( return { dnumber1 :this .number1 , dnumber2 :this .number2 } }, props :{ number1 :[Number ,String ], number2 :[Number ,String ], }, watch : { dnumber1 (newValue ){ this .dnumber1 = newValue * 100 this .$emit('num1change' ,newValue) }, dnumber2 (newValue ){ this .dnumber1 = newValue * 100 this .$emit('num2change' ,newValue) } }, }; const app = new Vue ({ el : "#app" , data ( return { num1 :1 , num2 :2 , } }, methods : { num1Change (value ){ this .num1 =value }, num2Change (value ){ this .num1 =value } }, components : { cpn }, }) </script > </body > </html >
9. 父访问子(children-ref) 父组件访问子组件,有时候需要直接操作子组件的方法,或是属性,此时需要用到$children和$ref。
1 2 3 4 5 6 7 8 9 10 11 12 13 14 15 16 17 18 19 20 21 22 23 24 25 26 27 28 29 30 31 32 33 34 35 36 37 38 39 40 41 42 43 44 45 46 47 48 49 50 51 52 <div id ="app" > <cpn > </cpn > <cpn > </cpn > <cpn ref ="aaa" > </cpn > <button @click ="btnClick" > 按钮</button > </div > <template id ="cpn" > <div > 我是子组件 </div > </template > <script src ="../js/vue.js" > </script > <script > const cpn = { template : "#cpn" , data ( return { name :"我是子组件的name" } }, methods : { showMessage ( console .log ("showMessage" ); } }, }; const app = new Vue ({ el : "#app" , data ( return { message :"hello" } }, methods : { btnClick ( console .log (this .$refs .aaa .name ) } }, components : { cpn }, }) </script >
$children方式
1 2 3 4 5 6 console .log (this .$children [0 ].showMessage )for (let cpn of this .$children ) { console .log (cpn.showMessage ) }
使用this.$children直接获取当前实例的直接子组件,需要注意 $children 并不保证顺序,也不是响应式的。 如果你发现自己正在尝试使用 $children 来进行数据绑定,考虑使用一个数组配合 v-for 来生成子组件,并且使用 Array 作为真正的来源。
$refs方式
先定义子组件
直接调用
1. slot-插槽的基本使用 我们在使用组件的时候有时候希望,在组件内部定制化内容,例如京东这样。
这两个都是导航栏,组件的思想是可以复用的,把这个导航栏看做一个组件。
这个组件都可以分成三个部分,左边中间右边,如果可以分割组件,就可以定制化组件内容了。
1 2 3 4 5 6 7 8 9 10 11 12 13 14 15 16 17 18 19 20 21 22 23 24 25 26 27 28 29 30 31 32 33 34 35 36 37 38 39 40 41 42 43 44 45 46 47 48 49 50 <div id ="app" > <cpn > </cpn > <cpn > <span style ="color:red;" > 这是插槽内容222</span > </cpn > <cpn > <i style ="color:red;" > 这是插槽内容333</i > </cpn > <cpn > </cpn > </div > <template id ="cpn" > <div > <div > {{message}} </div > <slot > <button > button</button > </slot > </div > </template > <script src ="../js/vue.js" > </script > <script > const cpn = { template : "#cpn" , data ( return { message : "我是子组件" } }, } const app = new Vue ({ el : "#app" , data ( return { message : "我是父组件消息" } }, components : { cpn }, }) </script >
简单使用插槽,定义template时候使用slot
1 2 3 4 5 6 7 8 9 10 <template id ="cpn" > <div > <div > {{message}} </div > <slot > <button > button</button > </slot > </div > </template >
插槽可以使用默认值,<button>button</button>就是插槽的默认值。
1 2 <cpn > </cpn > <cpn > <span style ="color:red;" > 这是插槽内容222</span > </cpn >
使用插槽,<span style="color:red;">这是插槽内容222</span>将替换插槽的默认值
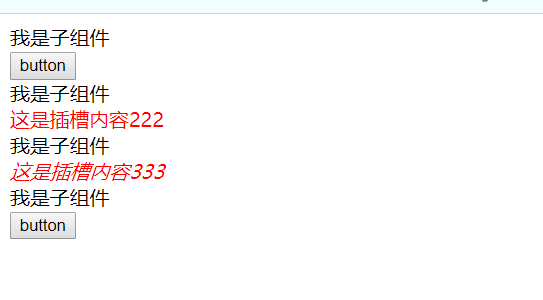
上述代码结果如图所示
替换了两次插槽,两次未替换显示默认的button。
如果想实现组件分成三部分就可以使用三个<slot></slot>来填充插槽了。
2. slot-具名插槽的使用 具名插槽,就是可以让插槽按指定的顺序填充,而没有具名的插槽是按照你填充的顺序排列的,而具名插槽可以自定义排列。
1 2 3 4 5 6 7 8 9 10 11 12 13 14 15 16 17 18 19 20 21 22 23 24 25 26 27 28 29 30 31 32 33 34 35 36 37 38 39 40 41 42 43 44 45 46 47 48 49 50 51 52 53 <div id ="app" > <cpn > <span > 具名插槽</span > <span slot ="left" > 这是左边具名插槽</span > <template v-slot:center > 这是中间具名插槽</template > <template #right > 这是右边具名插槽</template > </cpn > </div > <template id ="cpn" > <div > <slot name ="left" > 左边</slot > <slot name ="center" > 中间</slot > <slot name ="right" > 右边</slot > <slot > 没有具名的插槽</slot > </div > </template > <script src ="../js/vue.js" > </script > <script > const cpn = { template : "#cpn" , data ( return { message : "我是子组件" } }, } const app = new Vue ({ el : "#app" , data ( return { message : "我是父组件消息" } }, components : { cpn }, }) </script >
如图所示
没有具名的插槽排在最后,因为在定义组件的时候,排在了最后,如果有多个按顺序排列。具名插槽按照自定义的顺序排列。
定义具名插槽,使用name属性,给插槽定义一个名字。
1 2 3 4 5 6 7 8 9 10 <template id ="cpn" > <div > <slot name ="left" > 左边</slot > <slot name ="center" > 中间</slot > <slot name ="right" > 右边</slot > <slot > 没有具名的插槽</slot > </div > </template >
使用具名插槽,在自定义组件标签内使用slot="left",插入指定插槽
1 2 3 4 5 6 7 8 9 10 11 <div id ="app" > <cpn > <span > 具名插槽</span > <span slot ="left" > 这是左边具名插槽</span > <template v-slot:center > 这是中间具名插槽</template > <template #right > 这是右边具名插槽</template > </cpn > </div >
注意:此处有是三种写法,获取指定插槽。
3. 编译的作用域 前面说过组件都有自己的作用域,自己组件的作用在自己组件内。
1 2 3 4 5 6 7 8 9 10 11 12 13 14 15 16 17 18 19 20 21 22 23 24 25 26 27 28 29 30 31 32 33 34 35 36 37 38 39 40 41 42 43 44 45 46 47 48 49 50 51 52 <!DOCTYPE html > <html lang ="en" > <head > <meta charset ="UTF-8" > <meta name ="viewport" content ="width=device-width, initial-scale=1.0" > <meta http-equiv ="X-UA-Compatible" content ="ie=edge" > <title > 编译的作用域</title > </head > <body > <div id ="app" > <cpn v-show ="isShow" > </cpn > </div > <template id ="cpn" > <div > <h2 > 我是子组件</h2 > <p > 哈哈哈</p > <button v-show ="isShow" > </button > </div > </template > <script src ="../js/vue.js" > </script > <script > const cpn = { template : "#cpn" , data ( return { isShwo :false } }, } const app = new Vue ({ el : "#app" , data ( return { message : "我是父组件消息" , isShow :true } }, components : { cpn }, }) </script > </body > </html >
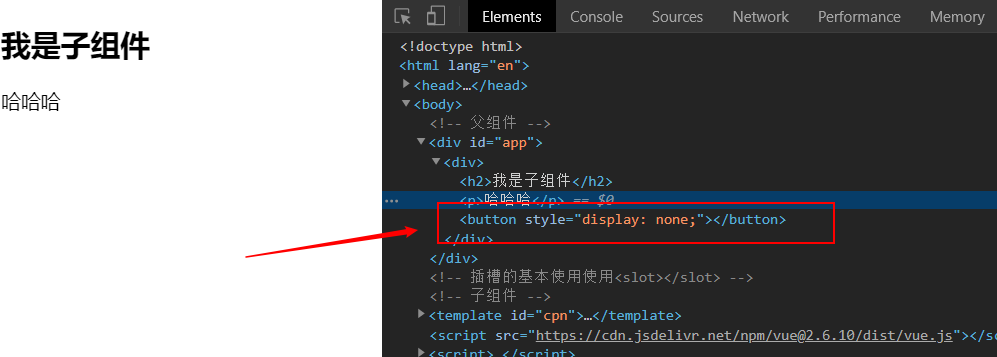
结果如下
子组件使用的是子组件的isShow,子组件为false,所以button没显示,被隐藏。
4. 作用域插槽案例 父组件替换插槽的标签,但是内容是由子组件来提供。
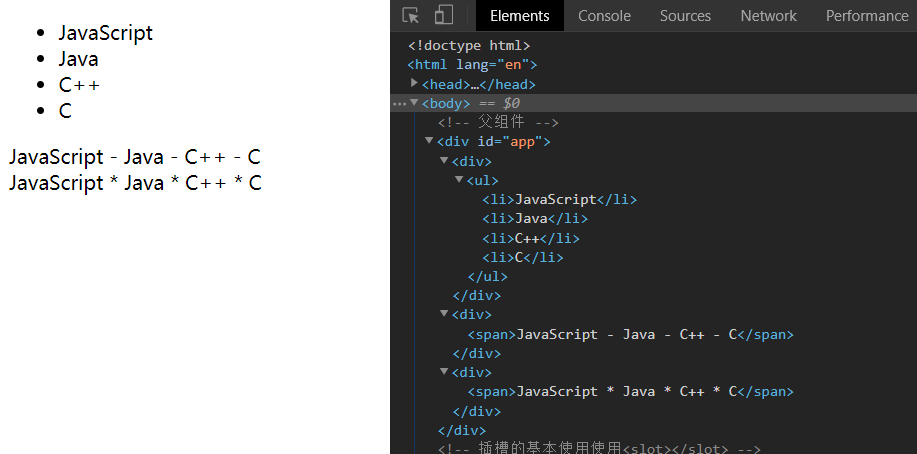
当组件需要在多个父组件多个界面展示的时候,将内容放在子组件插槽中,父组件只需要告诉子组件使用什么方式展示界面。
1 2 3 4 5 6 7 8 9 10 11 12 13 14 15 16 17 18 19 20 21 22 23 24 25 26 27 28 29 30 31 32 33 34 35 36 37 38 39 40 41 42 43 44 45 46 47 48 49 50 51 52 53 54 55 56 57 58 59 60 61 62 63 64 65 66 67 68 69 70 71 72 73 74 <!DOCTYPE html > <html lang ="en" > <head > <meta charset ="UTF-8" > <meta name ="viewport" content ="width=device-width, initial-scale=1.0" > <meta http-equiv ="X-UA-Compatible" content ="ie=edge" > <title > 作用域插槽案例</title > </head > <body > <div id ="app" > <cpn > </cpn > <cpn > <template slot-scope ="slot" > <span > {{slot.data.join(' - ')}}</span > </template > </cpn > <cpn > <template slot-scope ="slot" > <span > {{slot.data.join(' * ')}}</span > </template > </cpn > </div > <template id ="cpn" > <div > <slot :data ="pLanguage" > <ul > <li v-for ="(item, index) in pLanguage" :key ="index" > {{item}}</li > </ul > </slot > </div > </template > <script src ="../js/vue.js" > </script > <script > const cpn = { template : "#cpn" , data ( return { isShwo :false , pLanguage :['JavaScript' ,'Java' ,'C++' ,'C' ] } }, } const app = new Vue ({ el : "#app" , data ( return { isShow :true } }, components : { cpn }, }) </script > </body > </html >
组件中使用slot-scope="slot"(2.6.0已经废弃) 给插槽属性命名,在通过slot调用绑定在插槽上的属性。也可以使用v-slot="slot"。
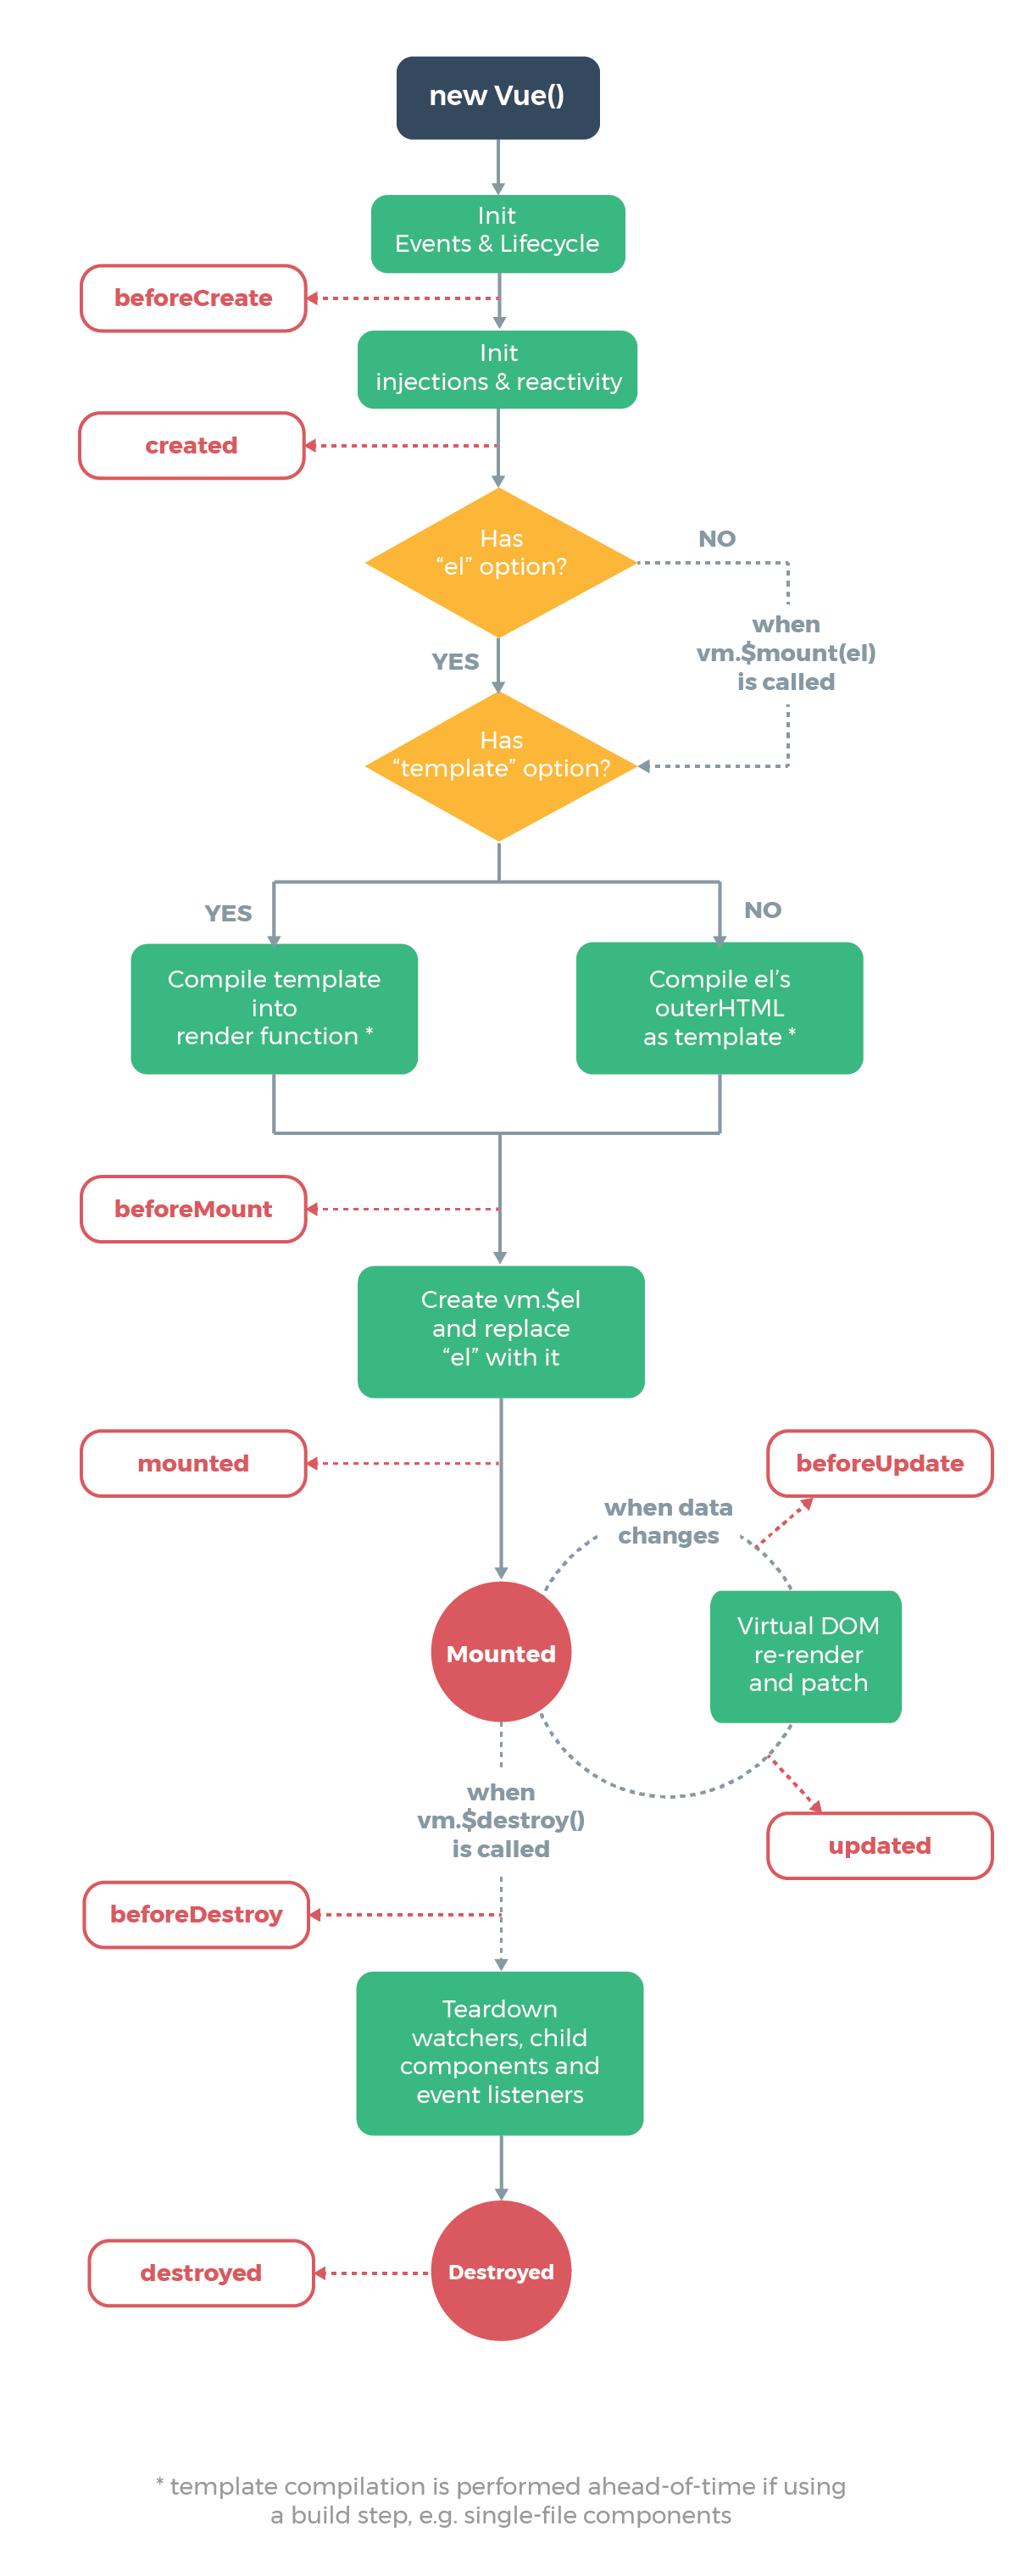
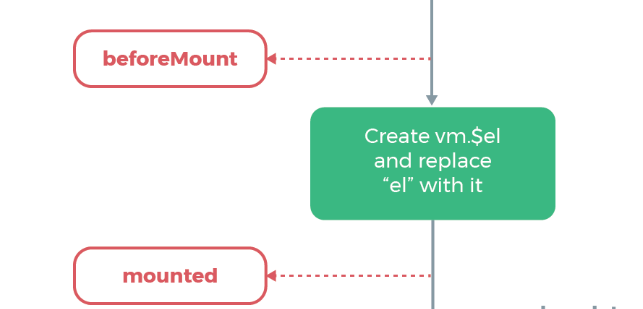
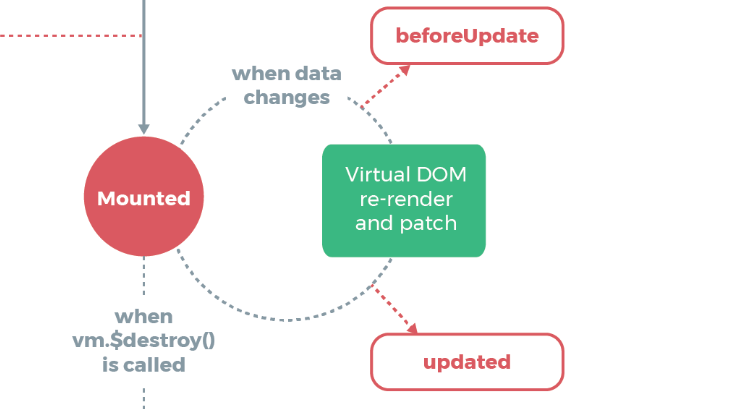
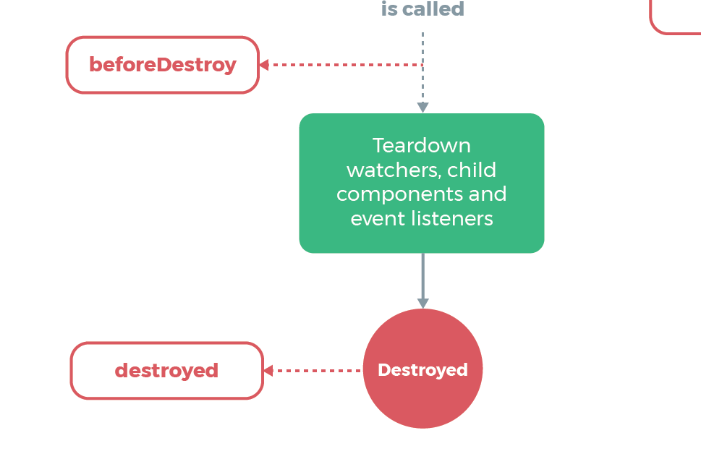
1. 生命周期图 Vue实例的生命周期中有多个状态。
测试代码
1 2 3 4 5 6 7 8 9 10 11 12 13 14 15 16 17 18 19 20 21 22 23 24 25 26 27 28 29 30 31 32 33 34 35 36 37 38 39 40 41 42 43 44 45 46 47 48 49 50 51 52 53 54 55 <!DOCTYPE html > <html lang ="en" > <head > <meta charset ="UTF-8" > <title > Vue实例的生命周期</title > </head > <body > <div id ="app" > <h1 > 测试生命周期</h1 > <div > {{msg}}</div > <hr > <h3 > 测试beforeUpdate和update两个钩子函数</h3 > <button @click ="handlerUpdate" > 更新数据</button > </div > <script src ="../js/vue.js" > </script > <script > const app = new Vue ({ el : '#app' , data : { msg : "12345" }, methods : { handlerUpdate ( this .msg =this .msg .split ("" ).reverse ().join ("" ) } }, beforeCreate ( console .log ("调用了beforeCreate钩子函数" ); }, created ( console .log ("调用了created钩子函数" ); }, beforeMount ( console .log ('调用了beforeMount钩子函数' ); }, mounted ( console .log ('调用了mounted钩子函数' ); }, beforeUpdate ( console .log ("调用了beforeUpdate钩子函数" ) }, updated ( console .log ("调用了updated钩子函数" ); }, beforeDestroy ( console .log ("调用了beforeDestroy钩子函数" ); }, destroyed ( console .log ("调用了destroyed钩子函数" ); } }) </script > </body > </html >
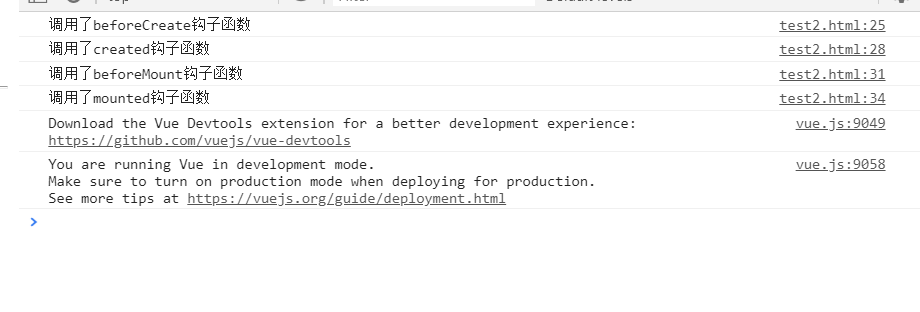
如图所示:
初始化页面依次调用了:
调用了beforeCreate钩子函数
调用了created钩子函数
调用了beforeMount钩子函数
调用了mounted钩子函数
点击更新数据后:
12345变成了54321,此时调用了:
调用了beforeUpdate钩子函数
调用了updated钩子函数
打开F12控制台app.$destroy()主动销毁Vue实例调用:
调用了beforeDestroy钩子函数
调用了destroyed钩子函数
2. 再探究 2.1 beforeCreate之前 初始化钩子函数和生命周期
2.2 beforeCreate和created钩子函数间的生命周期 在beforeCreate和created之间,进行数据观测(data observer) ,也就是在这个时候开始监控data中的数据变化了,同时初始化事件。
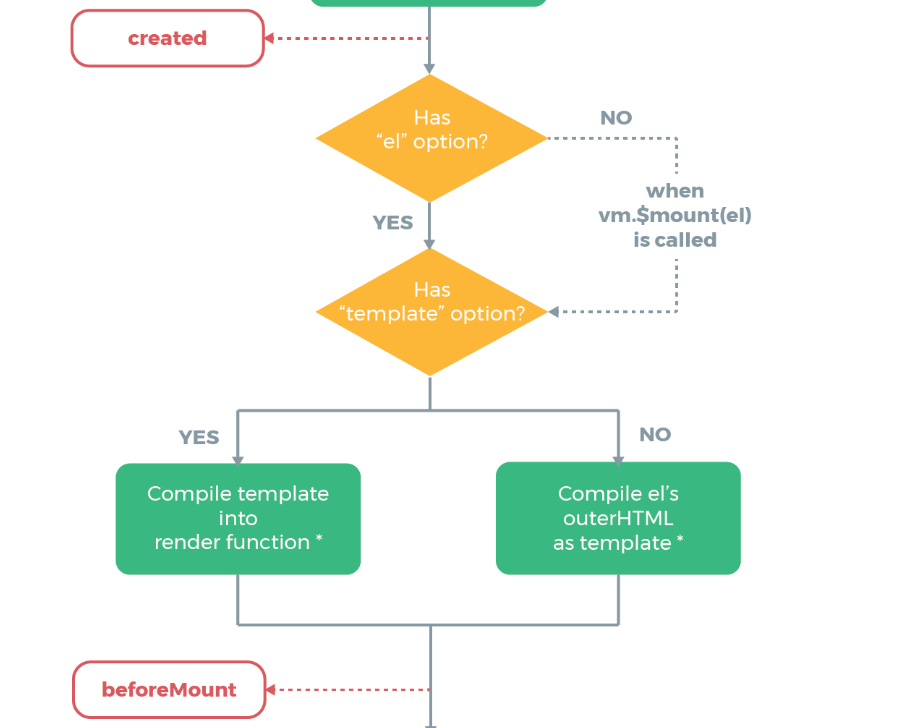
2.3 created钩子函数和beforeMount间的生命周期 对于created钩子函数和beforeMount有判断:
2.3.1 el选项对生命周期影响
有el选项
1 2 3 4 5 6 7 8 9 10 11 12 13 14 15 new Vue ({ el : '#app' , beforeCreate : function ( console .log ('调用了beforeCreat钩子函数' ) }, created : function ( console .log ('调用了created钩子函数' ) }, beforeMount : function ( console .log ('调用了beforeMount钩子函数' ) }, mounted : function ( console .log ('调用了mounted钩子函数' ) } })
结果:
无el选项
1 2 3 4 5 6 7 8 9 10 11 12 13 14 new Vue ({ beforeCreate : function ( console .log ('调用了beforeCreat钩子函数' ) }, created : function ( console .log ('调用了created钩子函数' ) }, beforeMount : function ( console .log ('调用了beforeMount钩子函数' ) }, mounted : function ( console .log ('调用了mounted钩子函数' ) } })
结果:
证明没有el选项,则停止编译,也意味着暂时停止了生命周期。生命周期到created钩子函数就结束了。而当我们不加el选项,但是手动执行vm.$mount(el)方法的话,也能够使暂停的生命周期进行下去,例如:
1 2 3 4 5 6 7 8 9 10 11 12 13 14 15 var app = new Vue ({ beforeCreate : function ( console .log ('调用了beforeCreat钩子函数' ) }, created : function ( console .log ('调用了created钩子函数' ) }, beforeMount : function ( console .log ('调用了beforeMount钩子函数' ) }, mounted : function ( console .log ('调用了mounted钩子函数' ) } }) app.$mount('#app' )
结果:
2.3.2 template
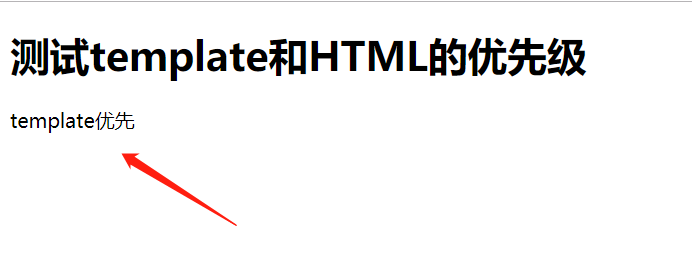
同时使用template和HTML,查看优先级:
1 2 3 4 5 6 7 8 9 10 11 12 13 <h1 > 测试template和HTML的优先级</h1 > <div id ="app" > <p > HTML优先</p > </div > <script > var app = new Vue ({ el :"#app" , data :{ msg :"template优先" }, template :"<p>{{msg}}</p>" , }); </script >
结果:
结论
如果Vue实例对象中有template参数选项,则将其作为模板编译成render函数
如果没有template参数选项,则将外部的HTML作为模板编译(template),也就是说,template参数选项的优先级要比外部的HTML高
如果1,2条件都不具备,则报错
注意
Vue需要通过el去找对应的template,Vue实例通过el的参数,首先找自己有没有template,如果没有再去找外部的html,找到后将其编译成render函数。
也可以直接调用render 选项,优先级:render函数选项 > template参数 > 外部HTML。
1 2 3 4 5 6 new Vue ({ el : '#app' , render (createElement) { return (....) } })
2.4 beforeMount和mounted钩子函数间的生命周期
beforeMount
载入前(完成了data和el数据初始化),但是页面中的内容还是vue中的占位符,data中的message信息没有被挂在到Dom节点中,在这里可以在渲染前最后一次更改数据的机会,不会触发其他的钩子函数,一般可以在这里做初始数据的获取。
Mount
载入后html已经渲染(ajax请求可以放在这个函数中),把vue实例中的data里的message挂载到DOM节点中去
这里两个钩子函数间是载入数据。
2.5 beforeUpdate钩子函数和updated钩子函数间的生命周期
在Vue中,修改数据会导致重新渲染,依次调用beforeUpdate钩子函数和updated钩子函数
如果待修改的数据没有载入模板中,不会调用这里两个钩子函数
1 2 3 4 5 6 7 8 9 10 11 12 13 14 var app = new Vue ({ el : '#app' , data : { msg : 1 }, template : '<div id="app"><p></p></div>' , beforeUpdate : function ( console .log ('调用了beforeUpdate钩子函数' ) }, updated : function ( console .log ('调用了updated钩子函数' ) } }) app.msg = 2
结果:
1 2 3 4 5 6 7 8 9 10 11 12 13 14 15 16 17 18 19 <h1>测试有数据绑定修改数据,钩子函数调用情况</h1> <div id ="app" > </div > <script > var app = new Vue ({ el :"#app" , template :"<p>{{msg}}</p>" , data :{ msg :"原数据" }, beforeUpdate : function ( console .log ("调用了beforeUpdate钩子函数" ) }, updated : function ( console .log ("调用了updated钩子函数" ); }, }); app.msg = "数据被修改了" ; </script >
结果:
注意只有写入模板的数据才会被追踪
2.6 beforeDestroy和destroyed钩子函数间的生命周期
2.6.1 beforeDestroy 销毁前执行($destroy方法被调用的时候就会执行),一般在这里善后:清除计时器、清除非指令绑定的事件等等…’)
2.6.2 destroyed 销毁后 (Dom元素存在,只是不再受vue控制),卸载watcher,事件监听,子组件
总结
beforecreate : 可以在这加个loading事件
created :在这结束loading,还做一些初始数据的获取,实现函数自-执行
mounted : 在这发起后端请求,拿回数据,配合路由钩子做一些事情
beforeDestroy: 你确认删除XX吗?
destroyed :当前组件已被删除,清空相关内容
1. 为什么要模块化 随着前端项目越来越大,团队人数越来越多,多人协调开发一个项目成为常态。例如现在小明和小张共同开发一个项目,小明定义一个aaa.js,小张定义了一个bbb.js。
aaa.js
1 2 3 4 5 6 7 8 9 10 11 var name = '小明' var age = 22 function sum (num1, num2 ) { return num1 + num2 } var flag = true if (flag) { console .log (sum (10 , 20 )); }
此时小明的sum是没有问题的。
bbb.js
1 2 3 var name = "小红" var flag = false
此时小明和小红各自用各自的flag你变量没问题。
但是此时小明又创建了一个mmm.js
1 2 3 4 if (flag){ console .log ("flag是true" ) }
在index.html页面导入这些js文件
1 2 3 <script src="aaa.js" ></script> <script src="bbb.js" ></script> <script src="ccc.js" ></script>
此时小明知道自己在aaa.js中定义的flag是true,认为打印没有问题,但是不知道小红的bbb.js中也定义了flag为true,所以mmm.js文件并没有打印出“flag是true”。
这就是全局变量同名问题。
2. 使用导出全局变量模块解决全局变量同名问题
aaa.js
1 2 3 4 5 6 7 8 9 10 11 12 13 14 15 16 17 var moduleA = (function (param ) { var obj = {} var name = '小明' var age = 22 function sum (num1, num2 ) { return num1 + num2 } var flag = true if (flag) { console .log (sum (10 , 20 )) } obj.flag =false return obj })()
mmm.js
1 2 3 4 5 if (moduleA.flag ){ console .log ("flag是true" ) }
这样直接使用aaa.js导出的moduleA变量获取小明自己定义的flag。
3. CommonJS的模块化实现 CommonJS需要nodeJS的依支持。
aaa.js
1 2 3 4 5 6 7 8 9 10 11 12 13 14 15 16 17 18 19 20 var name = '小明' var age = 22 function sum (num1, num2 ) { return num1 + num2 } var flag = true if (flag) { console .log (sum (10 , 20 )) } module .exports = { flag, sum }
使用module.exports = {}导出需要的对象。
mmm.js
1 2 3 4 5 6 7 8 var {flag,sum} = require ("./aaa" )console .log (sum (10 ,20 ));if (flag){ console .log ("flag is true" ); }
使用 var {flag,sum} = require("./aaa")获取已经导出的对象中自己所需要的对象。
4. ES6的模块化实现 如何实现模块化,在html中需要使用type='module'属性。
1 2 3 <script src ="aaa.js" type ="module" > </script > <script src ="bbb.js" type ="module" > </script > <script src ="mmm.js" type ="module" > </script >
此时表示aaa.js是一个单独的模块,此模块是有作用域的。如果要使用aaa.js内的变量,需要在aaa.js中先导出变量,再在需要使用的地方导出变量。
4.1 直接导出
使用
1 2 import {name} from './aaa.js' console .log (name)
./aaa.js表示aaa.js和mmm.js在同级目录。
如图打印结果。
4.2 统一导出 1 2 3 4 5 6 7 8 9 10 11 12 var age = 22 function sum (num1, num2 ) { return num1 + num2 } var flag = true if (flag) { console .log (sum (10 , 20 )) } export { flag,sum,age }
使用import {name,flag,sum} from './aaa.js'导入多个变量
1 2 3 4 5 6 7 8 9 import {name,flag,sum} from './aaa.js' console .log (name)if (flag){ console .log ("小明是天才" ); } console .log (sum (20 ,30 ));
使用{}将需要的变量放置进去
4.3 导出函数/类
在aaa.js中添加
1 2 3 4 5 6 7 8 9 export function say (value ) { console .log (value); } export class Person { run ( console .log ("奔跑" ); } }
在mmm.js中添加
1 2 3 4 5 6 7 8 9 10 11 12 13 import {name,flag,sum,say,Person } from './aaa.js' console .log (name)if (flag){ console .log ("小明是天才" ); } console .log (sum (20 ,30 ));say ('hello' )const p = new Person ();p.run ();
如图
4.4 默认导入 export default
导出
1 2 3 export default { flag,sum,age }
导入
1 2 3 import aaa from './aaa.js' console .log (aaa.sum (10 ,110 ));
注意:使用默认导出会将所有需要导出的变量打包成一个对象,此时导出一个对象,此时我在mmm.js中导入变量时候命名为aaa,如果要调用变量需要使用aaa.变量。
4.5 统一全部导入
使用import * as aaa from './aaa.js'统一全部导入
1 2 3 4 import * as aaa from './aaa.js' console .log (aaa.flag );console .log (aaa.name );
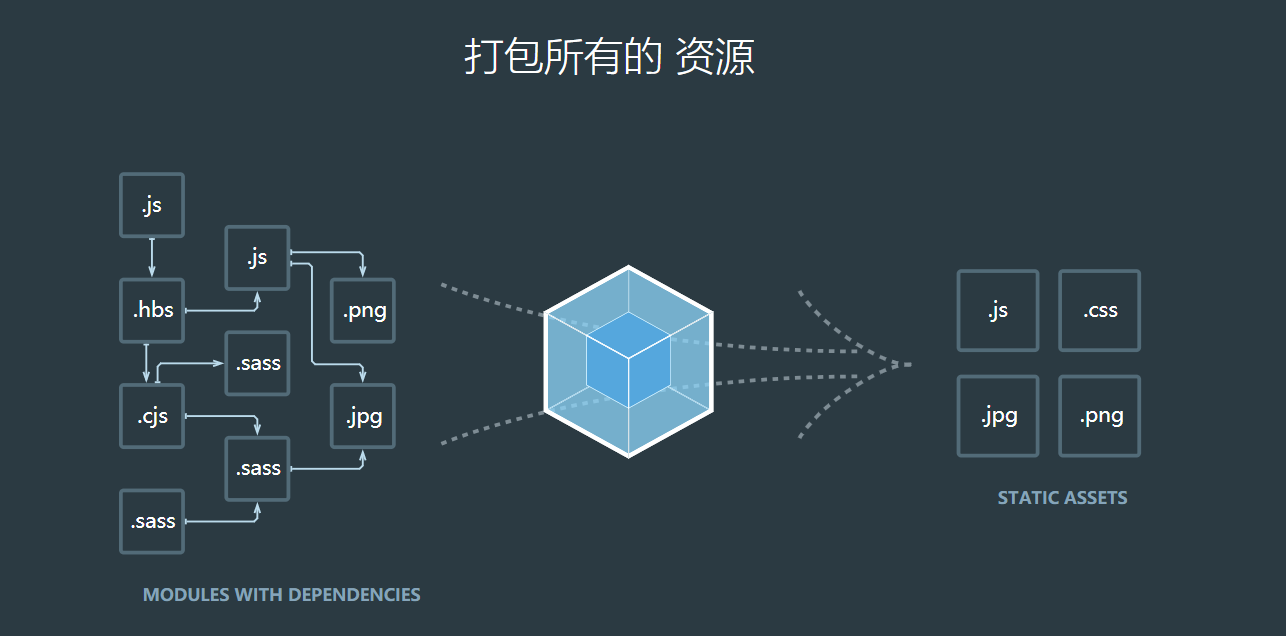
1. webpack起步 1.1 什么是webpack webpack是一个JavaScript应用的静态模块打包工具。
从这句话中有两个要点,模块 和打包 需要关注。grunt/gulp 都可以打包,那有什么区别。
模块化
webpack可以支持前端模块化的一些方案,例如AMD、CMD、CommonJS、ES6。可以处理模块之间的依赖关系。不仅仅是js文件可以模块化,图片、css、json文件等等都可以模块化。
打包
webpack可以将模块资源打包成一个或者多个包,并且在打包过程中可以处理资源,例如压缩图片,将scss转成css,ES6语法转成ES5语法,将TypeScript转成JavaScript等等操作。grunt/gulp 也可以打包。
和grunt/glup的对比
grunt/glup的核心是Task
我们可以配置一系列的task,并且定义task要处理的事务(例如ES6/TS转化,图片压缩,scss转css)
之后可以让grunt/glup来依次执行这些任务,让整个流程自动化
所以grunt/glup也被称为前端自动化任务管理工具
看一个gulp例子
task将src下的js文件转化为ES5语法
并输入到dist文件夹中
1 2 3 4 5 6 7 8 9 const gulp = require ('gulp' ) const babel = require ('gulp-babel' ) gulp.task ('js' ()=> gulp.src ('src/*.js' ) .pipe (babel ({ presets :['es2015' ] })) .pipe (gulp.dest ('dist' )) );
什么时候使用grunt/gulp呢?
如果工程依赖简单,甚至没有模块化
只需要进行简单的合并/压缩
如果模块复杂,相互依赖性强,我们需要使用webpack
grunt/glup和webpack区别
grunt/glup更加强调的是前端自动化流程,模块化不是其核心
webpack加强模块化开发管理,而文件压缩/合并/预处理等功能,是附带功能
webpack就是前端模块化打包工具
1.2 webpack的安装
webpack依赖node环境。
node环境依赖众多包,所以需要npm,npm(node packages manager)node包管理工具
nvm是node管理工具可以自由切换node环境版本
全局安装webpack
由于vue-cli2基于webpack3.6.0npm install [email protected] -g
局部安装
1 npm install webpack --save-dev
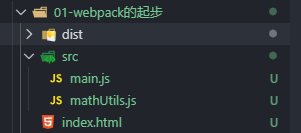
1.3 起步 新建一个文件夹,新建如下结构的目录:
目录结构
如图所示在src文件夹(源码文件夹),dist(要发布的文件,已经处理过的)。
1.新建入口js文件main.js和mathUtils.js,main.js依赖mathUtils.js。
mathUtils
1 2 3 4 5 6 7 8 9 10 function add (num1,num2 ) { return num1+num2 } function mul (num1,num2 ) { return num1*num2 } module .exports = { add,mul }
main.js
1 2 3 4 5 const {add,mul} = require ("./mathUtils.js" )console .log (add (10 ,20 ))console .log (mul (10 ,10 ))
2.使用webpack命令打包js文件
注意:webpack3使用webpack ./src/main.js ./dist/bundle.js
webpack4,webpack打包在01-webpack的起步目录下打开终端 webpack ./scr/main.js -o ./dist/bundle.js
我全局安装的是webpack@3.6.0 ,所以在根路径执行
如图显示打包成功,查看dist文件夹下自动生成了一个bundle.js。
bundle.js
1 2 3 4 5 6 7 8 9 10 11 12 13 14 15 16 17 18 19 20 21 const {add,mul} = __webpack_require__ (1 )console .log (add (10 ,20 ))console .log (mul (10 ,10 )) }), (function (module , exports function add (num1,num2 ) { return num1+num2 } function mul (num1,num2 ) { return num1*num2 } module .exports = { add,mul }
内容很多,其中包含mathUtils.js和main.js 内容,打包成功。
3.新建一个index.html文件,导入bundle.js 1 2 3 4 5 6 7 8 9 10 11 12 13 14 <!DOCTYPE html > <html lang ="en" > <head > <meta charset ="UTF-8" > <meta name ="viewport" content ="width=device-width, initial-scale=1.0" > <meta http-equiv ="X-UA-Compatible" content ="ie=edge" > <title > webpack入门</title > </head > <body > <script src ="./dist/bundle.js" > </script > </body > </html >
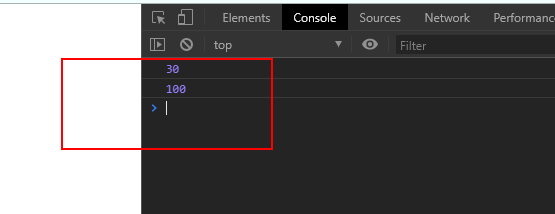
如图测试,打印成功。
4.新建一个info.js使用ES6的语法导出
info.js
1 2 3 4 5 export default { name :'zzz' , age :24 , }
main.js导入info.js
1 2 3 4 5 import info from './info.js' console .log (info.name )console .log (info.age )
再次使用webpack ./src/main.js ./dist/bundle.js,重新打包
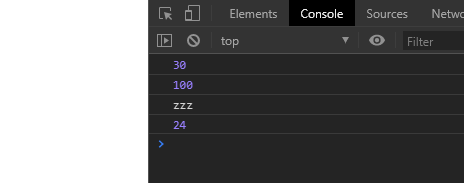
5.打开index.html测试
总结
webpack可以帮我们打包js文件,只要指定入口文件(main.js)和输出的文件(bundle.js),不管是es6的模块化还是CommonJs的模块化,webpack都可以帮我们打包,还可以帮我们处理模块之间的依赖。
2. webpack的配置 2.1 基本配置 如果每次都用webpack命令自己写入口文件和出口文件会很麻烦,此时我们可以使用webpack的配置。
准备工作:复制01-webpack的起步 文件夹并粘贴在同级目录,改名为02-webpack的配置 。
1.在根目录下新建一个webpack.config.js
webpack.config.js
1 2 3 4 5 6 7 8 9 10 11 const path = require ('path' )module .exports = { entry : './src/main.js' , output :{ path : path.resolve (__dirname, 'dist' ), filename : 'bundle.js' } }
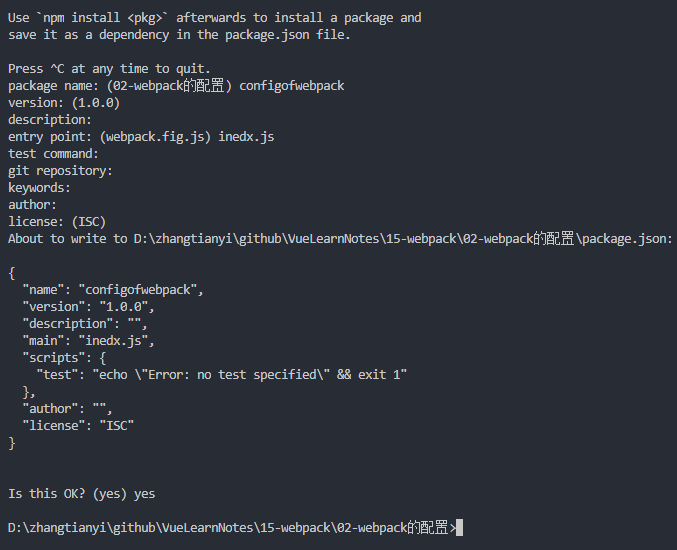
2.在根目录执行npm init初始化node包,因为配置文件中用到了node的path包 初始化
3.使用webpack打包
这样入口和出口的配置已经配置完成了,只需要使用webpack命令就行了。
4.使用自定义脚本(script)启动 一般来是我们使用的是
1 2 npm run dev//开发环境 npm run build//生产环境
在package.json中的script中加上
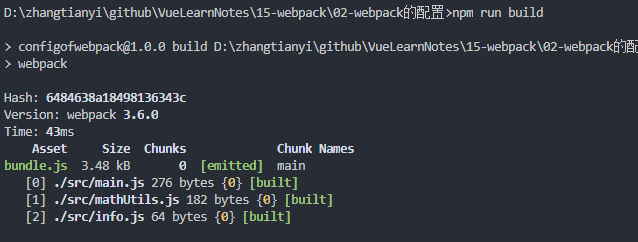
使用npm run build
2.2 全局安装和局部安装 webpack有全局安装和局部安装。
局部安装
使用npm run build执行webpack会先从本地查找是否有webpack,如果没有会使用全局的。
此时本地需要安装webapck
package.json中自动加上开发时的依赖devDependencies
再次使用npm run build,使用的是本地webpack版本。
3. webpack的loader 3.1 什么是loader loader是webpack中一个非常核心的概念。
webpack可以将js、图片、css处理打包,但是对于webpack本身是不能处理css、图片、ES6转ES5等。
此时就需要webpack的扩展,使用对应的loader就可以。
loader使用
步骤一:通过npm安装需要使用的loader
步骤二:通过webpack.config.js中的modules关键字下进行配置
大部分loader可以在webpack的官网找到对应的配置。
3.2 CSS文件处理
准备工作:复制02-webpack的配置到根目录,改名字为03-webpack的loader
1.将除了入口文件(main.js)所有js文件放在js文件夹,新建一个css文件夹,新建一个normal.css文件
normal.css
1 2 3 body { background-color : red; }
2.main.js导入依赖
1 2 require ('./css/normal.css' )
此时如果直接进行打包npm run build。
提示信息很清楚,打包到css文件时报错,提示我们可能需要一个loader来处理css文件。
3.安装css-loader
1 npm install --save-dev css-loader
4.使用css-loader
1 2 3 4 5 6 7 8 9 10 11 12 13 module .exports = { module : { rules : [ { test : /\.css$/ , use : [{ loader : 'css-loader' }] } ] } }
执行npm run build,提示打包成功,但是背景色并没有变红色,是因为css-loader只负责加载css文件,不负责解析,如果要将样式解析到dom元素中需要使用style-loader。
5.安装使用style-loader
1 npm install --save-dev style-loader
1 2 3 4 5 6 7 8 9 10 11 12 13 module : { rules : [ { test : /\.css$/ , use : [{ loader : 'style-loader' }, { loader : 'css-loader' }] } ] }
webpack使用多个loader是从右往左解析的,所以需要将css-loader放在style-loader右边,先加载后解析。
此时样式成加载解析到DOM元素上。
3.3 less文件处理 1.在css文件夹中新增一个less文件
special.less
1 2 3 4 5 6 @fontSize: 50px ;@fontColor: orange;body { font-size : @fontSize ; color : @fontColor ; }
2.main.js中导入less文件模块
1 2 3 4 require ('./css/special.less' )document .writeln ("hello,zzzz!" )
3.安装使用less-loader
1 npm install --save-dev less-loader less
在webpack.config.js中使用less-loader
1 2 3 4 5 6 7 8 9 10 11 12 13 14 15 module : { rules : [ { test : /\.less$/ , use : [{ loader : 'style-loader' }, { loader : 'css-loader' }, { loader : 'less-loader' }] } ] }
4.执行npm run build
less文件生效了,字体是orange,大小为50px。
3.4 图片文件的处理
准备工作,准备两张图片,图片大小为一张8KB以下(实际大小为5KB,名称为small.jpg),一张大于8KB(实际大小为10KB,名称为big.jpg),新建一个img文件夹将两张图片放入。
1.修改normal.css样式,先使用小图片作为背景
1 2 3 4 body { background : url ("../img/small.jpg" ); }
此时如果直接使用npm run build 直接打包会报错,因为css文件中引用了图片url,此时需要使用url-loader 。
2.安装使用url-loader处理图片
url-loader像 file loader 一样工作,但如果文件小于限制,可以返回 data URL 。
1 npm install --save-dev url-loader
配置
1 2 3 4 5 6 7 8 9 10 11 { test : /\.(png|jpg|gif)$/ , use : [ { loader : 'url-loader' , options : { limit : 8192 } } ] }
3.打包
使用npm run build打包后,打开index.html。
小于limit大小的图片地址被编译成base64格式的字符串。
此时修改css文件,使用big.jpg做背景。
1 2 3 4 5 body { background : url ("../img/big.jpg" ); }
再次打包,报错,提示未找到file-loader模块。
因为大于limit的图片需要file-loader来打包。
4.安装使用file-loader处理图片
1 npm install --save-dev file-loader
不需要配置,因为url-loader超过limit的图片会直接使用file-loader。
再次打包,没有报错,打包成功,但是图片未显示。
1.当加载的图片大小小于limit,使用base64将图片编译成字符串
2.当加载的图片大小大于limit,使用file-loader模块直接将big.jpg直接打包到dist文件家,文件名会使用hash值防止重复。
3.此时由于文件路径不对所以导致没有加载到图片
5.如何使用file-loader,指定路径
修改output属性
1 2 3 4 5 output :{ path : path.resolve (__dirname, 'dist' ), filename : 'bundle.js' , publicPath : 'dist/' },
此时打包,图片正常显示
注意:一般来说,index.html最终也会打包到dist文件夹下,所以,并不需要配置publicPath,如何打包index.html请看webpack处理.vue文件。
file-loader打包后,使用hash值做文件名太长,此时可以使用options的一些配置。
1 2 3 4 options : { limit : 8192 , name : 'img/[name].[hash:8].[ext]' }
修改options,加上name属性,其中img表示文件父目录,[name]表示文件名,[hash:8]表示将hash截取8位[ext]表示后缀
再次打包
3.5 ES6语法处理 webpack打包时候ES6语法没有打包成ES5语法,如果需要将ES6打包成ES5语法,那么就需要使用babel。直接使用babel对应的loader就可以了。
安装
1 npm install --save-dev babel-loader@7 babel-core babel-preset-es2015
配置
1 2 3 4 5 6 7 8 9 10 11 12 13 14 { test : /\.js$/ , exclude : /(node_modules|bower_components)/ , use : { loader : 'babel-loader' , options : { presets : ['es2015' ] } } }
1.如果要使用@babel/preset-env这里需要在根目录新建一个babel的文件
2.exclude排除不需要打包的文件
4. webpack的vue 4.1 简单安装使用vue 如果需要使用vue,必须使用npm先安装vue。
使用vue简单开发。
准备工作
复制03-webpack的loader到同级目录,改名为04-webpack的vue,并在04-webpack的vue根目录执行npm install vue --save ,下载安装vue。
1.在入口文件main.js导入已安装的vue,并在index.html声明要挂载的div。在main.js加入以下代码。
1 2 3 4 5 6 7 8 9 import Vue from 'vue' const app = new Vue ({ el : "#app" , data : { message : "hello webpack and vue" } })
修改index.html代码,添加
1 2 3 <div id ="app" > <h2 > {{message}}</h2 > </div >
2.再次打包npm run build后打开index.html
发现message并没有正确显示,打开console发现vue报错。错误提示我们,正在使用runtime-only构建,不能将template模板编译。
1.runtime-only模式,代码中不可以有任何template,因为无法解析。
2.runtime-complier模式,代码中可以有template,因为complier可以用于编译template。
在webpack中配置,设置指定使用runtime-complier模式。
webpack.config.js
1 2 3 4 5 6 7 resolve : { alias : { 'vue$' :'vue/dist/vue.esm.js' } }
3.重新打包,显示正确
4.2 如何分步抽取实现vue模块
创建vue的template和el关系
el表示挂载DOM的挂载点
template里面的html将替换挂载点
一般我们使用vue会开发单页面富应用(single page application),只有一个index.html,而且index.html都是简单结构。
1 2 3 4 5 6 7 8 9 10 11 12 13 14 <!DOCTYPE html > <html lang ="en" > <head > <meta charset ="UTF-8" > <meta name ="viewport" content ="width=device-width, initial-scale=1.0" > <meta http-equiv ="X-UA-Compatible" content ="ie=edge" > <title > webpack入门</title > </head > <body > <div id ="app" > </div > <script src ="./dist/bundle.js" > </script > </body > </html >
1.第一次抽取,使用template替换<div id="app"></div>。
修改mian.js的vue相关代码
1 2 3 4 5 6 7 8 9 10 11 12 13 14 15 16 17 18 19 20 21 22 import Vue from 'vue' new Vue ({ el : "#app" , template :` <div> <h2>{{message}}</h2> <button @click='btnClick'>这是一个按钮</button> <h2>{{name}}</h2> </div> ` , data : { message : "hello webpack and vue" , name : 'zzzz' }, methods : { btnClick ( console .log ("按钮被点击了" ) } }, })
使用template模板替换挂载的id为app的div元素,此时不需要修改html代码了,只需要写template。
再次打包,显示成功。
2.第二次抽取,使用组件化思想替换template
考虑第一次抽取,写在template中,main.js的vue代码太冗余。
修改main.js的代码
1 2 3 4 5 6 7 8 9 10 11 12 13 14 15 16 17 18 19 20 21 const App = { template : ` <div> <h2>{{message}}</h2> <button @click='btnClick'>这是一个按钮</button> <h2>{{name}}</h2> </div> ` , data ( return { message : "hello webpack and vue" , name : 'zzzz' } }, methods : { btnClick ( console .log ("按钮被点击了" ) } }, }
修改main.js,vue实例中注册组件,并使用组件
1 2 3 4 5 6 7 8 9 new Vue ({ el : "#app" , template : '<App/>' , components : { App } })
再次使用npm run build打包,打包成功,显示和使用template替换div一样。
3.第三次抽取组件对象,封装到新的js文件,并使用模块化导入main.js
此处我的vue-loader是15.7.2。
将其修改为13.0.0
重新安装版本
再次打包,打包成功,样式生效了。
6.组件化开发
我们使用app.vue分离了模板、行为、样式,但是不可能所有的模板和样式都在一个vue文件内,所以要用组件化。
在vue文件夹下新建一个Cpn.vue文件
Cpn.vue组件
1 2 3 4 5 6 7 8 9 10 11 12 13 14 15 16 17 18 19 20 21 22 <template> <div> <h2 class='title'>{{name}}</h2> </div> </template> <script type="text/ecmascript-6"> export default { name: "Cpn", data() { return { name: "组件名字是Cpn" }; } }; </script> <style scoped> .title { color: red; } </style>
将Cpn.vue组件导入到App.vue
1 2 3 4 5 6 7 8 9 10 11 12 13 14 15 16 17 18 19 20 21 22 23 24 25 26 27 28 29 30 31 32 33 34 35 <template> <div> <h2 class='title'>{{message}}</h2> <button @click="btnClick">按钮</button> <h2>{{name}}</h2> <!-- 使用Cpn组件 --> <Cpn/> </div> </template> <script type="text/ecmascript-6"> //导入Cpn组件 import Cpn from './Cpn.vue' export default { name: "App", data() { return { message: "hello webpack", name: "zzz" }; }, methods: { btnclick() {} }, components: { Cpn//注册Cpn组件 } }; </script> <style scoped> .title { color: green; } </style>
再次打包,打开index.html,cpn组件的内容显示
基于此,一个vue文件可以依赖导入很多vue文件,组成一个单页面富应用。
如果你在使用ES6语法导入模块时候想要简写的时候,例如这样省略.vue后缀
可以在webpack.config.js中配置:
1 2 3 4 5 6 7 8 9 resolve : { extensions : ['.js' , '.css' , '.vue' ], alias : { 'vue$' :'vue/dist/vue.esm.js' } }
5. webpack的plugin plugin插件用于扩展webpack的功能的扩展,例如打包时候优化,文件压缩。
loader和plugin的区别
loader主要用于转化某些类型的模块,是一个转化器。
plugin主要是对webpack的本身的扩展,是一个扩展器。
plugin的使用过程
步骤一:通过npm安装需要使用的plugins(某些webpack已经内置的插件不需要在安装)
步骤二:在webpack.config.js 中的plugins中配置插件。
准备工作
复制04-webpack的vue到同级目录,并改名为05-webpack的plugin
5.1 添加版权的Plugin BannerPlugin插件是属于webpack自带的插件可以添加版权信息。
自带的插件无需安装,直接配置。
先获取webpack的对象,在配置BannerPlugin插件。
1 2 3 4 5 6 7 8 9 const webpack = require ('webpack' )module .exports = { ... plugins :[ new webpack.BannerPlugin ('最终解释权归zz所有' ) ] }
打包后,查看bundle.js,结果如图所示:
多了一行我们自定义的版权声明注释。
5.2 打包html的plugin 之前我们的index.html文件都是存放在根目录下的。
在正式发布项目的时候发布的是dist文件夹的内容,但是dist文件夹是没有index.html文件的,那么打包就没有意义了。
所以我们需要将index.html也打包到dist文件夹中,这就需要使用**HtmlWebpackPlugin**插件了。
**HtmlWebpackPlugin**:
自动生成一个index.html文件(指定模板)
将打包的js文件,自动同script标签插入到body中
首先需要安装**HtmlWebpackPlugin**插件
1 npm install html-webpack-plugin --save-dev
使用插件,修改webpack.config.js文件中的plugins部分
1 2 3 4 5 6 7 8 9 10 11 12 const htmlWbepackPlugin = require ('html-webpack-plugin' )module .exports = { ... plugins :[ new webpack.BannerPlugin ('最终解释权归zz所有' ), new htmlWbepackPlugin ({ template : 'index.html' }) ] }
1.template表示根据哪个模板来生成index.html
2.需要删除output中添加的publicPath属性,否则插入的script标签的src可能有误
再次打包,打开dist文件夹,多了一个index.html
自动加入了script引入了bundle.js。
5.3压缩打包代码插件 uglifyjs-webpack-plugin是第三方插件,如果是vuecli2需要指定版本1.1.1。
安装:
配置plugin
1 2 3 4 5 6 7 8 9 10 11 12 13 const uglifyjsWebpackPlugin = require ('uglifyjs-webpack-plugin' )module .exports = { ... plugins :[ new webpack.BannerPlugin ('最终解释权归zz所有' ), new htmlWbepackPlugin ({ template : 'index.html' }), new uglifyjsWebpackPlugin () ] }
打包过后,打开bundle.js,发现已经压缩了,此时版权声明被删除了。
webpack高版本自带了压缩插件。
6. webpack搭建本地服务器 webpack提供了一个可选的本地开发服务器,这个本地服务器基于node.js搭建,内部使用了express框架,可以实现热启动。
准备工作复制05-webpack的plugin文件夹到同级目录,并改名为06-webpack搭建本地服务器。
不过这是一个单独的模块,在webpack中使用之前需要先安装:
devServe也是webpack中一个选项,选项本省可以设置一些属性:
contentBase:为哪个文件夹提供本地服务,默认是根文件夹,这里我们需要改成./dist
port:端口号
inline:页面实时刷新
historyApiFallback:在SPA(单页面富应用)页面中,依赖HTML5的history模式
修改webpack.config.js的文件配置
1 2 3 4 5 6 7 8 9 10 11 module .exports = { ... devServer : { contentBase : './dist' , port : 4000 , inline : true } }
配置package.json的script:
1 "dev" : "webpack-dev-server --open"
–open表示直接打开浏览器
启动服务器
启动成功,自动打开浏览器,发现在本地指定端口启动了,此时你修改src文件内容,会热修改。
1.服务器启动在内存中。
2.开发调试时候最好不要使用压缩js文件的插件,不易调试。
7. webpack的配置文件分离 webpack.config.js文件中有些是开发时候需要配置,有些事生产环境发布编译需要的配置,比如搭建本地服务器的devServer配置就是开发时配置,接下来我们分析如何分离配置文件。
准备工作:复制06-webpack搭建本地服务器文件夹到同级目录,并改名为07-webpack的配置文件分离。
在根目录下新建一个build的文件夹,新建配置文件。
base.config.js(公共的配置)
1 2 3 4 5 6 7 8 9 10 11 12 13 14 15 16 17 18 19 20 21 22 23 24 25 26 27 28 29 30 31 32 33 34 35 36 37 38 39 40 41 42 43 44 45 46 47 48 49 50 51 52 53 54 55 56 57 58 59 60 61 62 63 64 65 66 67 68 69 70 71 72 73 74 75 76 77 78 79 80 81 82 83 84 85 const path = require ('path' )const webpack = require ('webpack' )const htmlWbepackPlugin = require ('html-webpack-plugin' )module .exports = { entry : './src/main.js' , output :{ path : path.resolve (__dirname, 'dist' ), filename : 'bundle.js' , }, module : { rules : [ { test : /\.css$/ , use : [{ loader : 'style-loader' }, { loader : 'css-loader' }] }, { test : /\.less$/ , use : [{ loader : 'style-loader' }, { loader : 'css-loader' }, { loader : 'less-loader' }] }, { test : /\.(png|jpg|gif)$/ , use : [ { loader : 'url-loader' , options : { limit : 8192 , name : 'img/[name].[hash:8].[ext]' } } ] }, { test : /\.js$/ , exclude : /(node_modules|bower_components)/ , use : { loader : 'babel-loader' , options : { presets : ['es2015' ] } } }, { test : /\.vue$/ , use : { loader : 'vue-loader' } } ] }, resolve : { alias : { 'vue$' :'vue/dist/vue.esm.js' } }, plugins :[ new webpack.BannerPlugin ('最终解释权归zz所有' ), new htmlWbepackPlugin ({ template : 'index.html' }) ] }
dev.config.js(开发时候需要的配置)
1 2 3 4 5 6 7 module .exports = { devServer : { contentBase : './dist' , port : 4000 , inline : true } }
prod.config.js(构建发布时候需要的配置)
1 2 3 4 5 6 7 const uglifyjsWebpackPlugin = require ('uglifyjs-webpack-plugin' )module .exports = { plugins :[ new uglifyjsWebpackPlugin () ] }
此时我们将webpack.config.js文件分成了三个部分,公共部分、开发部分、构建发布的部分。
1.如果此时是dev环境,我们只需要使用base.config.js+dev.config.js的内容
2.如果此时是生产发布构建的环境,我们只需要使用base.config.js+prod.config.js的内容
要将两个文件内容合并需要使用webpack-merge插件,安装webpack-merge。
1 npm isntall webpack-merge --save-dev
合并内容都是将base.config.js的内容合并到dev或者prod的文件中,修改dev.config.js和prod.config.js文件。
修改dev.config.js
1 2 3 4 5 6 7 8 9 10 11 12 13 14 15 const webpackMerge = require ('webpack-merge' )const baseConfig = require ('./base.config' )module .exports = webpackMerge (baseConfig, { devServer : { contentBase : './dist' , port : 4000 , inline : true } })
修改prod.config.js
1 2 3 4 5 6 7 8 9 10 11 12 const uglifyjsWebpackPlugin = require ('uglifyjs-webpack-plugin' )const webpackMerge = require ('webpack-merge' )const baseConfig = require ('./base.config' )module .exports = webpackMerge (baseConfig, { plugins :[ new uglifyjsWebpackPlugin () ] })
此时我们使用三个文件构成了配置文件,此时在不同环境使用不同的配置文件,但是webpack不知道我们新配置文件,此时我们需要在package.json中的script指定要使用的配置文件。
1 2 3 4 5 "scripts" : { "test" : "echo \"Error: no test specified\" && exit 1" , "build" : "webpack --config ./build/prod.config.js" , "dev" : "webpack-dev-server --open --config ./build/dev.config.js" }
此时使用npm run build打包文件,dist文件并不在根目录下,因为我们在base.config.js中配置的出口文件使用的是当前文件的路径,即打包的根路径是配置文件的当前路径,也就是build文件夹。
1 2 3 4 5 6 entry : './src/main.js' ,output :{ path : path.resolve (__dirname, 'dist' ), filename : 'bundle.js' , }
注意:__dirname是当前文件路径,path.resolve拼接路径,所以在当前路径下创建了一个dist文件夹。
此时修改output属性:
1 2 3 4 5 output :{ path : path.resolve (__dirname, '../dist' ), filename : 'bundle.js' , }
使用../dist,在当前目录的上级目录创建dist文件夹
1. vue-cli起步 1.1 什么是vue-cli Vue CLI 是一个基于 Vue.js 进行快速开发的完整系统,提供:
通过 @vue/cli 搭建交互式的项目脚手架。
通过 @vue/cli + @vue/cli-service-global 快速开始零配置原型开发。
一个运行时依赖 (@vue/cli-service),该依赖:
可升级;
基于 webpack 构建,并带有合理的默认配置;
可以通过项目内的配置文件进行配置;
可以通过插件进行扩展。
一个丰富的官方插件集合,集成了前端生态中最好的工具。
一套完全图形化的创建和管理 Vue.js 项目的用户界面。
Vue CLI 致力于将 Vue 生态中的工具基础标准化。它确保了各种构建工具能够基于智能的默认配置即可平稳衔接,这样你可以专注在撰写应用上,而不必花好几天去纠结配置的问题。与此同时,它也为每个工具提供了调整配置的灵活性,无需 eject。
1.2 CLI是什么意思?
CLI是Command-Line Interface,即命令行界面,也叫脚手架。
vue cli 是vue.js官方发布的一个vue.js项目的脚手架
使用vue-cli可以快速搭建vue开发环境和对应的webpack配置
1.3 vue cli使用 vue cli使用前提node
vue cli依赖nodejs环境,vue cli就是使用了webpack的模板。
安装vue脚手架,现在脚手架版本是vue cli3
如果使用yarn
1 yarn global add @vue/cli
安装完成后使用命令查看版本是否正确:
注意安装cli失败
以管理员使用cmd
清空npm-cache缓存
拉取2.x模板(旧版本)
Vue CLI >= 3 和旧版使用了相同的 vue 命令,所以 Vue CLI 2 (vue-cli) 被覆盖了。如果你仍然需要使用旧版本的 vue init 功能,你可以全局安装一个桥接工具:
1 2 3 npm install -g @vue/cli-init vue init webpack my-project
1.在根目录新建一个文件夹16-vue-cli,cd到此目录,新建一个vue-cli2的工程。
1 2 3 4 5 cd 16-vue-cli//全局安装桥接工具 npm install -g @vue/cli-init //新建一个vue-cli2项目 vue init webpack 01-vuecli2test
注意:如果是创建vue-cli3的项目使用:
1 vue create 02-vuecli3test
2.创建工程选项含义
project name:项目名字(默认)
project description:项目描述
author:作者(会默认拉去git的配置)
vue build:vue构建时候使用的模式
runtime+compiler:大多数人使用的,可以编译template模板
runtime-only:比compiler模式要少6kb,并且效率更高,直接使用render函数
install vue-router:是否安装vue路由
user eslint to lint your code:是否使用ES规范
set up unit tests:是否使用unit测试
setup e2e tests with nightwatch:是否使用end 2 end,点到点自动化测试
Should we run npm install for you after the project has been created? (recommended):使用npm还是yarn管理工具
等待创建工程成功。
注意:如果创建工程时候选择了使用ESLint规范,又不想使用了,需要在config文件夹下的index.js文件中找到useEslint,并改成false。
2. vue-cli2的目录结构 创建完成后,目录如图所示:
其中build和config都是配置相关的文件。
2.1 build和config
如图所示,build中将webpack的配置文件做了分离:
webpack.base.conf.js(公共配置)webpack.dev.conf.js(开发环境)webpack.prod.conf.js(生产环境)
我们使用的脚本命令配置在package.json中。
打包构建:
如果搭建了本地服务器webpack-dev-server,本地开发环境:
此时npm run build打包命令相当于使用node 执行build文件夹下面的build.js文件。
build.js
检查dist文件夹是否已经存在,存在先删除
如果没有err,就使用webpack的配置打包dist文件夹
在生产环境,即使用build打包时候,使用的是webpack.prod.conf.js配置文件。
源码中,显然使用了webpack-merge插件来合并prod配置文件和公共的配置文件,合并成一个配置文件并打包,而webpack.dev.conf.js也是如此操作,在开发环境使用的是dev的配置文件。
config文件夹中是build的配置文件中所需的一些变量、对象,在webpack.base.conf.js中引入了index.js。
1 const config = require ('../config' )
2.2 src和static src源码目录,就是我们需要写业务代码的地方。
static是放静态资源的地方,static文件夹下的资源会原封不动的打包复制到dist文件夹下。
2.3 其他相关文件 2.3.1 .babelrc文件 .babelrc是ES代码相关转化配置。
1 2 3 4 5 6 7 8 9 10 11 12 { "presets" : [ [ "env" , { "modules" : false , "targets" : { "browsers" : [ "> 1%" , "last 2 versions" , "not ie <= 8" ] } } ] , "stage-2" ] , "plugins" : [ "transform-vue-jsx" , "transform-runtime" ] }
browsers表示需要适配的浏览器,份额大于1%,最后两个版本,不需要适配ie8及以下版本
babel需要的插件
2.3.2 .editorconfig文件 .editorconfig是编码配置文件。
1 2 3 4 5 6 7 8 9 root = true [*] charset = utf-8 indent_style = space indent_size = 2 end_of_line = lf insert_final_newline = true trim_trailing_whitespace = true
一般是配置编码,代码缩进2空格,是否清除空格等。
2.3.3 .eslintignore文件 .eslintignore文件忽略一些不规范的代码。
1 2 3 4 /build/ /config/ /dist/ /*.js
忽略build、config、dist文件夹和js文件。
2.3.4 .gitignore文件 .gitignore是git忽略文件,git提交忽略的文件。
2.3.5 .postcssrc.js文件 css转化是配置的一些。
2.3.6 index.html文件 index.html文件是使用html-webpack-plugin插件打包的index.html模板。
2.3.7 package.json和package-lock.json
package.json(包管理,记录大概安装的版本)
package-lock.json(记录真实安装版本)
3. runtime-compiler和runtime-only区别 新建两个vuecli2项目:
1 2 3 4 //新建一个以runtime-compiler模式 vue init webpack 02-runtime-compiler //新建一个以runtime-only模式 vue init webpack 03-runtime-only
两个项目的main.js区别
runtime-compiler
1 2 3 4 5 6 7 8 9 10 11 import Vue from 'vue' import App from './App' Vue .config .productionTip = false new Vue ({ el : '#app' , components : { App }, template : '<App/>' })
runtime-only
1 2 3 4 5 6 7 8 9 10 import Vue from 'vue' import App from './App' Vue .config .productionTip = false new Vue ({ el : '#app' , render : h =>h (App ) })
render: h => h(App)
1 2 3 render :function (h ){ return h (App ) }
compiler编译解析template过程
vm.options.template解析成ast(abstract syntax tree)抽象语法树,抽象语法树编译成vm.options.render(functions)render函数。render函数最终将template解析的ast渲染成虚拟DOM(virtual dom),最终虚拟dom映射到ui上。
runtime-compiler runtime-only
1.性能更高,2.需要代码量更少
render函数
1 2 3 4 5 6 7 8 render :function (createElement ){ return createElement ('h2' , {class :'box' }, ['Hello World' ,createElement ('button' ,['按钮' ])]) }
h就是一个传入的createElement函数,.vue文件的template是由vue-template-compiler解析。
将02-runtime-compiler的main.js修改
1 2 3 4 5 6 7 8 9 10 11 new Vue ({ el : '#app' , render (createElement ){ return createElement ('h2' , {class :'box' }, ['hello vue' , createElement ('button' ,['按钮' ])]) } })
并把config里面的inedx.js的useEslint: true改成false,即关掉eslint规范,打包项目npm run dev,打开浏览器。
在修改main.js
1 2 3 4 5 6 7 8 9 10 11 12 new Vue ({ el : '#app' , render (createElement ){ return createElement (App ) }
再次打包,发现App组件被渲染了。
4. vue-cli3 4.1 vue-cli3起步 vue-cli3与2版本区别
vue-cli3基于webpack4打造,vue-cli2是基于webpack3
vue-cli3的设计原则是”0配置”,移除了配置文件,build和config等
vue-cli3提供vue ui的命令,提供了可视化配置
移除了static文件夹,新增了public文件夹,并将index.html移入了public文件夹
创建vue-cli3项目
1 vue create 04-vuecli3test
目录结构:
public 类似 static文件夹,里面的资源会原封不动的打包
src源码文件夹
使用npm run serve运行服务器,打开浏览器输入http://localhost:8080/
打开src下的main.js
1 2 3 4 5 6 7 8 import Vue from 'vue' import App from './App.vue' Vue .config .productionTip = false new Vue ({ render : h =>h (App ), }).$mount('#app' )
Vue.config.productionTip = false构建信息是否显示
如果vue实例有el选项,vue内部会自动给你执行$mount('#app'),如果没有需要自己执行。
4.2 vue-cli3的配置 在创建vue-cli3项目的时候可以使用vue ui命令进入图形化界面创建项目,可以以可视化的方式创建项目,并配置项。
vue-cli3配置被隐藏起来了,可以在node_modules文件夹中找到@vue模块,打开其中的cli-service文件夹下的webpack.config.js文件。
再次打开当前目录下的lib文件夹,发现配置文件service.js,并导入了许多模块,来自与lib下面的config、util等模块
如何要自定义配置文件
在项目根目录下新建一个vue.config.js配置文件,必须为vue.config.js,vue-cli3会自动扫描此文件,在此文件中修改配置文件。
1. 路由简介 什么是路由?
2. 前端/后端路由
后端渲染(服务端渲染)
前后端分离(ajax请求数据)
单页面富应用(SPA页面)
3. URL的hash和HTML5的history 3.1 URL的hash
URL的hash是通过锚点(#),其本质上改变的是window.location的href属性。
可以通过直接赋值location.hash来改变href,但是页面并不会发生刷新。
使用命令vue init webpack 01-vue-router-vuecli2创建新的vuecli2工程,等待创建完成后,使用npm run dev启动服务器,在浏览器通过 http://localhost:8080 进入工程主页。 测试通过改变hash,查看是否会刷新页面,浏览器的url地址是否改变。
结论
测试发现url的地址栏改变了变成了http://localhost:8080/#/zty ,通过查看network发现只有favicon.ico资源重新请求了,这个是工程的logo图标,其他资源都未请求。可以通过改变hash改变url,此时页面是未刷新的。
vue-router其实用的就是这样的机制,改变url地址,这个url地址存在一份路由映射表里面,比如/user代表要请求用户页面,只要配置了这个路由表(路由关系),就可以前端跳转而不刷新页面,所有的数据请求都走ajax。
3.2 HTML5的history模式
pushState
同样的使用HTML5的history模式也是不会刷新页面的,history对象栈结构,先进后出,pushState类似压入栈中,back是回退。
1 2 hristory.pushState ({}, '' , '/foo' ) history.back ()
replaceState
replaceState模式与pushState模式区别在于replaceState模式浏览器没有返回只是替换,不是压入栈中。
1 history.replaceState ({}, '' , 'home' )
go
go只能在pushState模式中使用,go是前进后退到哪个历史页面。
1 2 3 4 history.go (-1 ) history.go (1 ) history.forward () history.back ()
4. vue-router的安装配置
使用npm install vue-router --save来安装vue-router插件模块
在模块化工程中使用他(因为是一个插件,所以可以通过Vue.user来安装路由功能)
在src下创建一个router文件夹(一般安装vue-router时候会自动创建)用来存放vue-router的路由信息导入路由对象,并且调用Vue.use(VueRouter)
创建路由实例,并且传入路由映射配置
在vue实例中挂载创建的路由实例对象
router文件夹中的index.js
1 2 3 4 5 6 7 8 9 10 11 12 13 14 15 16 17 18 19 20 21 22 23 24 25 import Vue from 'vue' import Router from 'vue-router' import HelloWorld from '@/components/HelloWorld' Vue .use (Router )const routes = [ { path : '/' , name : 'HelloWorld' , component : HelloWorld } ] const router = new Router ({ routes }) export default router
main.js中挂载router对象
1 2 3 4 5 6 new Vue ({ el : '#app' , router, render : h =>h (App ) })
5. vue-router的使用 5.1 创建路由组件 在components文件夹下创建2个组件。
Home组件
1 2 3 4 5 6 7 8 9 10 11 12 13 <template> <div class="page-contianer"> <h2>这是首页</h2> <p>我是首页的内容,123456.</p> </div> </template> <script type="text/ecmascript-6"> export default { name: 'Home' } </script> <style scoped> </style>
About组件
1 2 3 4 5 6 7 8 9 10 11 12 13 <template> <div class="page-contianer"> <h2>这是关于页面</h2> <p>我是关于页面的内容,about。</p> </div> </template> <script type="text/ecmascript-6"> export default { name: 'About' } </script> <style scoped> </style>
5.2 配置路由映射:组件和路径映射关系 在路由与组件对应关系配置在routes中。
修改index.js
1 2 3 4 5 6 7 8 9 10 11 12 13 14 15 16 17 18 19 20 21 22 23 24 25 26 import Vue from 'vue' import Router from 'vue-router' import Home from '@/components/Home' Vue .use (Router )const routes = [ { path : '/home' , name : 'Home' , component : Home }, { path : '/about' , name : 'About' , component : () => import ('@/components/About' ) } ] const router = new Router ({ routes }) export default router
5.3 使用路由:通过<router-link>和<router-view> 在app.vue中使用<router-link>和<router-view> 两个全局组件显示路由。
<router-link>是全局组件,最终被渲染成a标签,但是<router-link>只是标记路由指向类似一个a标签或者按钮一样,但是我们点击a标签要跳转页面或者要显示页面,所以就要用上<router-view>。
<router-view> 是用来占位的,就是路由对应的组件展示的地方,该标签会根据当前的路径,动态渲染出不同的组件。
路由切换的时候切换的是<router-view>挂载的组件,其他不会发生改变。
<router-view>默认使用hash模式,可以在index.js中配置修改为history模式。
app.vue修改template
1 2 3 4 5 6 7 <template> <div id="app"> <router-link to="/home">首页</router-link> | <router-link to="/about">关于</router-link> <router-view/> </div> </template>
使用npm run dev启动项目,此时<router-view>在<router-link>下面,那渲染页面就在下面,此时未配置路由的默认值,所以第一次进入网页的时候<router-view>占位的地方是没有内容的。
5.4 路由的默认值和history模式
路由的默认值,修改index.js的routes
1 2 3 4 5 6 7 8 9 10 11 12 13 14 15 16 17 const routes = [ { path : '' , redirect : '/home' }, { path : '/home' , name : 'Home' , component : Home }, { path : '/about' , name : 'About' , component : () => import ('@/components/About' ) } ]
添加缺省值,并重定向到/home路径,此时打开http://localhost:8080 ,直接显示home组件内容。
修改hash模式为history模式,修改index.js的router对象
1 2 3 4 5 const router = new Router ({ routes, mode : 'history' })
此时发现浏览器地址栏的URL是没有#的。
5.5 <router-link>的其他属性
to属性:用于跳转到指定路径。
tag属性:可以指定<router-link>之后渲染成什么组件使用<router-link to='/home' tag='button'>会被渲染成一个按钮,而不是a标签。
relapce属性:在history模式下指定<router-link to='/home' tag='button' replace>使用replaceState而不是pushState,此时浏览器的返回按钮是不能使用的。
active-class属性:当<router-link>对应的路由匹配成功的时候,会自动给当前元素设置一个router-link-active的class,设置active-class可以修改默认的名称。
在进行高亮显示的导航菜单或者底部tabbar时,会用到该属性
但是通常不会修改类的属性,会直接使用默认的router-link-active
<router-link to='/home' tag='button' active-class='active'>此时被选中的<router-link>就会有active的class。
如果每个<router-link>都要加上active-class='active',那就在路由里面统一更改。
1 2 3 4 5 6 const router = new Router ({ routes, mode : 'history' , linkActiveClass : 'active' })
1 2 3 4 5 6 7 8 9 10 11 12 13 14 15 16 17 18 19 20 21 22 23 24 25 26 27 <template> <div id="app"> <router-link to="/home" tag='button' replace active-class='active'>首页</router-link> | <router-link to="/about" active-class='active'>关于</router-link> <router-view/> </div> </template> <script> export default { name: 'App' } </script> <style> #app { font-family: 'Avenir', Helvetica, Arial, sans-serif; -webkit-font-smoothing: antialiased; -moz-osx-font-smoothing: grayscale; text-align: center; color: #2c3e50; margin-top: 60px; } .active { color: red; } </style>
修改app.vue文件此时被选中的<router-link>就有了active属性,给active的class加上字体变红的css。
5.6 通过代码修改路由跳转
$router属性
1 2 3 4 5 6 7 8 9 10 11 12 13 14 15 16 17 18 19 20 21 22 23 24 25 26 27 28 29 30 31 32 33 34 35 36 37 38 39 40 41 <template> <div id="app"> <!-- <router-link to="/home" tag='button' replace active-class='active'>首页</router-link> | <router-link to="/about" active-class='active'>关于</router-link> --> <button @click="homeClick">首页</button>| <button @click="aboutClick">关于</button> <router-view/> </div> </template> <script> export default { name: 'App', methods: { homeClick() {//通过代码的路径修改路由 this.$router.push('/home')//push 等价于pushState // this.$router.replace('/home')//replace 等价于replaceState console.log("homeClick") }, aboutClick() { this.$router.push('/about') // this.$router.replace('/about')//replace 等价于replaceState console.log("aboutClick") } } } </script> <style> #app { font-family: 'Avenir', Helvetica, Arial, sans-serif; -webkit-font-smoothing: antialiased; -moz-osx-font-smoothing: grayscale; text-align: center; color: #2c3e50; margin-top: 60px; } .active { color: red; } </style>
修改app.vue,将<router-link>换成button等任何组件,添加上点击事件,并写好点击事件响应方法,此时使用this.$router.push('/home'),push方法 等价于pushState方法,replace 方法等价于replaceState方法。
6. vue-router深入 6.1 vue-router的动态路由 一个页面的path路径可能是不确定的,例如可能有/user/aaaa或者/user/bbbb,除了/user之外,后面还跟上了用户ID/user/123等。这种path和component的匹配关系,叫动态路由。
新建一个User组件
1 2 3 4 5 6 7 8 9 10 11 12 13 14 15 16 17 18 19 20 <template> <div class="page-contianer"> <h2>这是用户界面</h2> <p>这里是用户页面的内容。</p> <p>用户ID是: {{ userId }}</p> </div> </template> <script type="text/ecmascript-6"> export default { name: 'User', computed:{ userId() { return this.$route.params.userId } } } </script> <style scoped> </style>
该组件定义一个计算属性,通过this.$route.params.userId获取处于激活状态的路由参数userId。
配置路由参数index.js
1 2 3 4 5 { path : '/user/:userId' , name : 'User' , component : () => import ('@/components/User' ) }
使用:userId指定动态路由参数userId。
app.vue中添加user页面的<router-link>,并添加userId变量
1 <router-link :to="/user/ + userId">用户</router-link>
1 2 3 4 data (){ return { userId : 'zty' }
启动项目,点击用户。
总结
$route是代表处于激活状态的路由,这里指的也就是
1 2 3 4 5 { path : '/user/:userId' , name : 'User' , component : () => import ('@/components/User' ) }
通过$route.params获取 $route$route.params.userId,获取所有参数中的名字叫userId的属性,此时可以在User组件中动态获取路由参数,也就可以在app.vue中动态设置路由中的userId,其他属性请参考 $route
6.2 vue-router的打包文件解析
问题:打包时候js太大,页面响应缓慢
如果组件模块化了,当路由被访问的时候才开始加载被选中的组件,这样就是懒加载,前面也介绍过。
1 component : () => import ('@/components/User' )
使用npm run build命令将之前创建的项目打包,打开dist文件夹,器目录结构如下:
app.xxx.js是我们自己编写的业务代码
vendor.xxx.js是第三方框架,例如vue/vue-router/axios等
mainfest.xxx.js是为了打包的代码做底层支持的,一般是webpack帮我们做一些事情
除了这三个还多了2个js,这2个js文件(0.5bxxx.js和1.e5xxx.js)分别是About和User组件,因为这2个组件是懒加载的所以被分开打包了。
此时因为是懒加载,需要用到这个组件的时候才会加载,所以不会一次性请求所有js。
6.3 嵌套路由 平常在一个home页面中,我们可能需要/home/news和/home/message访问一些内容,一个路由映射一个组件就像后端一个api对应一个controller的一个requestMapping一样,访问两个路由也会分别渲染这两个组件。
要实现嵌套路由:
创建对应的子组件,并且在路由映射(router/index.js)中配置对应的子路由。
在组件内部使用<router-view>标签来占位。
新建2个组件HomeNews和HomeMessage
1 2 3 4 5 6 7 8 9 10 11 12 13 14 15 16 17 18 <template> <div class="page-contianer"> <ul> <li v-for="(item, index) in list" :key="index">{{ item + index + 1 }}</li> </ul> </div> </template> <script type="text/ecmascript-6"> export default { name: 'HomeNews', data() { return { list: ['新闻', '新闻', '新闻', '新闻'] } } } </script> <style scoped></style>
1 2 3 4 5 6 7 8 9 10 11 12 13 14 15 16 17 18 <template> <div class="page-contianer"> <ul> <li v-for="(item, index) in list" :key="index">{{ item + index + 1 }}</li> </ul> </div> </template> <script type="text/ecmascript-6"> export default { name: 'HomeMessage', data() { return { list: ['消息', '消息', '消息', '消息'] } } } </script> <style scoped></style>
配置嵌套路由
1 2 3 4 5 6 7 8 9 10 11 12 13 14 15 16 17 18 19 20 21 { path : '/home' , name : 'Home' , component : Home , children : [ { path : '' , redirect : '/home/news' }, { path : 'news' , name : 'News' , component : () => import ('@/components/HomeNews' ) }, { path : 'message' , name : 'Message' , component : () => import ('@/components/HomeMessage' ) } ] },
修改Home.vue组件加上<router-link>和<router-view/>
1 2 3 4 5 6 7 8 9 <template> <div class="page-contianer"> <h2>这是首页</h2> <p>我是首页的内容,123456.</p> <router-link to="/home/news">新闻</router-link>| <router-link to="/home/message">消息</router-link> <router-view/> </div> </template>
6.4 vue-router的参数传递 之前的动态路由说的userId也是参数传递的方式的一种,准备新建一个Profile.vue组件,并配置路由映射,添加指定的<router-link>。
1 2 3 4 5 6 7 8 9 10 11 12 13 14 15 16 17 18 19 20 <template> <div class="page-contianer"> <h2>这是档案界面</h2> <p>这里是档案页面的内容。</p> <p>档案的名字是: {{ profileInfo.name }}</p> <p>档案的年龄是: {{ profileInfo.age }}</p> <p>档案的身高是: {{ profileInfo.height }}</p> </div> </template> <script type="text/ecmascript-6"> export default { name: 'Profile', computed: { profileInfo() { return this.$route.query.profileInfo } } } </script> <style scoped></style>
1 2 3 4 5 { path : '/profile' , name : 'Profile' , component : () => import ('@/components/Profile' ) }
1 <router-link :to="{ path: '/profile', query: { profileInfo } }">档案</router-link>
在app.vue中设置初始的对象profileInfo
1 2 3 4 5 6 7 8 9 10 data (){ return { userId : 'zty' , profileInfo : { name : "zty" , age : 24 , height : 177 } } }
传递参数主要有两种类型:params和query
params的类型也就是动态路由形式
配置路由的格式:/user/:userId
传递的方式:在path后面跟上对应的userId
传递形成的路径:/user/123,/user/xxx
通过$route.params.userId获取指定userId
query的类型
配置路由的格式:/profile,也就是普通的配置
传递的方式:对象中使用query的key作为传递的方式
传递形成的路径:/profile?name=zty&age=24&height=177(这个传递的是三个键值对),/profile?profileInfo=%5Bobject%20Object%5D(这个query传递的是一个对象的键值对,key为profileInfo,value是一个对象)
使用代码编写传递数据,使用button代替<router-link>,并添加点击事件。
1 2 <button @click="userClick">用户</button> <button @click="profileClick">档案</button>
1 2 3 4 5 6 7 8 9 10 11 12 13 14 userClick ( this .$router .push ('/user/' + this .userId ) console .log ("userClick" ) }, profileClick ( let profileInfo = this .profileInfo this .$router .push ({ path : '/profile' , query : { profileInfo } }) console .log ("profileClick" ) }
6.5 router和route的由来 vue全局对象this.$router与main.js导入的router对象是一个对象,也就是我们router/index.js导出的对象router。
1 2 3 4 5 new Vue ({ el : '#app' , router, render : h =>h (App ) })
this.$route对象是当前处于活跃的路由,有params和query属性可以用来传递参数。
查看vue-router源码,在我们项目中的router/index.js中,vue 对于插件必须要使用Vue.use(Router),来安装插件,也就是执行vue-router的install.js。
在vue-router的github 源码中查看src结构如下:
其中index.js是入口文件,入口js文件就是导入并执行了install.js文件。
发现
install.js中有注册2个全局组件RouterView和RouterLink,所以我们能使用<router-view>和<router-link>组件。
$router和$route是继承自vue的原型
怎么理解原型?学过Java 的都知道有父类和子类,子类也可以有自己的子类,但是他们都有一个处于最顶层的类Object(所有类的父类)。在Vue中就有那一个Vue类似Object,在java中在Object中定义的方法,所有的类都可以使用可以重写,类似的Vue.prototype(Vue的原型)定义的属性方法,他的原型链上的对象都可以使用,而$router和$route都在Vue的原型链上。
在main.js入口文件中在vue的原型上定义一个方法test,然后在User组件中尝试调用。
1 2 3 4 5 6 7 8 9 10 11 12 13 14 15 16 17 import Vue from 'vue' import App from './App' import router from './router' Vue .prototype test = function ( console .log ("test" ) } Vue .config .productionTip = false new Vue ({ el : '#app' , router, render : h =>h (App ) })
1 2 3 4 5 6 7 8 9 10 11 12 13 14 15 16 17 18 19 20 21 22 23 24 25 26 27 28 29 30 31 <template> <div class="page-contianer"> <h2>这是用户界面</h2> <p>这里是用户页面的内容。</p> <p>用户ID是: {{ userId }}</p> <button @click="btnClick">按钮</button> </div> </template> <script type="text/ecmascript-6"> export default { name: 'User', computed:{ userId() { return this.$route.params.userId } }, methods: { btnClick() { //所有组件都继承自vue的原型 console.log(this.$router) console.log(this.$route) //调用vue原型的test this.test() } } } </script> <style scoped> </style>
启动项目点击User页面上的按钮,打开浏览器控制台查看日志发现test方法被执行了,而User组件中并未定义test方法,却可以调用。
继续来读install.js,install.js中一开始就将Vue这个类当参数传入了install方法中,并把Vue赋值给_Vue。
继续读install.js发现以下代码
1 2 3 4 5 6 7 Object .defineProperty (Vue .prototype '$router' , { get () { return this ._routerRoot ._router } }) Object .defineProperty (Vue .prototype '$route' , { get () { return this ._routerRoot ._route } })
Object.defineProperty用来定义属性,以上代码就是给Vue.prototype(Vue原型)添加$router和$route属性并给属性赋值,等价于
1 2 3 4 5 6 Vue .prototype $router = { get () { return this ._routerRoot ._router } } Vue .prototype $router = { get () { return this ._routerRoot ._router } }
也就是在Vue的原型上添加$router和$route属性,再查看get()返回值this._routerRoot._router
这里的this.$options.router就是我们main.js入口文件传入的参数router,也就是router/index.js导出的router对象。
1 2 3 4 5 new Vue ({ el : '#app' , router, render : h =>h (App ) })
7. vue-router其他 7.1 vue-router的导航守卫 问题:我们经常需要在路由跳转后,例如从用户页面跳转到首页,页面内容虽然可以自己定义,但是只有一个html文件,也只有一个title标签,我们需要改变标题。
可以使用js去修改title,可以使用vue的生命周期函数在组件被创建的时候修改title标签内容。
1 2 3 4 5 6 7 8 9 10 created ( document .title = '关于' } mounted ( } update ( }
当然不能每个组件去写生命周期函数,如果我们能监听路由的变化(了解路由从哪来往哪里跳转),那我们就能在跳转中修改title标签,这就是导航守卫能做的事情。
修改router/index.js
1 2 3 4 5 6 7 8 9 router.beforeEach ((to, from , next ) => { document .title = to.matched [0 ].meta .title next () })
router.beforeEach()称为前置钩子(前置守卫),顾名思义,跳转之前做一些处理。
当然每个路由配置上也要加上meta属性,不然就取不到了,为什么要使用matched[0],因为如果你是嵌套路由,有没有给子路由添加meta(元数据:描述数据的数据)属性,就会显示undefined,使用matched[0]表示取到匹配的第一个就会找到父路由的meta属性。
1 2 3 4 5 6 7 8 9 10 11 12 13 14 15 16 17 18 19 20 21 22 23 24 25 { path : '/home' , name : 'Home' , component : Home , meta : { title : '首页' }, children : [ { path : '' , redirect : '/home/news' }, { path : 'news' , name : 'News' , component : () => import ('@/components/HomeNews' ) }, { path : 'message' , name : 'Message' , component : () => import ('@/components/HomeMessage' ) } ] },
启动服务发现功能已经实现。
7.2 导航守卫补充 前面说了前置守卫router.beforeEach(),相对的应该也存在后置守卫(后置钩子)。
1 2 3 4 5 6 router.afterEach ((to, from ) => { console .log ('后置钩子调用了----' ) })
顾名思义,也就是在跳转之后的回调函数。
路由独享守卫,路由私有的
1 2 3 4 5 6 7 8 9 10 11 12 { path : '/about' , name : 'About' , component : () => import ('@/components/About' ), beforeEnter : (to, from , next ) => { console .log ('来自' + from .path + ',要去' + to.path ) next () }, meta : { title : '关于' } },
beforeEnter的参数与全局守卫一样,修改about路由的参数,添加路由独享守卫,此时只有跳转到about路由,才会打印日志。
组件内的守卫,直接在组件中定义的属性
beforeRouteEnterbeforeRouteUpdate (2.2 新增)beforeRouteLeave
1 2 3 4 5 6 7 8 9 10 11 12 13 14 15 16 17 18 const Foo = { template : `...` , beforeRouteEnter (to, from , next) { }, beforeRouteUpdate (to, from , next) { }, beforeRouteLeave (to, from , next) { } }
beforeRouteEnter 守卫 不能 访问 this,因为守卫在导航确认前被调用,因此即将登场的新组件还没被创建。
不过,你可以通过传一个回调给 next来访问组件实例。在导航被确认的时候执行回调,并且把组件实例作为回调方法的参数。
1 2 3 4 5 beforeRouteEnter (to, from , next) { next (vm => }) }
注意 beforeRouteEnter 是支持给 next 传递回调的唯一守卫。对于 beforeRouteUpdate 和 beforeRouteLeave 来说,this 已经可用了,所以不支持 传递回调,因为没有必要了。
1 2 3 4 5 beforeRouteUpdate (to, from , next) { this .name = to.params .name next () }
这个离开守卫通常用来禁止用户在还未保存修改前突然离开。该导航可以通过 next(false) 来取消。
1 2 3 4 5 6 7 8 beforeRouteLeave (to, from , next) { const answer = window .confirm ('Do you really want to leave? you have unsaved changes!' ) if (answer) { next () } else { next (false ) } }
7.3 完整的导航解析流程
导航被触发。
在失活的组件里调用离开守卫。
调用全局的 beforeEach 守卫。
在重用的组件里调用 beforeRouteUpdate 守卫 (2.2+)。
在路由配置里调用 beforeEnter。
解析异步路由组件。
在被激活的组件里调用 beforeRouteEnter。
调用全局的 beforeResolve 守卫 (2.5+)。
导航被确认。
调用全局的 afterEach 钩子。
触发 DOM 更新。
用创建好的实例调用 beforeRouteEnter 守卫中传给 next 的回调函数。
8. keep-alive 先给Home组件加上created()和destoryed()2个生命周期函数。
1 2 3 4 5 6 7 8 9 10 11 <script type="text/ecmascript-6"> export default { name: 'Home', created() { console.log('Home组件被创建了') }, destoryed() { console.log('Home组件被销毁了') } } </script>
启动项目,某些时候可能有这样的需求,如图所示:
分析
在首页和关于组件之间路由跳转的时候,Home组件一直重复创建和销毁的过程,每次创建都是新的Home组件,但是我有这样的需求。当我点击首页消息页面,随后跳转到关于页面,又跳转到首页,此时我希望显示的是首页的消息页面而不是默认的新闻页面,此时就需要keep-alive来使组件保持状态,缓存起来,离开路由后,Home组件生命周期的destroyed()不会被调用,Home组件不会被销毁。
keep-alive是Vue内置的一个组件,可以使被包含的组件保留状态,或者避免重新渲染。router-view也是一个组件,如果用<keep-alive><router-vie/></keep-alive>,将其包起来,所有路径匹配到的视图组件都会被缓存。
修改app.vue代码
1 2 3 <keep-alive > <router-view /> </keep-alive >
再次启动项目,发现还是新闻页面?难道是keep-alive无效?
仔细看控制台发现,在跳转关于页面的时候Home组件并没有被销毁,说明keep-alive生效了。仔细查看路由配置发现,/home被默认重定向到了/home/news。所以在访问/home的时候每次出来的都是新闻。
思路
将默认的重定向去掉,但是第一次进入首页,那新闻页面内容又不会显示了。
为了第一次能使新闻页面内容显示,可以使用created(),将路由用代码的方式手动重定向,也就是push。
1 2 3 4 created ( console .log ('Home组件被创建了' ) this .$router .push ('/home/news' ) },
由于keep-alive组件只创建一次,第一次进入Home组件的时候,新闻页面显示正常,当第二次跳转首页的时候,因为不会再调用created(),所以新闻页面又不会显示了。
为了解决问题,在Home组件中引入activated()和deactivated()两个函数,这2个函数与keep-alive有关,不使用keep-alive的这两个函数无效。
activated()当组件属于进入活跃状态的时候调用deactivated()当组件属于退出活跃状态的时候调用(此时路由已经跳转,所以不能在此方法中修改路由,因为修改的是to路由)
为了使第二次进入首页新闻页面可以生效,使用activated()在Home组件使活跃状态时候就重定向
1 2 3 4 5 6 7 8 9 10 11 12 13 14 data ( return { path : '/home/news' } }, activated ( console .log ('调用actived' ) this .$router .push (this .path ) }, deactivated ( console .log ('调用actived' ) console .log (this .$route .path ) this .path = this .$route .path }
发现还是不行,由于deactivated()调用的时候,此时路由已经跳转,所以不能在此方法中修改路由,因为修改的是to路由。
使用路由守卫(组件内守卫),beforeRouteLeave (to, from , next)在离开路由的时候将当前的路由赋值给path并保存起来。
1 2 3 4 5 6 7 8 9 10 11 12 13 14 activated ( console .log ('调用actived' ) this .$router .push (this .path ) }, beforeRouterLeave (to, from , next ) { console .log (this .$route .path ) this .path = this .$route .path next () }
此时问题完全解决了。
keep-alive的属性
1 2 3 <keep-alive> <router-view/> </keep-alive>
我们将<router-view/>包起来,那所有的组件都会缓存,都只会创建一次,如果我们需要某一个组件每次都创建销毁,就需要使用exclude属性。
1 2 3 <keep-alive exclude='Profile,User'> <router-view/> </keep-alive>
此时Profile和User组件(这里组件需要有name属性,分别为Profile和User)就被排除在外,每次都会创建和销毁。相对应的也有include属性,顾名思义就是包含,只有选中的才有keep-alive。
1 2 3 <keep-alive include='Profile,User'> <router-view/> </keep-alive>
include和exclude都是使用字符串和正则表达式,使用字符串的时候,注意“,”之后之前都别打空格。
1. 什么是Promies 简单说Promise是异步编程的一种解决方案。
Promise是ES6中的特性。
什么是异步操作?
网络请求中,对端服务器处理需要时间,信息传递过程需要时间,不像我们本地调用一个js加法函数一样,直接获得1+1=2的结果。这里网络请求不是同步的有时延,不能立即得到结果。
如何处理异步事件?
对于网络请求这种,一般会使用回调函数,在服务端传给我数据成功后,调用回调函数。例如ajax调用。
1 2 3 4 5 $.ajax ({ success :function ( ... } })
如果碰到嵌套网络请求,例如第一次网络请求成功后回调函数再次发送网络请求,这种代码就会让人很难受。
1 2 3 4 5 6 7 $.ajax({ success: function(){ $.ajax({ ... } ) } } )
如果还需要再次网络请求,那么又要嵌套一层,这样的代码层次不分明很难读,也容易出问题。
2. Promise的基本使用 2.1 什么时候使用Promise 解决异步请求冗余这样的问题,promise就是用于封装异步请求的。
2.2 Promise对象 1 new Promise ((resolve, reject ) => {})
Promise对象的参数是一个函数(resolve, reject) => {},这个函数又有2个参数分别是resolve和reject。这2个参数本身也是函数,是不是有点绕?后面还有回调函数then(func)的参数也是一个函数。
模拟定时器的异步事件
用定时器模拟网络请求,定时一秒为网络请求事件,用console.log()表示需要执行的代码。
1 2 3 4 5 6 7 8 9 10 setTimeout (() => { console .log ("hello world" ) setTimeout (() => { console .log ("hello vuejs" ) setTimeout (() => { console .log ("hello java" ) }, 1000 ) }, 1000 ) }, 1000 )
一层套一层,看起是不是很绕。
使用promise来处理异步操作
1 2 3 4 5 6 7 8 9 10 11 12 13 14 15 16 17 18 19 20 21 22 23 24 new Promise ((resolve, reject ) => { setTimeout (() => { resolve () }, 1000 ) }).then (() => { console .log ("hello world" ) return new Promise ((resolve, reject ) => { setTimeout (() => { resolve () }, 1000 ).then (() => { console .log ("hello vuejs" ) return new Promise ((resolve, reject ) => { setTimeout (() => { resolve () }, 1000 ) }).then (() => { console .log ("hello java" ) }) }) }) })
是不是觉得代码还要更复杂了?仔细看看第一个如果使用了多个就找不到对应关系了。相反第二个流程就很清楚,调用resolve()就能跳转到then()方法就能执行处理代码,then()回调的返回值又是一个Promise对象。层次很明显,只要是then()必然就是执行处理代码,如果还有嵌套必然就是返回一个Promise对象,这样调用就像java中的StringBuffer的append()方法一样,链式调用。
1 2 3 4 5 6 7 new Promise ((resolve, reject ) => { setTimeout (() => { resolve ('success' ) }, 1000 ).then (success => console .log (success) }) })
setTimeout()模拟的是网络请求,而then()执行的是网络请求后的代码,这就将网络请求和请求得到响应后的操作分离了,每个地方干自己的事情。在resolve中传参了,那么在then()方法中的参数就有这个参数,例如data。
网络请求中也会有失败情况?例如网络堵塞。
如何处理失败情况,此时就要用到reject()
1 2 3 4 5 6 7 new Promise ((resolve, reject ) => { setTimeout (() => { reject ('error message' ) }, 1000 ).catch (error => console .log (error) }) })
此时reject(error),catch()方法捕获到reject()中的error。
合起来
1 2 3 4 5 6 7 8 9 10 11 12 13 new Promise ((resolve, reject ) => { setTimeout (() => { reject ('error message' ) }, 1000 ).then (success => console .log (success) }).catch (error => console .log (error) }) })
拿ajax来举例子:
1 2 3 4 5 6 7 8 9 10 11 12 13 14 15 new Promise ((resolve, reject ) => { $.ajax ({ success :function ( reject ('error message' ) } }).then (success => console .log (success) }).catch (error => console .log (error) }) })
3. Promise的三种状态
pending:等待状态,比如正在进行的网络请求还未响应,或者定时器还没有到时间
fulfill:满足状态,当我们主动回调了resolve函数,就处于满足状态,并会回调then()
reject:拒绝状态,当我们主动回调reject函数,就处于该状态,并且会回调catch()
4. Promies的链式调用
网络请求响应结果为 hello ,打印hello
处理: hello world ,打印hello world
处理: hello world,vuejs ,打印hello world,vuejs
1 2 3 4 5 6 7 8 9 10 11 12 13 14 15 16 17 new Promise ((resolve, reject ) => { setTimeout (() => { resolve ('hello' ) }, 1000 ) }).then (res => console .log (res) return new Promise (resolve => resolve (res + ' world' ) }).then (res => console .log (res) return new Promise (resolve => resolve (res + ',vuejs' ) }).then (res => console .log (res) }) }) })
链式调用就是then()方法的返回值返回一个Promise对象继续调用then(),此外还有简写Promise.resolve()。
1 2 3 4 5 6 7 8 9 10 11 12 13 new Promise ((resolve, reject ) => { setTimeout (() => { resolve ('hello' ) }, 1000 ) }).then (res => console .log (res) return Promise .resolve (res + ' world' ) }).then (res => console .log (res) return Promise .resolve (res + ',vuejs' ) }).then (res => console .log (res) })
还可以直接省略掉Promise.resolve()
1 2 3 4 5 6 7 8 9 10 11 12 13 new Promise ((resolve, reject ) => { setTimeout (() => { resolve ('hello' ) }, 1000 ) }).then (res => console .log (res) return res + ' world' }).then (res => console .log (res) return res + ',vuejs' }).then (res => console .log (res) })
如果中途发生异常,可以通过catch()捕获异常
1 2 3 4 5 6 7 8 9 10 11 12 13 14 15 16 new Promise ((resolve, reject ) => { setTimeout (() => { resolve ('hello' ) }, 1000 ) }).then (res => console .log (res) return res + ' world' }).then (res => console .log (res) throw 'error message' }).then (res => console .log (res) }).catch (error => console .log (error) })
也可以通过throw抛出异常,类似java
5. Promies的all使用 有这样一个情况,一个业务需要请求2个地方(A和B)的数据,只有A和B的数据都拿到才能走下一步。
ajax实现
1 2 3 4 5 6 7 8 9 10 11 12 13 14 15 16 $.ajax ({ ... resultA = true callback () }) $.ajax ({ ... resultB = true callback () }) function callback ( if (resultA&&resultB){ ... } }
由于不知道网络请求A和网络请求B哪个先返回结果,所以需要定义一个函数只有2个请求都返回数据才回调成功。
Promise实现
1 2 3 4 5 6 7 8 9 10 11 12 13 14 15 16 17 18 19 20 Promise .all ([ new Promise ((resolve, resjct ) => { $.ajax ({ url : 'url1' , success : function (data ) { resolve (data) } }) }), new Promise ((resolve, resjct ) => { $.ajax ({ url : 'url2' , success : function (data ) { resolve (data) } }) }).then (results => console .log (results) }) ])
上面是伪代码,只是包装了ajax,ajaxA和ajaxB的结果都放在resolve()中,Promise将其放在results中了,使用setTimeout模拟。
1 2 3 4 5 6 7 8 9 10 11 12 13 14 Promise .all ([ new Promise ((resolve, reject ) => { setTimeout (() => { resolve ('结果A' ) }, 1000 ) }), new Promise ((resolve, reject ) => { setTimeout (() => { resolve ('结果B' ) }, 1000 ) }) ]).then (results => console .log (results) })
1. 什么是Vuex Vuex 是一个专为Vue.js 应用程序开发的状态管理模式。它采用集中式存储管理应用的所有组件的状态,并以相应的规则保证状态以一种可预测的方式发生变化。
其实最简单理解为,在我们写Vue组件中,一个页面多个组件之间想要通信数据,那你可以使用Vuex
Vuex 是一个专为 Vue.js 应用程序开发的状态管理模式
Vuex状态管理 === 管理组件数据流动 === 全局数据管理
Vue的全局数据池,在这里它存放着大量的复用或者公有的数据,然后可以分发给组件
Vue双向数据绑定的MV框架,数据驱动(区别节点驱动),模块化和组件化,所以管理各组件和模块之间数据的流向至关重要
Vuex是一个前端非持久化的数据库中心,Vuex其实是Vue的重要选配,一般小型不怎么用,大型项目运用比较多,所以页面刷新,Vuex数据池会重置
路由-》管理的是组件流动
Vuex-》管理的是数据流动
没有Vuex之前,组件数据来源
ajax请求后端
组件自身定义默认数据
继承其他组件的数据
(从vuex拿)
1.1 使用场景
1 传参的方法对于多层嵌套的组件将会非常繁琐,并且对于兄弟组件间的状态传递无能为力
1 采用父子组件直接引用或者通过事件来变更和同步状态的多份拷贝,通常会导致无法维护的代码
1.2 数据流层
注意事项
数据流都是单向的
组件能够调用action
action用来派发mutation
只有mutation可以改变状态
store是响应式的,无论state什么时候更新,组件都将同步更新
2. 核心概念 2.1 state Vuex 使用单一状态树,用一个对象就包含了全部的应用层次状态。至此它便作为一个唯一的数据源而存在。这也意味着,每个应用将仅仅包含一个store实例。
单状态树让我们能够直接地定位任一特定的状态片段,在调试的过程中也能轻易地取得整个当前应用状态的快照。
2.1.1 在 Vue 组件中获得 Vuex 状态 由于 Vuex 的状态存储是响应式的,从 store 实例中读取状态最简单的方法就是在计算属性中返回某个状态:
1 2 3 4 5 6 7 8 9 10 11 const Counter = { template : `<div>{{ count }}</div>` , computed : { count () { return store.state .count } } }
Vuex 通过 store 选项,提供了一种机制将状态从根组件“注入”到每一个子组件中(需调用 Vue.use(Vuex)):
1 2 3 4 5 6 7 8 9 10 11 const app = new Vue ({ el : '#app' , store, components : { Counter }, template : ` <div class="app"> <counter></counter> </div> ` })
通过在根实例中注册 store 选项,该 store 实例会注入到根组件下的所有子组件中,且子组件能通过 this.$store 访问到。让我们更新下 Counter 组件 的实现:
1 2 3 4 5 6 7 8 const Counter = { template : `<div>{{ count }}</div>` , computed : { count () { return this .$store .state .count } } }
2.1.2 mapState 辅助函数 当一个组件需要获取多个状态时,将这些状态都声明为计算属性会有些重复和冗余。为了解决这个问题,我们可以使用 mapState 辅助函数帮助我们生成计算属性,让你少按几次键:
1 2 3 4 5 6 7 8 9 10 11 12 13 14 15 16 17 18 import { mapState } from 'vuex' export default { computed : mapState ({ count : state =>count , countAlias : 'count' , countPlusLocalState (state) { return state.count + this .localCount } }) }
当映射的计算属性的名称与 state 的子节点名称相同时,我们也可以给 mapState 传一个字符串数组。
1 2 3 4 computed : mapState ([ 'count' ])
由于 mapState 函数返回的是一个对象,在ES6的写法中,我们可以通过对象展开运算符,可以极大的简化写法:
1 2 3 4 5 6 7 8 9 computed : { localComputed () { }, ...mapState ({ }) }
2.2 Getter 用来从store获取Vue组件数据,类似于computed。
Getter 接受 state 作为其第一个参数:
1 2 3 4 5 6 7 8 9 10 11 12 13 const store = new Vuex .Store ({ state : { todos : [ { id : 1 , text : '...' , done : true }, { id : 2 , text : '...' , done : false } ] }, getters : { doneTodos : state => return state.todos .filter (todo =>done ) } } })
2.2.1 通过属性访问 Getter 会暴露为 store.getters 对象,你可以以属性的形式访问这些值:
Getter 也可以接受其他 getter 作为第二个参数:
1 2 3 4 5 6 getters : { doneTodosCount : (state, getters ) => { return getters.doneTodos .length } }
在其他组件中使用getter:
1 2 3 4 5 computed : { doneTodosCount () { return this .$store .getters .doneTodosCount } }
注意: getter 在通过属性访问时是作为 Vue 的响应式系统的一部分缓存其中的。
2.2.2 通过方法访问 你也可以通过让 getter 返回一个函数,来实现给 getter 传参。在你对 store 里的数组进行查询时非常有用。
1 2 3 4 5 6 7 8 9 getters : { getTodoById : (state ) => (id ) => { return state.todos .find (todo =>id === id) } } store.getters .getTodoById (2 )
注意: getter 在通过方法访问时,每次都会去进行调用,而不会缓存结果。
2.2.3 mapGetters 辅助函数 mapGetters 辅助函数仅仅是将 store 中的 getter 映射到局部计算属性:
1 2 3 4 5 6 7 8 9 10 11 12 13 import { mapGetters } from 'vuex' export default { computed : { ...mapGetters ([ 'doneTodosCount' , 'anotherGetter' , ]) } }
如果你想将一个 getter 属性另取一个名字,使用对象形式:
1 2 3 4 mapGetters ({ doneCount : 'doneTodosCount' })
2.3 Mutation 事件处理器用来驱动状态的变化,类似于methods,同步操作。
更改 Vuex 的 store 中的状态的唯一方法是提交 mutation。
每个 mutation 都有一个字符串的 事件类型 (type) 和 一个 回调函数 (handler)。这个回调函数就是我们实际进行状态更改的地方,并且它会接受 state 作为第一个参数:
1 2 3 4 5 6 7 8 9 10 11 const store = new Vuex .Store ({ state : { count : 1 }, mutations : { increment (state,value) { state.count ++ } } })
当外界需要通过mutation的handler 来修改state的数据时,不能直接调用 mutation的handler,而是要通过 commit 方法 传入类型。
store.mutations.increment,这种方式是错误的,必须使用 store.commit('increment',value) ,value可作为要传递进入store的数据
2.3.1 提交载荷(Payload) 你可以向 store.commit 传入额外的参数,即 mutation 的 载荷(payload):
1 2 3 4 5 6 7 mutations : { increment (state, value) { state.count += value } }
使用方式:
1 store.commit ('increment' , 10 )
在大多数情况下,载荷应该是一个对象,这样可以包含多个字段并且记录的 mutation 会更易读:
1 2 3 4 5 6 ... mutations : { increment (state, payload) { state.count += payload.amount } }
1 2 3 4 store.commit ('increment' , { amount : 10 })
2.3.2 对象风格的提交方式 提交 mutation 的另一种方式是直接使用包含 type 属性的对象:
1 2 3 4 5 store.commit ({ type : 'increment' , amount : 10 })
当使用对象风格的提交方式,整个对象都作为载荷传给 mutation 函数,因此 handler 保持不变:
1 2 3 4 5 mutations : { increment (state, payload) { state.count += payload.amount } }
2.3.3 Mutation 需遵守 Vue 的响应规则 既然 Vuex 的 store 中的状态是响应式的,那么当我们变更状态时,监视状态的 Vue 组件也会自动更新。
最好提前在你的 store 中初始化好所有所需属性
使用 Vue.set(obj, ‘newProp’, 123)
以新对象替换老对象。例如,利用对象展开运算符我们可以这样写:state.obj = { …state.obj, newProp: 123 }
2.3.4 使用常量替代 Mutation 事件类型
新建 mutation-types.js 文件,定义常量来管理 mutation 中的类型:
1 2 export const SOME_MUTATION = 'SOME_MUTATION'
或者直接导出对象
1 2 3 4 export default { SOME_MUTATION :'SOME_MUTATION' }
在 store.js 中引入 mutation-types.js,引入类型常量使用
1 2 3 4 5 6 7 8 9 10 11 12 13 import Vuex from 'vuex' import { SOME_MUTATION } from './mutation-types' const store = new Vuex .Store ({ state : { ... }, mutations : { [SOME_MUTATION ] (state) { } } })
引入类型对象使用:
1 2 3 4 5 6 7 8 ... import MutationType from './mutation-type' mutations : { [MutationType .SOME_MUTATION ] (state) { } }
在外部使用时,需要局部先引入或者在main.js全局引入mutation-types.js:
1 2 3 import MutationType from './mutation-type' this .$store .commit (MutationType .SOME_MUTATION ,'传入内容' )
2.3.5 Mutation 必须是同步函数 1 2 3 4 5 6 7 mutations : { someMutation (state) { api.callAsyncMethod (() => { state.count ++ }) } }
假设现在正在debug 一个 app 并且观察 devtool中的mutation日志。 每一条 mutation 被记录,devtools 都需要捕捉到前一状态和后一状态的快照。 然而,在上面的例子中 mutation 中的异步函数中的回调让这不可能完成:
因为当 mutation 触发的时候,回调函数还没有被调用,devtools 不知道什么时候回调函数实际上被调用——实质上任何在回调函数中进行的状态的改变都是不可追踪的。
2.3.6 在组件中提交 Mutation 你可以在组件中使用 this.$store.commit('xxx') 提交 mutation,或者使用 mapMutations 辅助函数将组件中的 methods 映射为 store.commit 调用(需要在根节点注入 store)。
方式一:
1 this.$store.commit('increment','参数')
方式二:
1 2 3 4 5 6 7 8 9 10 11 12 13 14 15 16 import { mapMutations } from 'vuex' export default { methods : { ...mapMutations ([ 'increment' , 'incrementBy' ]), ...mapMutations ({ add : 'increment' }) } }
2.4 Action 可以给组件使用的函数,以此用来驱动事件处理器 mutations,异步操作。
Action 类似于 mutation,不同在于:
Action 提交的是 mutation,而不是直接变更状态。
Action 可以包含任意异步操作。
例子:
1 2 3 4 5 6 7 8 9 10 11 12 13 14 15 const store = new Vuex .Store ({ state : { count : 0 }, mutations : { increment (state) { state.count ++ } }, actions : { increment (context) { context.commit ('increment' ) } } })
Action 函数接受一个与 store 实例具有相同方法和属性的 context 对象,因此你可以调用 context.commit 提交一个 mutation,或者通过 context.state 和 context.getters 来获取 state 和 getters。
需要调用 commit 很多次的时候,可以简写成:
1 2 3 4 5 actions : { increment ({ commit }) { commit ('increment' ) } }
2.4.1 分发 Action Action 通过 store.dispatch 方法触发:
1 store.dispatch ('increment' )
Action 就不受约束!在Mutation无法执行的异步操作,可以在action内部进行使用:
1 2 3 4 5 6 7 actions : { incrementAsync ({ commit }) { setTimeout (() => { commit ('increment' ) }, 1000 ) } }
Actions 支持同样的载荷方式和对象方式进行分发:
1 2 3 4 5 6 7 8 9 10 store.dispatch ('incrementAsync' , { amount : 10 }) store.dispatch ({ type : 'incrementAsync' , amount : 10 })
调用异步 API 和分发多重 mutation:
1 2 3 4 5 6 7 8 9 10 11 12 13 14 15 16 actions : { checkout ({ commit, state }, products) { const savedCartItems = [...state.cart .added ] commit (types.CHECKOUT_REQUEST ) shop.buyProducts ( products, () => commit (types.CHECKOUT_SUCCESS ), () => commit (types.CHECKOUT_FAILURE , savedCartItems) ) } }
2.4.2 在组件中分发 Action 你在组件中使用 this.$store.dispatch('xxx') 分发 action,或者使用 mapActions 辅助函数将组件的 methods 映射为 store.dispatch 调用(需要先在根节点注入 store):
1 2 3 4 5 6 7 8 9 10 11 12 13 14 15 16 import { mapActions } from 'vuex' export default { methods : { ...mapActions ([ 'increment' , 'incrementBy' ]), ...mapActions ({ add : 'increment' }) } }
2.4.3 组合 Action
Action 通常是异步的,那么如何知道 action 什么时候结束呢?更重要的是,我们如何才能组合多个 action,以处理更加复杂的异步流程?
首先,你需要明白 store.dispatch 可以处理被触发的 action 的处理函数返回的 Promise,并且 store.dispatch 仍旧返回 Promise:
1 2 3 4 5 6 7 8 9 10 actions : { actionA ({ commit }) { return new Promise ((resolve, reject ) => { setTimeout (() => { commit ('someMutation' ) resolve () }, 1000 ) }) } }
现在可以直接使用:
1 2 3 store.dispatch ('actionA' ).then (() => { })
在另外一个 action 中也可以:
1 2 3 4 5 6 7 8 actions : { actionB ({ dispatch, commit }) { return dispatch ('actionA' ).then (() => { commit ('someOtherMutation' ) }) } }
最后,如果我们利用 async / await,我们可以如下组合 action:
1 2 3 4 5 6 7 8 9 10 11 actions : { async actionA ({ commit }) { commit ('gotData' , await getData ()) }, async actionB ({ dispatch, commit }) { await dispatch ('actionA' ) commit ('gotOtherData' , await getOtherData ()) } }
一个 store.dispatch 在不同模块中可以触发多个 action 函数。在这种情况下,只有当所有触发函数完成后,返回的 Promise 才会执行。
2.5 Module 由于使用单一状态树,应用的所有状态会集中到一个比较大的对象。当应用变得非常复杂时,store 对象就有可能变得相当臃肿。
为了解决以上问题,Vuex 允许我们将 store 分割成模块(module)。每个模块拥有自己的 state、mutation、action、getter、甚至是嵌套子模块——从上至下进行同样方式的分割:
1 2 3 4 5 6 7 8 9 10 11 12 13 14 15 16 17 18 19 20 21 22 23 24 const moduleA = { state : { ... }, mutations : { ... }, actions : { ... }, getters : { ... } } const moduleB = { state : { ... }, mutations : { ... }, actions : { ... } } const store = new Vuex .Store ({ modules : { a : moduleA, b : moduleB } }) store.state .a store.state .b 假设模块A state 中 有 ‘city’,在外界访问时,则用 store.state .a .city
2.5.1 模块的局部状态 对于模块内部的 mutation 和 getter,接收的第一个参数是模块的局部状态对象。
1 2 3 4 5 6 7 8 9 10 11 12 13 14 15 const moduleA = { state : { count : 0 }, mutations : { increment (state) { state.count ++ } }, getters : { doubleCount (state) { return state.count * 2 } } }
同样,对于模块内部的 action,局部状态通过 context.state 暴露出来,根节点状态则为 context.rootState:
1 2 3 4 5 6 7 8 9 10 const moduleA = { actions : { incrementIfOddOnRootSum ({ state, commit, rootState }) { if ((state.count + rootState.count ) % 2 === 1 ) { commit ('increment' ) } } } }
对于模块内部的 getter,根节点状态会作为第三个参数暴露出来:
1 2 3 4 5 6 7 8 const moduleA = { getters : { sumWithRootCount (state, getters, rootState) { return state.count + rootState.count } } }
2.5.2 命名空间 默认情况下,模块内部的 action、mutation 和 getter 是注册在全局命名空间 的——这样使得多个模块能够对同一 mutation 或 action 作出响应。
如果希望你的模块具有更高的封装度和复用性,你可以通过添加 namespaced: true 的方式使其成为带命名空间的模块。
当模块被注册后,它的所有 getter、action 及 mutation 都会自动根据模块注册的路径调整命名。
例如:
1 2 3 4 5 6 7 8 9 10 11 12 13 14 15 16 17 18 19 20 21 22 23 24 25 26 27 28 29 30 31 32 33 34 35 36 37 38 39 40 const store = new Vuex .Store ({ modules : { account : { namespaced : true , state : { ... }, getters : { isAdmin () { ... } }, actions : { login () { ... } }, mutations : { login () { ... } }, modules : { myPage : { state : { ... }, getters : { profile () { ... } } }, posts : { namespaced : true , state : { ... }, getters : { popular () { ... } } } } } } })
启用了命名空间的 getter 和 action 会收到局部化的 getter,dispatch 和 commit。换言之,你在使用模块内容(module assets)时不需要在同一模块内额外添加空间名前缀。更改 namespaced属性后不需要修改模块内的代码。
3. Vuex项目开发中常见的文件布局 3.1 项目结构
3.2 文件的说明 1、一般会在vue的项目下src文件中创建一个store存放项目中使用的vuex相关的文件
4. Vuex的简单案例 4.1 目录结构
4.2 新建store存储于vuex相关 4.2.1 state.js 1 2 3 4 5 6 7 8 9 const state = { count : 0 , show : '' }; export default state
4.2.2 getters.js 1 2 3 4 5 6 7 8 9 export const counts = state => state.count export const show = state => state.show
4.2.3 mutations-types.js 1 2 3 4 5 6 7 8 9 export const INCREMENT = 'INCREMENT' export const DECREMENT = 'DECREMENT' export const CHANGE_TEXT = 'CHANGE_TEXT'
4.2.4 mutations.js 1 2 3 4 5 6 7 8 9 10 11 12 13 14 15 import * as types from "./mutations-types" const mutations = { [types.INCREMENT ](state){ state.count ++ }, [types.DECREMENT ](state){ state.count -- }, [types.CHANGE_TEXT ](state,v){ state.show = v } } export default mutations
4.2.5 index.js 1 2 3 4 5 6 7 8 9 10 11 12 13 14 import Vue from 'vue' import Vuex from 'vuex' import * as getters from "./getters" import state from "./state" import mutations from "./mutations" Vue .use (Vuex )export default new Vuex .Store ({ getters, state, mutations })
4.3 在main.js中注册store 1 2 3 4 5 6 7 8 9 10 import Vue from 'vue' import App from './App.vue' import store from './store/index' Vue .config .productionTip = false new Vue ({ store, render : h =>h (App ) }).$mount('#app' )
4.4 在App.vue中使用 1 2 3 4 5 6 7 8 9 10 11 12 13 14 15 16 17 18 19 20 21 22 23 24 25 26 27 28 29 30 31 32 33 34 35 36 37 38 39 40 41 42 43 44 45 46 47 48 49 50 51 52 53 54 55 56 57 58 59 <template> <div id ="app" > <div class ="store" > <p > {{counts}} </p > <button @click ="handleIncrement" > <strong > +</strong > </button > <button @click ="handleDecrement" > <strong > -</strong > </button > <hr > <h3 > {{show}}</h3 > <input placeholder ="请输入内容" v-model ="obj" @change ="changObj" clearable > </input > </div > </div > </template > <script > import {mapGetters,mapMutations} from 'vuex' ; import * as types from './store/mutations-types' ; export default { name : 'app' , data ( return { obj : '' } }, computed :{ ...mapGetters ([ 'counts' , 'show' ]) }, methods :{ handleIncrement ( this .setIncrement () }, handleDecrement ( this .setDecrement () }, changObj ( this .setChangeText (this .obj ) }, ...mapMutations ({ setIncrement : types.INCREMENT , setDecrement : types.DECREMENT , setChangeText : types.CHANGE_TEXT , }) } } </script > <style > .store { text-align : center; } </style >
4.5 结果
5. Vuex工作原理详解 5.1 理解computed Computed 计算属性是 Vue 中常用的一个功能,但你理解它是怎么工作的吗?
拿官网简单的例子来看一下:
1 2 3 4 <div id ="example" > <p > Original message: "{{ message }}"</p > <p > Computed reversed message: "{{ reversedMessage }}"</p > </div >
1 2 3 4 5 6 7 8 9 10 11 12 13 var vm = new Vue ({ el : '#example' , data : { message : 'Hello' }, computed : { reversedMessage : function ( return this .message .split ('' ).reverse ().join () } } })
vue的computed是如何更新的,为什么当vm.message发生变化时,vm.reversedMessage也会自动发生变化?
vue中data属性和computed相关的源代码 1 2 3 4 5 6 7 8 9 10 11 12 13 14 15 16 17 18 19 export function initState (vm : Component ) { vm._watchers = [] const opts = vm.$options if (opts.props ) initProps (vm, opts.props ) if (opts.methods ) initMethods (vm, opts.methods ) if (opts.data ) { initData (vm) } else { observe (vm._data = {}, true ) } if (opts.computed ) initComputed (vm, opts.computed ) if (opts.watch && opts.watch !== nativeWatch) { initWatch (vm, opts.watch ) } }
initState方法当组件实例化时会自动触发,该方法主要完成了初始化data,methods,props,computed,watch这些我们常用的属性,我们来看看我们需要关注的initData和initComputed
initData1 2 3 4 5 6 7 8 9 10 11 12 13 14 15 16 17 18 19 20 21 22 23 24 25 function initData (vm : Component ) { let data = vm.$options .data data = vm._data = typeof data === 'function' ? getData (data, vm) : data || {} observe (data, true ) } export function observe (value : any, asRootData : ?boolean): Observer | void { if (!isObject (value)) { return } let ob : Observer | void ob = new Observer (value) if (asRootData && ob) { ob.vmCount ++ } return ob }
在初始化的时候observe方法本质上是实例化了一个Observer对象,这个对象的类是这样的
1 2 3 4 5 6 7 8 9 10 11 12 13 14 15 16 17 18 19 20 21 22 23 24 export class Observer { value : any; dep : Dep ; vmCount : number; constructor (value : any) { this .value = value this .dep = new Dep () this .vmCount = 0 def (value, '__ob__' , this ) this .walk (value) } walk (obj : Object ) { const keys = Object .keys (obj) for (let i = 0 ; i < keys.length ; i++) { defineReactive (obj, keys[i], obj[keys[i]]) } } }
在对象的构造函数中,最后调用了walk 方法,该方法即遍历data中的所有属性,并调用defineReactive方法,defineReactive方法是vue 实现 MDV(Model-Driven-View)的基础,本质上就是代理了数据的set,get方法,当数据修改或获取的时候,能够感知。我们具体看看defineReactive的源代码
1 2 3 4 5 6 7 8 9 10 11 12 13 14 15 16 17 18 19 20 21 22 23 24 25 26 27 28 29 30 31 32 33 34 35 36 37 38 39 40 41 42 43 44 45 46 47 48 49 50 51 52 53 54 55 56 57 58 59 60 61 export function defineReactive ( obj : Object , key : string, val : any, customSetter?: ?Function , shallow?: boolean ) { const dep = new Dep () const property = Object .getOwnPropertyDescriptor (obj, key) if (property && property.configurable === false ) { return } const getter = property && property.get const setter = property && property.set let childOb = !shallow && observe (val) Object .defineProperty (obj, key, { enumerable : true , configurable : true , get : function reactiveGetter () { const value = getter ? getter.call (obj) : val if (Dep .target ) { dep.depend () if (childOb) { childOb.dep .depend () } if (Array .isArray (value)) { dependArray (value) } } return value }, set : function reactiveSetter (newVal) { const value = getter ? getter.call (obj) : val if (newVal === value || (newVal !== newVal && value !== value)) { return } if (setter) { setter.call (obj, newVal) } else { val = newVal } childOb = !shallow && observe (newVal) dep.notify () } }) }
我们可以看到,在所代理的属性的get方法中,当dep.Target存在的时候会调用dep.depend()方法,这个方法非常的简单,不过在说这个方法之前,我们要认识一个新的类Dep
Dep 是 vue 实现的一个处理依赖关系的对象, 主要起到一个纽带的作用,就是连接 reactive data 与 watcher,代码非常的简单
1 2 3 4 5 6 7 8 9 10 11 12 13 14 15 16 17 18 19 20 21 22 23 24 25 26 27 28 29 30 31 32 33 34 35 36 37 38 39 40 41 42 43 44 45 46 47 48 49 50 export default class Dep { static target : ?Watcher ; id : number; subs : Array <Watcher >; constructor () { this .id = uid++ this .subs = [] } addSub (sub : Watcher ) { this .subs .push (sub) } removeSub (sub : Watcher ) { remove (this .subs , sub) } depend () { if (Dep .target ) { Dep .target .addDep (this ) } } notify () { const subs = this .subs .slice () for (let i = 0 , l = subs.length ; i < l; i++) { subs[i].update () } } } Dep .target = null const targetStack = []export function pushTarget (_target : Watcher ) { if (Dep .target ) targetStack.push (Dep .target ) Dep .target = _target } export function popTarget () { Dep .target = targetStack.pop () }
代码非常的简单,回到调用dep.depend()方法的时候,当Dep.Target存在,就会调用,而depend方法则是将该dep加入watcher的newDeps中,同时,将所访问当前属性的dep对象中的subs插入当前Dep.target的watcher.看起来有点绕,不过没关系,我们一会跟着例子讲解一下就清楚了。
讲完了代理的get,方法,我们讲一下代理的set方法,set方法的最后调用了dep.notify(),当设置data中具体属性值的时候,就会调用该属性下面的dep.notify()方法,通过class Dep了解到,notify方法即将加入该dep的watcher全部更新,也就是说,当你修改data 中某个属性值时,会同时调用dep.notify()来更新依赖该值的所有watcher。
initComputedinitComputed这条线,这条线主要解决了什么时候去设置Dep.target的问题
1 2 3 4 5 6 7 8 9 10 11 12 13 14 15 16 17 18 19 20 21 22 23 24 25 26 const computedWatcherOptions = { lazy : true }function initComputed (vm : Component , computed : Object ) { const watchers = vm._computedWatchers = Object .create (null ) const isSSR = isServerRendering () for (const key in computed) { const userDef = computed[key] const getter = typeof userDef === 'function' ? userDef : userDef.get if (!isSSR) { watchers[key] = new Watcher ( vm, getter || noop, noop, computedWatcherOptions ) } if (!(key in vm)) { defineComputed (vm, key, userDef) } } }
在初始化computed时,有2个地方需要去关注
对每一个属性都生成了一个属于自己的Watcher实例,并将 **{ lazy: true }**作为options传入
对每一个属性调用了defineComputed方法(本质和data一样,代理了自己的set和get方法,我们重点关注代理的get 方法)
我们看看Watcher 的构造函数
1 2 3 4 5 6 7 8 9 10 11 12 13 14 15 16 17 18 19 20 21 22 23 24 25 26 27 28 29 30 31 32 constructor ( vm : Component , expOrFn : string | Function , cb : Function , options?: Object ) { this .vm = vm vm._watchers .push (this ) if (options) { this .deep = !!options.deep this .user = !!options.user this .lazy = !!options.lazy this .sync = !!options.sync } else { this .deep = this .user = this .lazy = this .sync = false } this .cb = cb this .id = ++uid this .active = true this .dirty = this .lazy this .deps = [] this .newDeps = [] this .depIds = new Set () this .newDepIds = new Set () this .getter = expOrFn this .value = this .lazy ? undefined : this .get () }
除了日常的初始化外,还有2行重要的代码
1 this .dirty = this .lazy this .getter = expOrFn
在computed 生成的watcher ,会将watcher的lazy设置为true,以减少计算量。因此,实例化时,this.dirty也是true,标明数据需要更新操作。我们先记住现在computed中初始化对各个属性生成的watcher的dirty和lazy都设置为了true 。同时,将computed传入的属性值(一般为funtion) ,放入watcher 的getter 中保存起来。
defineComputed所代理属性的get方法1 2 3 4 5 6 7 8 9 10 11 12 13 14 15 16 17 function createComputedGetter (key) { return function computedGetter () { const watcher = this ._computedWatchers && this ._computedWatchers [key] if (watcher) { if (watcher.dirty ) { watcher.evaluate() } if (Dep .target ) { watcher.depend () } return watcher.value } } }
当第一次访问computed中的值时,会因为初始化watcher.dirty = watcher.lazy的原因,从而调用evalute()方法,evalute()方法很简单,就是调用了watcher实例中的get 方法以及设置dirty = false ,我们将这两个方法放在一起
1 2 3 4 5 6 7 8 9 10 11 12 13 14 15 16 17 18 19 20 21 evaluate () { this .value = this .get () this .dirty = false } get () { pushTarget (this ) let value const vm = this .vm try { value = this .getter .call (vm, vm) } catch (e) { } finally { popTarget () } return value }
在get方法中中,第一行就调用了pushTarget 方法,其作用就是将Dep.target 设置为所传入的watcher,即所访问的computed 中属性的watcher ,value = this.getter.call(vm, vm)方法,想一想,调用这个方法会发生什么?
this.getter 在Watcher构建函数中提到,本质就是用户传入的方法,也就是说,this.getter.call(vm, vm)就会调用用户自己声明的方法,那么如果方法里面用到了 this.data 中的值或者其他被用 defineReactive 包装过的对象,那么,访问this.data.或者其他被defineReactive 包装过的属性,是不是就会访问被代理的该属性的get方法。我们在回头看看get 方法是什么样子的。
注意:我讲了其他被用defineReactive,这个和后面的vuex有关系,我们后面在提
1 2 3 4 5 6 7 8 9 10 11 12 13 14 15 get : function reactiveGetter () { const value = getter ? getter.call (obj) : val if (Dep .target ) { dep.depend () if (childOb) { childOb.dep .depend () } if (Array .isArray (value)) { dependArray (value) } } return value }
代码注释已经写明了,就不在解释了,这个时候我们走完了一个依赖收集流程,知道了computed是如何知道依赖了谁。最后根据this.data所代理的set 方法中调用的notify ,就可以改变this.data的值,去更新所有依赖this.data值的computed属性value了。
获取依赖并更新的过程 那么,我们根据下面的代码,来简易拆解获取依赖并更新的过程
1 2 3 4 5 6 7 8 9 10 11 12 13 14 15 16 var vm = new Vue ({ el : '#example' , data : { message : 'Hello' }, computed : { reversedMessage : function ( return this .message .split ('' ).reverse ().join () } } }) vm.reversedMessage vm.message = 'World' vm.reversedMessage
初始化 data和computed,分别代理其set以及get方法, 对data中的所有属性生成唯一的dep实例。
对computed中的reversedMessage生成唯一watcher,并保存找vm._computedWatchers中
访问 reversedMessage ,设置Dep.target指向reversedMessage的watcher,调用该属性具体方法reversedMessage 。
方法中访问this.message,即会调用this.message代理的get方法,将this.message的dep 加入输入reversedMessage的watcher ,同时该dep中的subs 添加这个watcher
设置vm.message = ‘World’,调用message代理的set方法触发 dep的notify 方法
因为是computed属性,只是将watcher 中的dirty 设置为true
最后一步vm.reversedMessage ,访问其get方法时,得知reversedMessage 的watcher.dirty 为true,调用**watcher.evaluate()**方法获取新的值。
这样,也可以解释了为什么有些时候当computed没有被访问(或者没有被模板依赖),当修改了this.data值后,通过vue-tools发现其computed 中的值没有变化的原因,因为没有触发到其get 方法。
5.2 vuex插件 我们知道,vuex仅仅是作为vue的一个插件而存在,不像Redux,MobX等库可以应用于所有框架,vuex只能使用在vue上,很大的程度是因为其高度依赖于vue的computed依赖检测系统以及其插件系统,
通过官方文档 我们知道,每一个vue插件都需要有一个公开的install方法,vuex也不例外。其代码比较简单,调用了一下applyMixin方法,该方法主要作用就是在所有组件的beforeCreate 生命周期注入了设置this.$store 这样一个对象。
1 2 3 4 5 6 7 8 export function install (_Vue) { if (Vue && _Vue === Vue ) { return } Vue = _Vue applyMixin (Vue ) }
1 2 3 4 5 6 7 8 9 10 11 12 13 14 15 16 17 18 19 20 21 22 23 24 25 26 27 28 29 30 31 32 33 export default function (Vue ) { const version = Number (Vue .version .split ('.' )[0 ]) if (version >= 2 ) { Vue .mixin ({ beforeCreate : vuexInit }) } else { const _init = Vue .prototype _init Vue .prototype _init = function (options = {} ) { options.init = options.init ? [vuexInit].concat (options.init ) : vuexInit _init.call (this , options) } } function vuexInit () { const options = this .$options if (options.store ) { this .$store = typeof options.store === 'function' ? options.store () : options.store } else if (options.parent && options.parent .$store ) { this .$store = options.parent .$store } } }
我们在业务中使用vuex需要类似以下的写法
1 2 3 4 5 6 const store = new Vuex .Store ({ state, mutations, actions, modules });
那么 Vuex.Store 到底是什么样的东西呢?我们先看看他的构造函数
1 2 3 4 5 6 7 8 9 10 11 12 13 14 15 16 17 18 19 20 21 22 23 24 25 26 27 28 29 30 31 32 33 34 35 36 37 38 39 40 41 42 43 44 constructor (options = {}) { const { plugins = [], strict = false } = options this ._committing = false this ._actions = Object .create (null ) this ._actionSubscribers = [] this ._mutations = Object .create (null ) this ._wrappedGetters = Object .create (null ) this ._modules = new ModuleCollection (options) this ._modulesNamespaceMap = Object .create (null ) this ._subscribers = [] this ._watcherVM = new Vue () const store = this const { dispatch, commit } = this this .dispatch = function boundDispatch (type, payload) { return dispatch.call (store, type, payload) } this .commit = function boundCommit (type, payload, options) { return commit.call (store, type, payload, options) } this .strict = strict const state = this ._modules .root .state installModule (this , state, [], this ._modules .root ) resetStoreVM (this , state) plugins.forEach (plugin =>plugin (this )) }
除了一堆初始化外,我们注意到了这样一行代码resetStoreVM(this, state) 他就是整个vuex的关键
1 2 3 4 5 6 7 8 9 10 11 function resetStoreVM (store, state, hot) { Vue .config .silent = true store._vm = new Vue ({ data : { $$state : state }, computed }) }
去除了一些无关代码后我们发现,其本质就是将我们传入的state作为一个隐藏的vue组件的data,也就是说,我们的commit操作,本质上其实是修改这个组件的data值,结合上文的computed,修改被defineReactive 代理的对象值后,会将其收集到的依赖的watcher 中的dirty 设置为true,等到下一次访问该watcher中的值后重新获取最新值。
这样就能解释了为什么vuex中的state的对象属性必须提前定义好,如果该state 中途增加一个属性 ,因为该属性 没有被defineReactive ,所以其依赖系统没有检测到,自然不能更新。
由上所说,我们可以得知store._vm.$data.$$state === store.state, 我们可以在任何含有vuex框架的工程得到这一点
vuex整体思想诞生于flux ,可其的实现方式完完全全的使用了vue自身的响应式设计,依赖监听、依赖收集都属于vue对对象Property set get方法的代理劫持。最后一句话结束vuex工作原理,vuex中的store本质就是没有template的隐藏着的vue组件;
1. Axios简介 1.1 什么是Axios Axios 是一个基于 promise 的 HTTP 库,可以用在浏览器和 node.js 中。
1.2 特性
浏览器端发起XMLHttpRequests请求
node端发起http请求
支持Promise API
监听请求和返回
转化请求和返回
取消请求
自动转化json数据
客户端支持抵御
2. Axios的使用和配置 2.1 安装 1 npm install axios --save
或者使用cdn
1 <script src="https://unpkg.com/axios/dist/axios.min.js" ></script>
2.2 基本使用 2.2.1 Get请求 1 2 3 4 5 6 7 8 9 axios.get ('/user' , { params : { name : 'krislin' } }).then (function (response ) { console .log (response); }).catch (function (error ) { console .log (error) }
2.2.2 Post请求 1 2 3 4 5 6 7 8 9 10 axios.post ('/user' ,{ name :'krislin' , address :'china' }) .then (function (response ){ console .log (response); }) .catch (function (error ){ console .log (error); });
2.2.3 并发操作 1 2 3 4 5 6 7 8 9 10 11 12 function getUserAccount ( return axios.get ('/user/12345' ); } function getUserPermissions ( return axios.get ('/user/12345/permissions' ); } axios.all ([getUerAccount (),getUserPermissions ()]) .then (axios.spread (function (acc,pers ){ }));
2.3 请求API配置 axios 能够在进行请求时进行一些设置,具体如下:
1 2 3 4 5 6 7 8 axios ({ method :'post' , url :'/user/12345' , data :{ name :'krislin' , address :'china' } });
2.4 请求设置 请求配置中,只有url是必须的,如果没有指明的话,默认是Get请求
1 2 3 4 5 6 7 8 9 10 11 12 13 14 15 16 17 18 19 20 21 22 23 24 25 26 27 28 29 30 31 32 33 34 35 36 37 38 39 40 41 42 43 44 45 46 47 48 49 50 51 52 53 54 55 56 57 58 59 60 61 62 63 64 65 66 67 68 69 70 71 72 73 74 75 76 77 78 79 80 81 82 83 84 85 86 87 88 89 90 91 92 93 94 95 96 97 98 99 100 101 102 103 104 105 106 107 108 109 110 111 112 113 114 115 116 117 118 { url :'/user' , method :`get` , baseURL :'http://some-domain.com/api/' , transformRequest :[function (data ){ return data; }], transformResponse :[function (data ){ return data; }], headers :{'X-Requested-with' :'XMLHttpRequest' }, params :{ ID :12345 }, paramsSerializer : function (params ){ return Qs .stringify (params,{arrayFormat :'brackets' }) }, data :{ firstName :'fred' }, timeout :1000 , withCredentials :false adapter :function (config ){ }, auth :{ username :'janedoe' , password :'s00pers3cret' }, responsetype :'json' , xrsfHeadername :'X-XSRF-TOKEN' , onUploadProgress : function (progressEvent ){ }, onDownloadProgress : function (progressEvent ){ }, maxContentLength : 2000 , validateStatus : function (status ){ return status >= 200 && stauts < 300 ; }, httpAgent : new http.Agent ({keepAlive :treu}), httpsAgent : new https.Agent ({keepAlive :true }), proxy :{ host :127.0 .0 .1 , port :9000 , auth :{ username :'cdd' , password :'123456' } }, cancelToke : new CancelToken (function (cancel ){ }) }
2.5 响应数据Response 一个请求的返回包含以下信息
1 2 3 4 5 6 7 8 9 10 11 12 13 14 15 16 17 { data{}, status :200 , statusText : 'ok' , headers :{}, config :{} }
2.6 拦截器Interceptors 你可以在 请求 或者 返回 被 then 或者 catch 处理之前对他们进行拦截。
添加拦截器:
1 2 3 4 5 6 7 8 9 10 11 12 13 14 15 16 17 axios.interceptors .request .use (function (config ){ return config; },function (error ){ return Promise .reject (error); }); axios.interceptors .response .use (function (response ){ return response; },function (error ){ return Promise .reject (error); });
移除拦截器:
1 2 var myInterceptor = axios.interceptors .request .use (function (axios.interceptors .rquest .eject (myInterceptor);
3. 跨域 因为在Vue的开发阶段,基本都是用webpack打包编译,需要node环境本地运行,因而运行的域名为本地的localhost,这个时候调用后端接口就涉及到跨域的问题了。
3.1 ProxyTable vue 的 proxyTable 是用于开发阶段配置跨域的工具,可以同时配置多个后台服务器跨越请求接口,其真正依赖的npm包是 http-proxy-middleware , 在GitHub上拥有更丰富的配置,可以按需配置
在不考虑后端CROS跨域方案的情况下,前端配置ProxyTable实现跨域请求的用法如下:
1. 找到 config/index.js 文件中的 proxyTable:{} 将其修改 1 2 3 4 5 6 7 8 9 proxyTable : { '/api' : { target : 'https://tasst.sinoxk.cn' , changeOrigin : true , pathRewrite : { '^/api' : '' } } }
proxyTable支持配置多个接口:
1 2 3 4 5 6 7 8 9 10 11 12 13 14 15 16 proxyTable : { '/api' : { target : 'https://tasst.sinoxk.cn' , changeOrigin : true , pathRewrite : { '^/api' : '' } }, '/service' : { target : 'https://tasst.sinoxk.cn' , changeOrigin : true , pathRewrite : { '^/service' : '' } } }
2. 找到 config/dev.env.js 文件,配置BASE_URL 1 2 3 4 module .exports = merge (prodEnv, { NODE_ENV : '"development"' , BASE_URL :'"/api"' })
3. 找到 config/prod.env.js 文件,配置BASE_URL 1 2 3 4 module .exports = { NODE_ENV : '"production"' , BASE_URL :'"https://asst.sinoxk.com"' }
4. 配置 axios 的基础域名 1 axios.defaults.baseURL = process.env.BASE_URL
修改完所有的配置文件后,要注意,需要重启下环境
1 npm run dev / npm run start
4. 封装 在日常项目开发过程中,在和后台交互获取数据的时候,我们都需要使用到网络库,通常在vue的项目中 ,使用的是 axios 库 ,在此基于自身项目业务,做一个二次封装。
4.1 条件准备 在UI轻提示组件上,选定的是 vant 库中的 Toast 组件(Vant文档 ),可按实际需要选定具体要使用的UI框架
安装:
数据序列化,如果有实际需要的项目,可以使用qs,在这里做一个简单的介绍
安装:
qs.stringify和JSON.stringify的使用和区别
qs.stringify()将对象 序列化成URL的形式,以&进行拼接
JSON.stringify 是将对象转化成一个json字符串的形式
用法:
1 2 3 4 5 var a = {name :'xiaoming' ,age :10 }qs.stringify (a); JSON .stringify (a)
基于底层配置和业务接口分离,在src目录中会新建文件夹 httpServer ,同时新建立 ajax.js 和 api.js 文件
1 ajax.js: axios的二次封装,作为基础网络库,添加基础的配置
1 api.js: 管理项目实际业务基础接口的输出,以及返回响应数据的处理
在日常项目模块中,基于多人开发,当然可以在api.js的基础上,可以根据功能模块实现业务拓展延伸,比如
1 2 3 4 5 6 7 8 9 10 11 12 小明负责list模块业务 新建api-list.js ,并导入api.js .... import api from './api' export default { getList (url,params ){ api.get (url,params) } }
对于个别项目,可能存在多个域名配置的情况下, 可以重新建立 base.js , 来管理多个接口域名
base.js:
1 2 3 4 5 6 7 8 9 const base = { sq : 'https://xxxx111111.com/api/v1' , bd : 'http://xxxxx22222.com/api' } export default base;
4.2 axios封装(单域名) src/main.js文件:
1 2 3 4 5 6 7 8 9 10 11 12 13 14 15 16 import Vue from 'vue' import App from './App' import router from './router' import Api from './httpServer/api' Vue .prototype $https = Api Vue .config .productionTip = false new Vue ({ el : '#app' , router, components : { App }, template : '<App/>' })
src/httpServer/ajax.js文件:
1 2 3 4 5 6 7 8 9 10 11 12 13 14 15 16 17 18 19 20 21 22 23 24 25 26 27 28 29 30 31 32 33 34 35 36 37 38 39 40 41 42 43 44 45 import axios from 'axios' import {Toast } from 'vant' const ajax = axios.create ({ timeout :60000 , baseURL :process.env .BASE_URL }) ajax.interceptors .request .use ( config => return config; }, error =>Promise .error (error) ) ajax.interceptors .response .use ( res =>status === 200 ? Promise .resolve (res) : Promise .reject (res), error => const {response} = error; if (response) { Toast ({message : response.message }); return Promise .reject (response); } else { Toast ({message : '网络开小差,请稍后重试' }); } } ) export default ajax;
对于process.env.BASE_URL 的配置,在开发环境中,需要以代理的方式进行访问:
1 2 3 4 5 6 7 8 9 10 'use strict' const merge = require ('webpack-merge' )const prodEnv = require ('./prod.env' )module .exports = merge (prodEnv, { NODE_ENV : '"development"' , BASE_URL :'"/api"' })
1 2 3 4 5 6 7 'use strict' module .exports = { NODE_ENV : '"production"' , BASE_URL :'"https://www.xxx.com"' }
1 2 3 4 5 6 7 8 9 10 11 12 13 ... proxyTable : { '/api' : { target : 'https://tasst.sinoxk.cn' , changeOrigin : true , pathRewrite : { '^/api' : '' , }, } }, ...
src/httpServer/api.js文件:
1 2 3 4 5 6 7 8 9 10 11 12 13 14 15 16 17 18 19 20 21 22 23 24 25 26 27 28 29 30 31 32 33 34 35 36 37 38 39 40 41 42 43 44 import ajax from './ajax' import {Toast } from 'vant' const handleResponse = (res, success, failure ) => { switch (res.code ) { case 200 : success && success (res.data ); break ; case 401 : break ; default : if (failure) { failure (res); } else { Toast ({message :res.msg || '请求失败,请稍后重试!' }); } break ; } } export default { get : function (url, params, success, failure ) { ajax.get (url, { params : params }).then (res => if (res.status == 200 ) { handleResponse (res.data .data , success, failure); } }); }, post : function (url, params, success, failure ) { ajax.post (url, params).then (res => if (res.status == 200 ) { handleResponse (res.data .data , success, failure); } }) } }
在src/components/HelloWorld.vue 文件中使用:
1 2 3 4 5 6 7 8 9 10 11 12 13 14 15 16 17 18 19 20 21 22 23 <script> export default { name : 'HelloWorld' , data ( return { msg : 'Welcome to Your Vue.js App' } }, created ( this .$https .get ('/xkzx/member/service' , { pageNum : 1 , pageSize : 10 }, function (data ) { console .log (data); }, function (res ) { }) } } </script>
来源StudyNotes

